Hexo & Travis CI 搭建博客
Hexo 博客使用好多年了,总结下日常使用的一些内容。
Hexo
安装配置
1 | # -g 参数全局安装 Hexo 命令行工具,安装后才可以使用下述 hexo 命令 |
主题
NexT
https://github.com/next-theme/hexo-theme-next
https://theme-next.js.org/pisces/
https://hexo-next.readthedocs.io/zh_CN/latest/
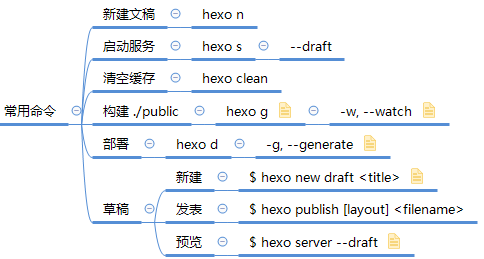
常用命令
依赖安装完毕,开始使用 hexo,常用命令如下:
GitHub
为了方便随时随地可以编写博客,搭建好的本地仓库及其源文件一般会推送到 GitHub 远程仓库中保管,而构建出来的 ./public 目录会部署到 GitHub Pages 服务。因此需要在 GitHub 中新建两个仓库:
- 仓库一:存放源文件,名字随意
- 仓库二:存放构建文件(
./public),GitHub Pages 服务要求名字为yourname.github.io
Travis CI
完成上面两步就可以开始创作了。但毕竟命令还是有些繁琐,因此可以利用持续集成服务代替人工来做重复的事情。引入 Travis CI 后,整体流程如下:
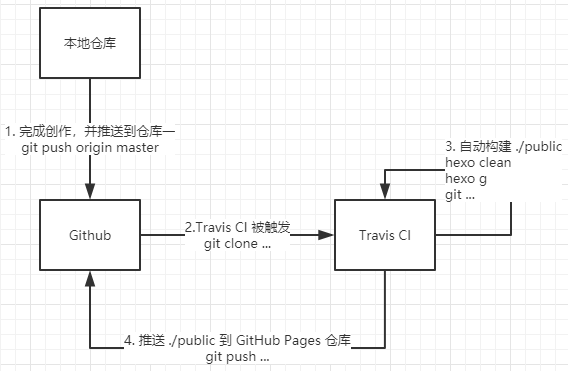
从上述流程来看,作者只需要完成创作并推送即可,其它构建、部署的事则由 Travis CI 来完成,非常简单。
下面来看下如何配置:
GitHub 创建 access token
登录 GitHub - Settings - Developer Settings 选项,找到 Personal access tokens 页面,创建个人 access token,创建时权限 repo 权限和 user:email 权限。
Travis CI 仓库配置
- 使用 GitHub 账户登录 Travis CI 官网并进行 OAuth 授权
- 同步仓库一,过程中会在 GitHub 账户下安装 Travis CI 的 GitHub App,用于触发持续集成
- 为仓库一设置环境变量:
GH_TOKEN值为 GitHub access tokenGH_REF值为 GitHub 仓库二地址
创建 .travis.yml 配置
1 | # 设置语言 |
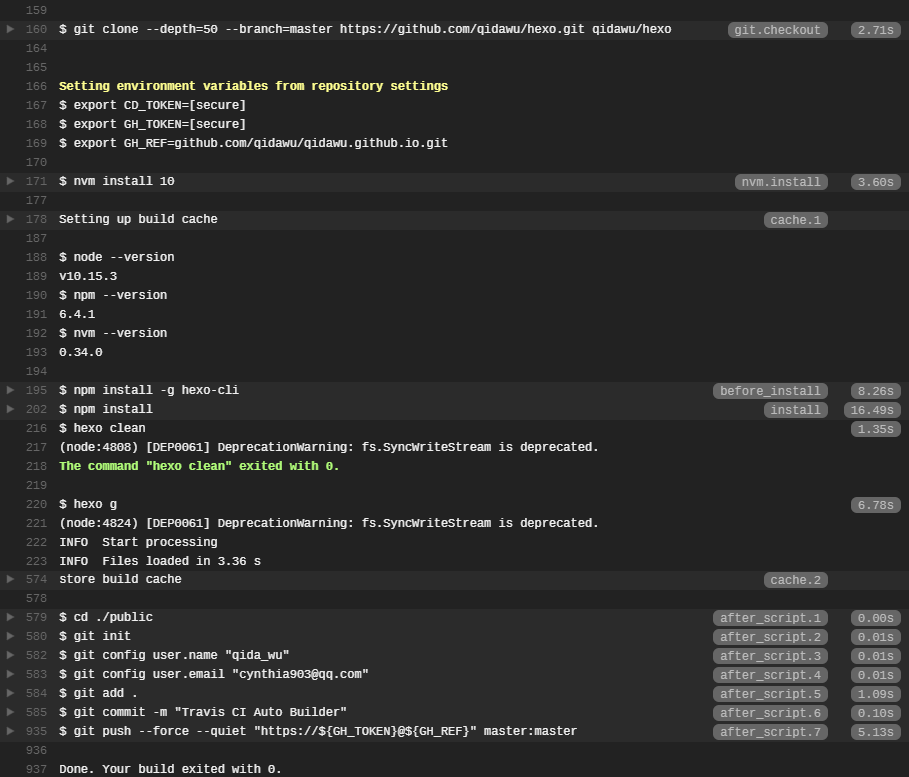
自动构建
创作并推送到仓库一即可,其它构建、部署的事都由 Travis CI 来完成,过程如下: