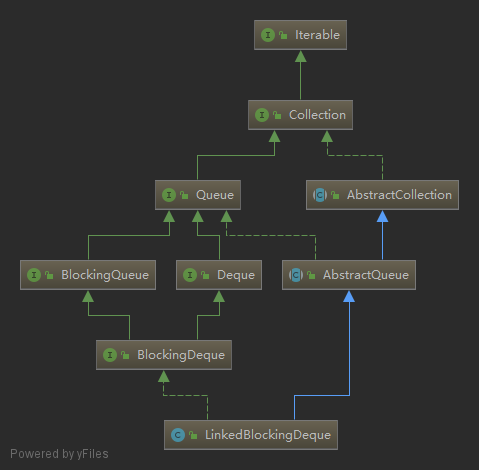
Qida's Blog

纸上得来终觉浅,绝知此事要躬行。

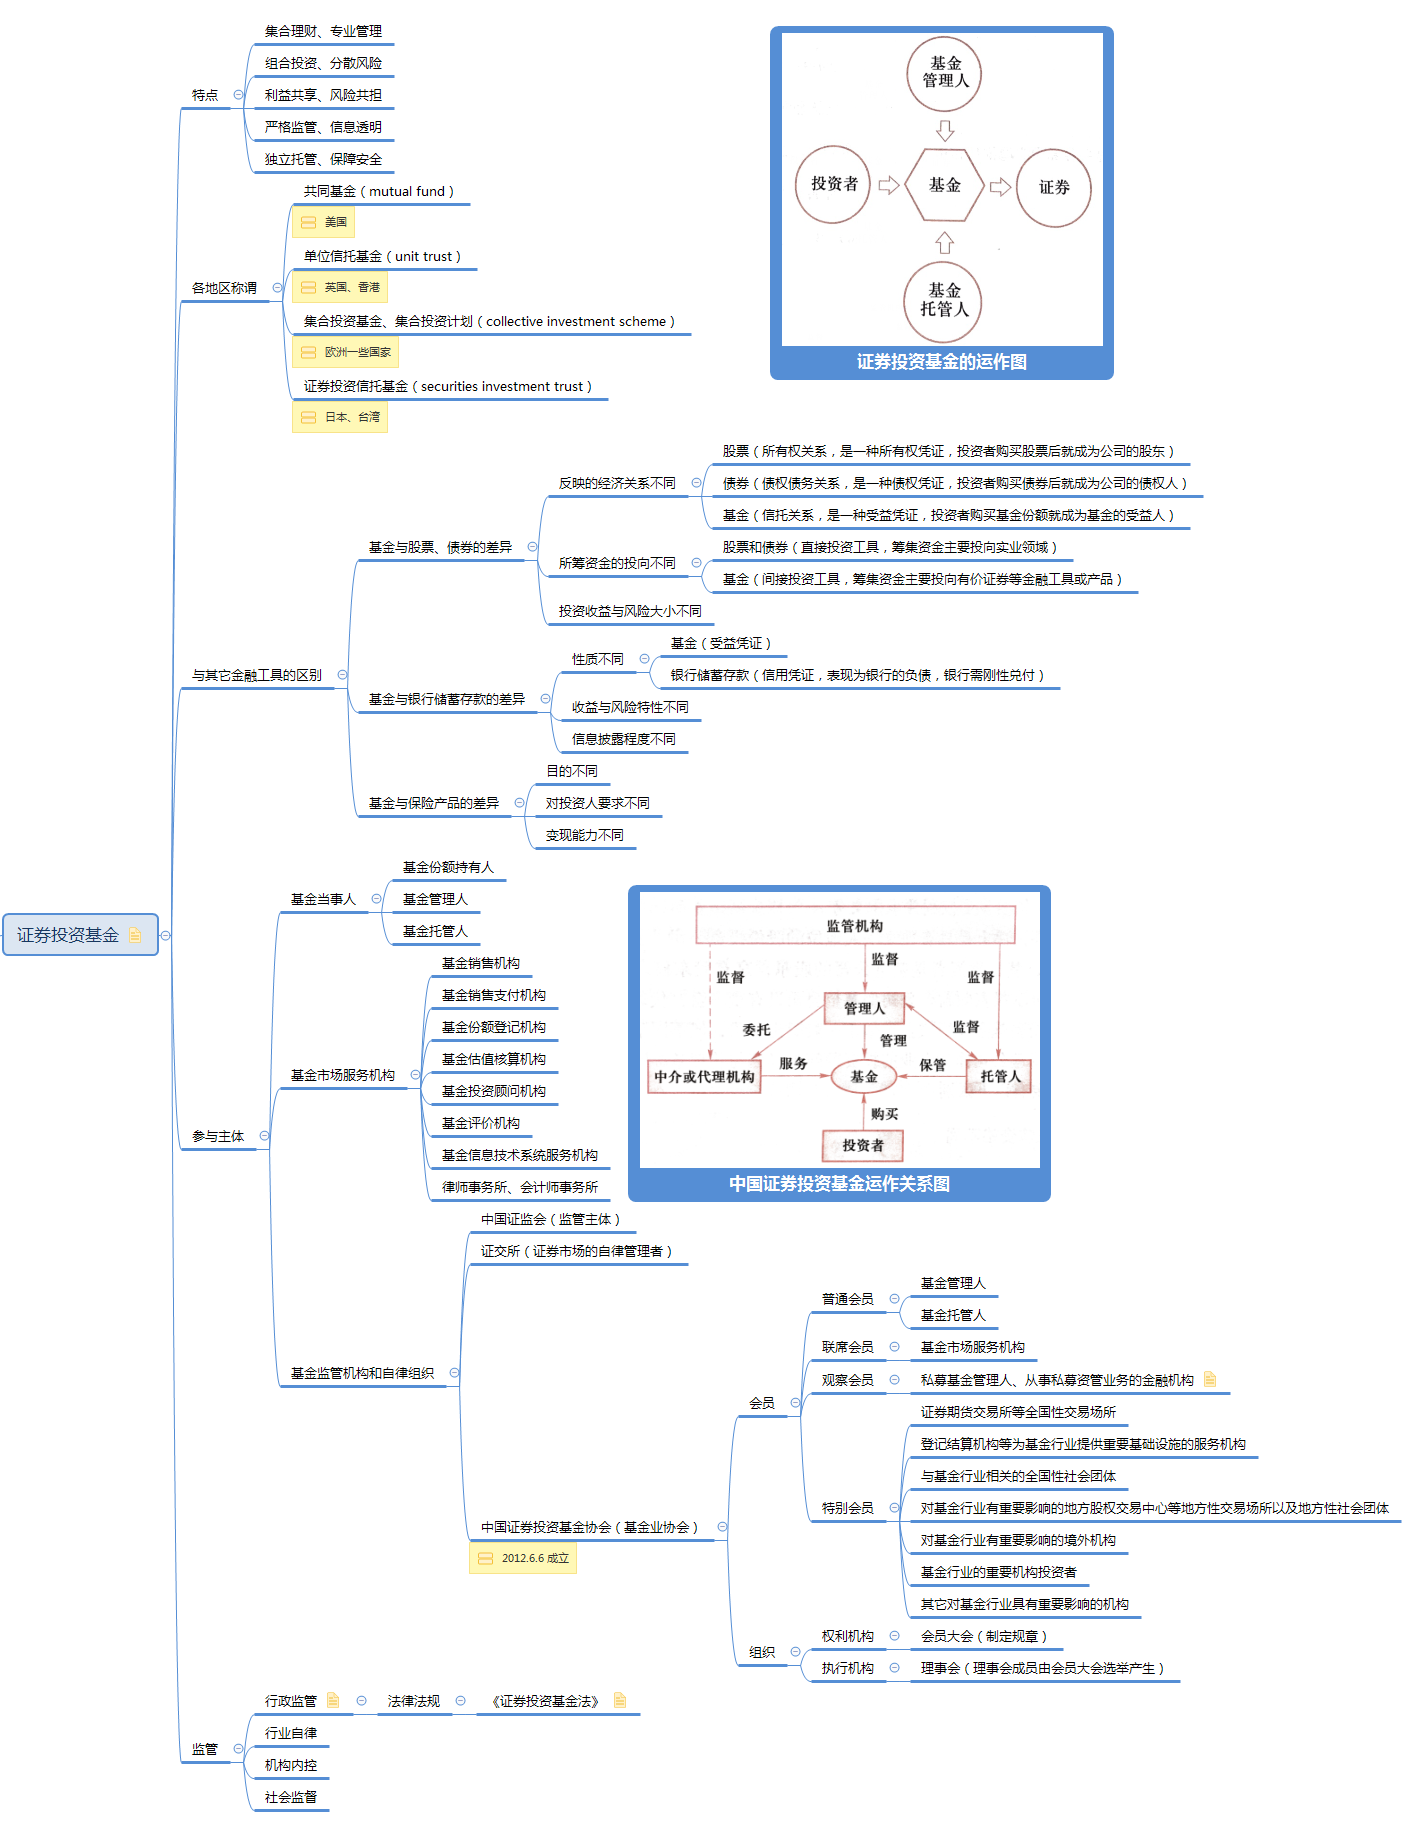
证券投资基金是资产管理的主要方式之一,它是一种组合投资、专业管理、利益共享、风险共担的集合投资方式。它主要通过向投资者发行受益凭证(基金份额),将众多不特定投资者的资金汇集起来,形成独立财产,委托基金管理人进行投资管理,基金托管人进行财产托管,由基金投资人共享投资收益、共担投资风险的集合投资方式。

投资基金是一种间接投资工具,基金投资者、基金管理人、托管人是基金运作中的主要当事人。

基金管理机构和托管机构分别作为基金管理人和基金托管人,一般按照基金的资产规模获得一定比例的管理费收入和托管费收入(即为净值型产品)

基金概况

证券投资基金概况

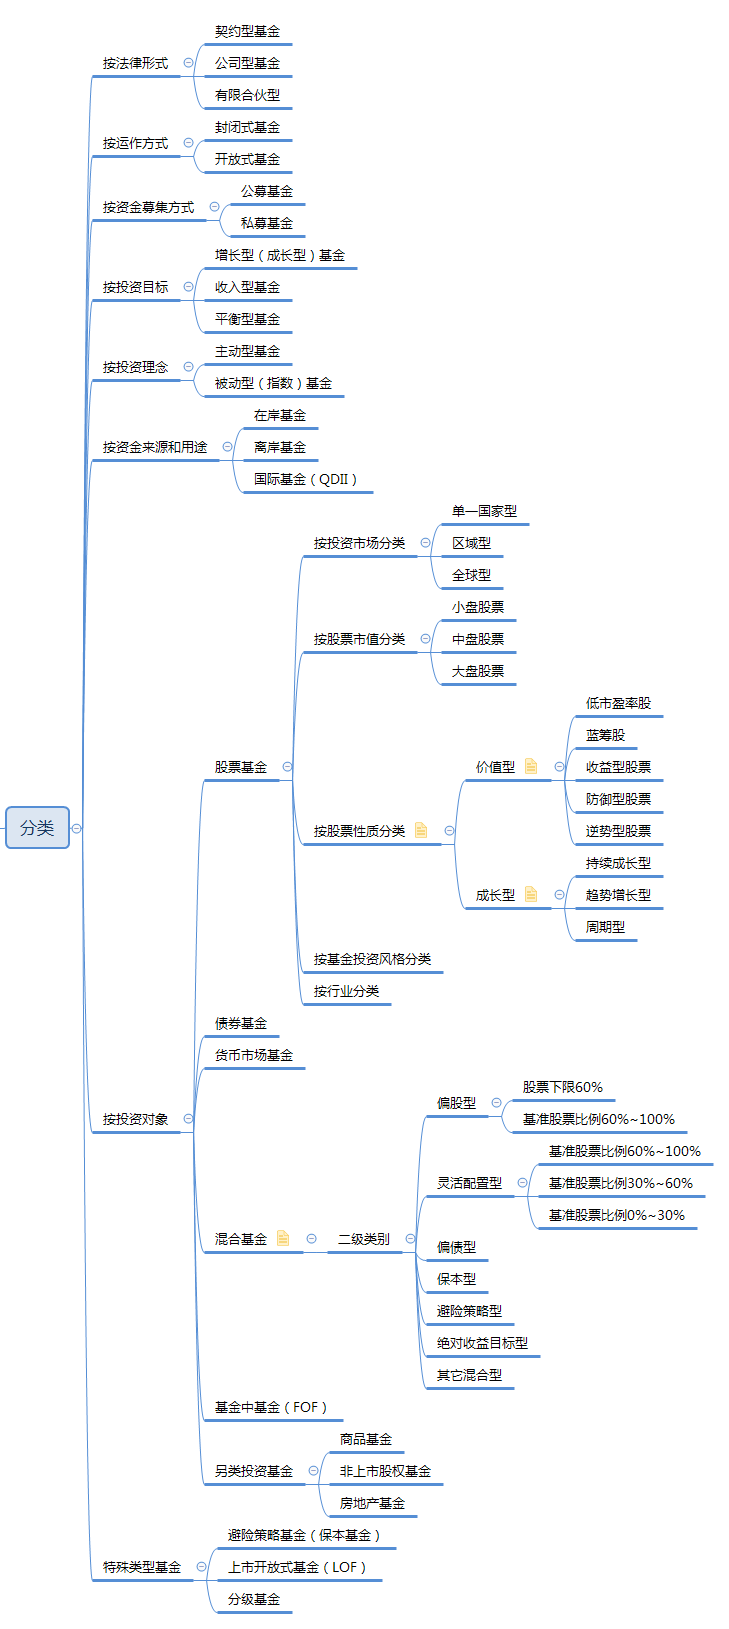
基金分类

证券投资基金分类

按法律形式

契约型基金 公司型基金
法律主体资格不同 不具有法人资格 具有法人资格
投资者的地位不同 依据基金合同成立,基金投资者可通过持有人大会表达意见,但权利相对较小 通过股东大会,持有人权利较大
基金组织方式和营运依据不同 借用了信托法律制度,依据基金合同营运基金,基金投资人和基金管理人、托管人之间是信托委托人、受托人和受益人。基金投资人通过基金持有人大会行使权力。 借用了《公司法》规定的股份有限公司的组织方式,其依据投资公司章程营运基金,设有股东会、董事会等决策监督机构,基金投资人通过股东会行使权力,设立董事会进行相关事务的决策与监督,基金管理人的身份是公司董事会聘请的投资顾问。
优点 在设立上更为简单易行 法律关系明确清晰,监督约束机制较为完善
范围 中国的基金均是契约型基金 美国的投资公司为代表

按运作方式

开放式基金 封闭式基金
份额 不固定 固定
存续期限 不确定,理论上可以无限期存续 确定
交易方式 一般不上市,通过向基金管理公司和代销机构进行申购、赎回 上市流通
交易价格 按照每日基金单位资产净值(NAVPS) 根据市场行情变化,相对于单位资产净值可能折价或溢价,多为折价
估值频率 每个交易日估值,次日公告 每个交易日估值,每周披露
信息披露 每日公布基金单位资产净值(NAVPS),每季度公布资产组合,每六个月公布变更的招募说明书 每周公布基金单位资产净值(NAVPS),每季度公布资产组合
投资策略 强调流动性管理,基金资产中要保持一定现金及流动性资产 全部资金在封闭期内可进行长期投资
收益分配频率 开放式基金的基金合同应当约定每年基金收益分配的最多次数和基金收益分配的最低比例。实践中,许多基金合同规定每年至少一次。如果是货币基金,一般为每日结转收益或按月结转收益。 每年不得少于一次
收益分配方式 1、现金分红;2、分红再投资转换为基金份额 现金分红
总结 基金份额不固定,基金份额可以在基金合同约定的时间和场所进行申购、赎回的一种基金运作方式 基金份额在基金合同期限内固定不变,基金份额可以在证交所交易,但基金份额持有人不得申请赎回

按资金募集方式

公募基金 私募基金
制度 基金募集注册制。即证监会不进行实质性审核,而只是进行合规性审查。 基金管理人登记制,即私募基金的基金管理人只需向基金业协会登记即可,无须中国证监会审批。
申请期限 依据《证券投资基金法》的规定,公募基金应当经中国证监会注册。证监会在受理申请之日起 6 个月内依照法律法规进行审查,作出注册或者不予注册的决定。 基金业协会应当在私募基金管理人登记材料齐备后的 20 个工作日内,通过网站公告私募基金管理人名单及其基本情况的方式,为私募基金管理人办理登记手续。
监管主体 由证监会监管 由基金业协会制定相关指引和准则,实行自律管理。
提交文件 1、申请报告;2、基金合同草案;3、基金托管协议草案;4、招募说明书草案;5、律所出具的法律意见书;6、中国证监会规定提交的其它文件。 1、工商登记和营业执照正副本复印件;2、公司章程或者合伙协议;3、主要股东或者合伙人名单;4、高级管理人员的基本信息;5、基金业协会规定的其它信息。
募集群体 不特定对象、或特定对象累计超过 200 人。 合格投资者,且累计不得超过 200 人。

按投资对象

股票基金

债券基金

债券 债券基金
利息 有固定的利息收入 不同债券的组合,利息不固定
到期日 有确定的到期日 没有确定的到期日
收益率 单一债券的收益率可以根据购买价格、现金流以及到期收回的本金计算其投资收益率 较难计算和预测收益率
投资风险 单一债券的信用风险比较集中,随着到期日的临近,所承担的利率风险会下降 债券基金通过分散投资可以有效避免单一债券可能面临的较高的信用风险。由于没有固定到期日,所承担的利率风险将取决于所持有的债券的平均到期日

债券基金的风险如下:

  1. 利率风险
  2. 再投资风险
  3. 信用风险
  4. 流动性风险
  5. 提前赎回风险
  6. 可转债的特定风险
  7. 债券回购风险

货币基金

货币市场基金在投资组合中的作用

与其它类型基金相比,货币市场基金具有风险低、流动性好的特点,是厌恶风险、对资产流动性安全性要求较高的投资者进行短期投资和现金管理的理想工具,或是暂时存放现金的理想场所。

货币市场基金的投资对象与货币市场工具

货币市场基金的投资对象是货币市场工具,通常指到期日不足 1 年的短期金融工具,也成为现金投资工具。货币市场工具通常由政府、金融机构以及信誉卓著的大型工商企业发行,流动性好、安全性高,但其收益率与其它证券相比则非常低。货币市场与股票市场的一个主要区别是:货币市场进入门槛通常很高,在很大程度上限制了一般投资者的进入。此外,货币市场属于场外交易市场,交易主要由买卖双方通过电话或电子交易系统以协商价格完成。货币市场基金的投资门槛极低,因此,货币市场基金为普通投资者进入货币市场提供了重要通道。

按照中国证监会和中国人民银行 2015 年颁布的《货币市场基金监督管理办法》的规定,货币市场基金应当投资于以下金融工具:

  1. 现金;
  2. 期限在 1 年以内(含 1 年)的银行存款、债券回购、中央银行票据、同业存单;
  3. 剩余期限在 397 天以内(含 397 天)的债券、非金融企业债务融资工具、资产支持证券;
  4. 中国证监会、中国人民银行认可的其它具有良好流动性的货币市场工具。

货币市场基金不得投资于以下金融工具:

  1. 股票;
  2. 可转换债券、可交换债券;
  3. 以定期存款利率为基准利率的浮动利率债券,已进入最后一个利率调整期的除外;
  4. 信用等级在 AA+ 以下的债券与非金融企业债务融资工具;
  5. 中国证监会、中国人民银行禁止投资的其它金融工具。

货币市场基金的支付功能

由于货币市场基金风险低、流动性好,通过以下机制设计,基金管理公司将货币市场基金的功能从投资拓展为类似货币的支付功能:

  1. 每个交易日办理基金份额申购、赎回;
  2. 在基金合同中将收益分配的方式约定为红利再投资,并每日进行收益分配(每日结转收益);
  3. 每日按照面值(一般为 1 元)进行报价。

基金术语

基金分红

基金收益分配(即分红)是指将本基金的净收益根据持有基金单位的数量(即持有份额)按比例向基金持有人进行分配。若基金上一年度亏损,当年收益应先用于弥补上年亏损,在基金亏损完全弥补后尚有剩余的,方能进行当年收益分配。基金当年发生亏损无净收益的,不进行收益分配。

基金进行收益分配会导致基金份额净值的下降,但对投资者的利益没有实际影响。一只基金在收益分配前份额净值为1.2元,每份基金分配0.05元收益,在分配后基金份额净值将会下降到1.15元。但对投资者来说,分红前后的价值是不变的。

收益分配后基金份额净值不得低于面值

现有制度下,基金分红主要有两种形式:

  1. 现金分红。是指直接获得现金红利,落袋为安;
  2. 红利再投资转换为基金份额。红利再投资是指将所分得的现金红利再投资该基金或者购买的个股,从而达到增加原先持有基金或股票的份额,俗称“利滚利”,这样做既可免掉再投资的申购费,而且再投资所获得的基金份额还可以享受或增加下次分红的数额,可使基金份额随着分红的次数而增加。

假如选择红利再投资方式对开放式基金进行长期投资,则可享受基金投资增值的复利增长效果。例如,假如开放式基金每年分红5%,选择红利再投资,则10年后资金将增值为62.89%;而假如同样的收益情况,选择现金分红方式,则10年后资金只增值为50%,收益少了12.89%。假如投资时间更长,则差别更大。

中国法律规定默认的基金分红方式是现金分红,投资者可以通过销售机构将分红方式变更为红利再投资,以获得更大的回报。

现金分红涉;及三个日期:

  1. 权益登记日:是基金公司进行红利分配时,需要定出某一天,界定哪些基金持有人可以参加分红,定出的这一天就是权益登记日。也就说,在权益登记日当天仍持有或申购基金并得到确认的投资者均可享受此次分红。

  2. 除息日:分红方案中确定的将红利从基金资产中扣除的日期。除息日当天,基金净值将会降低,如果不考虑当日市场波动,下降的幅度就是单位基金的现金分红额。

  3. 派息日:也就是基金分红拨付给基金持有人的日子。

基金分拆

基金分拆是指保证投资者的投资总额不发生改变的前提下,将一份基金按照一定的比例分拆为若干份,每一基金份额的单位净值也按相同比例降低:

  • 分拆比例大于 1 的分拆为基金分拆;
  • 分拆比例小于 1 的分拆为基金合并。

基金份额净值

  • 基金资产估值:通过对基金所拥有的全部资产及全部负债按一定的原则和方法进行估算,进而确定基金资产公允价值的过程。
  • 基金资产总值(AV, Asset Value):基金全部资产的价值总和。
  • 基金资产净值(NAV, Net Asset Value):基金资产 - 基金负债(NAV = Assets - Liabilities)
  • 基金份额净值(NAVPS, Net Asset Value Per Share):基金资产净值 / 基金总份额(NAVPS = Net Asset Value (NAV) / Number of Shares Outstanding)。也叫“单位净值”,与“累计净值”的区别查看这里
  • 基金份额:是指基金发起人向投资者公开发行的,表示持有人按其所持份额对基金财产享有收益分配权、清算后剩余财产取得权和其他相关权利,并承担相应义务的凭证。

一图看清“基金份额净值”:基金份额净值

基金份额类型(费率模式)

常见的基金收费有申购费、赎回费、管理费、托管费、销售服务费。还有一个认购费,但那是只有在基金募集期才会用到的。这么多费率,怎么区分?

货币基金

一般来说,我们常见的货币基金主要分A类、B类,其实货基的A、B类相差并不大,在收益方面的差别也不是很大,但门槛方面相差还是比较多的(具体以基金合同为准):

基金份额类型(费率模式) 描述
A类份额 货币基金中的低门槛份额,适用于认购、申购金额低于500万的投资者,散户投资者买货基都是此类;
B类份额 货币基金中的高门槛份额,适用于认购、申购金额高于500万的投资者,专为高净值客户或机构客户设置。

股票型/混合型/债券型基金

基金份额类型(费率模式) 费用差别 适合人群
A类份额 前端收费,即申购时收取申购费(不同的销售渠道会有打折) 投资时间没有明确判断
B类份额 后端收费,即赎回时收取申购费(持有的时间越长,申购费越少,持有超过一定年限后,不再收取) 长期持有(一般3~5年)
C类份额 无申购费,但按日收取销售服务费 短期持有(一般1~2年)

值得注意的是:A类份额和B类份额,都要收取一定的基金管理费和托管费,但是不收取销售服务费。

A类基金:前端申购费+赎回费+管理费+托管费
B类基金:后端申购费+赎回费+管理费+托管费
C类基金:销售服务费+赎回费+管理费+托管费

持有区间收益率

  • 资产回报:是指股票、债券、房地产等资产价格的增加或减少。
  • 资产回报率 = (期末资产价格 - 期初资产价格) ÷ 期初资产价格 × 100%
  • 收入回报:包括分红、利息等。
  • 收入回报率 = 期间收入 ÷ 期初资产价格 × 100%
  • 持有区间收益 = 资产回报 + 收入回报
  • 持有区间收益率 = 资产回报率 + 收入回报率
  • 除权:因送股或配股而形成的剔除行为。
  • 除息:因派息而引起的剔除行为。
  • 除权(息)参考价 = (前收盘价 - 现金红利 + 配股价格 × 股份变动比例) ÷ (1+ 股份变动比例)

公式

申购计算公式

净申购金额=申购金额/(1+申购费率)

申购费用=申购金额-净申购金额

申购份额=净申购金额/T日基金份额净值
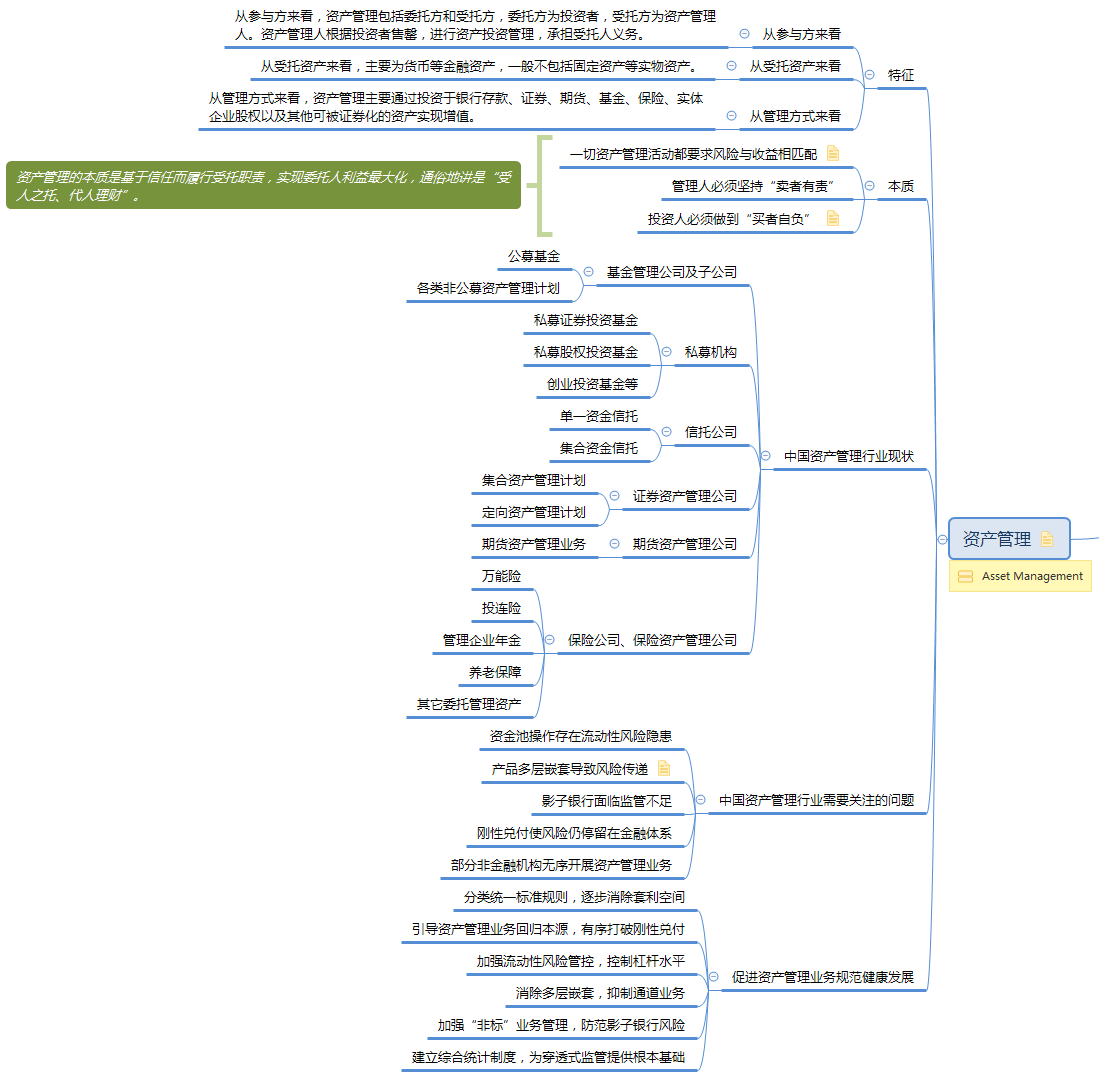
在金融市场上,资金的供给者通过投资金融工具获得各种类型的金融资产。金融资产是代表未来收益或资产合法要求权的凭证,标示了明确的价值,表明了交易双方的所有权关系和债权关系。它分为债券类金融资产和股权类金融资产两类。债券类金融资产以票据、债券等契约型投资工具为主,股权类金融资产以各类股票为主。资金的供给者产生了对金融资产进行管理的需求。

资产管理并没有一个得到广泛认可的明确定义,根据国内外行业共识,资产管理一般是指金融机构受投资者委托,为实现投资者的特定目标和利益,进行证券和其它金融产品的投资并提供金融资产管理服务、收取费用的行为。
从资产管理的外延来看,资产管理广泛涉及银行、证券、保险、基金、信托、期货等行业,但是具体范围并无明确界定。

资产管理提供的是代客理财服务,与储蓄产品有着本质区别:

  1. 对储蓄而言,存款人与银行是债权人与债务人关系,银行必须按照约定到期偿还本金,支付利息;而对资产管理而言,投资人与管理人是委托人和受托人关系,投资人自担风险、自享收益,管理人只作为管理顾问收取一定比例的管理费。
  2. 资产管理人对于投资人的根本效用价值在于通过集合资金、组合投资,有效管理风险,获取更合理的风险回报。所获取的收益与其承担的风险相匹配。

资产管理的简单总结如下图:

金融资产管理总结

金融市场和金融机构作为金融的微观运作载体,也是人们日常生活中接触最多的内容。下面总结一点《金融学》学习过程中总结的笔记。

什么是金融市场?

  • 广义的金融市场:是货币借贷、资金融通、买卖票据和有价证券等所有金融交易活动的总称,包括直接融资和间接融资在内的所有金融投融资活动。
  • 狭义的金融市场:专指以金融工具为载体的交易活动,即直接融资和金融投资活动。

金融的两大投资:

  • 产业投资:投资于实体经济的活动,如投资于工业、农业、服务业等,这些投资最后会形成各种各样的固定资产和流动资产,通过生产经营会产品利润,从而给投资者带来相应的回报。产业投资是最基本、最重要的投资,是经济发展的根基和利润的源泉。
  • 金融投资:以金融资产为标的物的投资活动,如买卖股票、债券、外汇等的投资活动。与产业投资相比,金融投资具有流动性强、交易成本低、风险和收益相对较高的特点。

金融市场的特点:

  • 以资金为交易对象,借助金融工具完成交易。
  • 交易之间不单纯是买卖关系,更主要的是信用关系,体现了货币所有权和使用权相分离的原则。
  • 可以是有形市场,也可以是无形市场。

金融市场的功能:

  • 资产配置与转化
  • 价格发现
  • 风险分散和规避
  • 宏观调控传导

总结:

  • 金融市场理论是现代金融学最前沿和最核心的内容。
  • 金融市场是资金供求双方借助金融工具以一定的价格进行各种投融资活动的场所。
  • 投融资需求是金融市场产生和发展的基础。
  • 金融市场的交易对象主要是金融工具金融资产价格是市场交易最敏感的因素。
  • 利率、汇率金融资产价格是金融市场交易最主要的价格机制。
  • 各经济主体都可以通过金融市场利用相应的信用形式进行投融资活动。

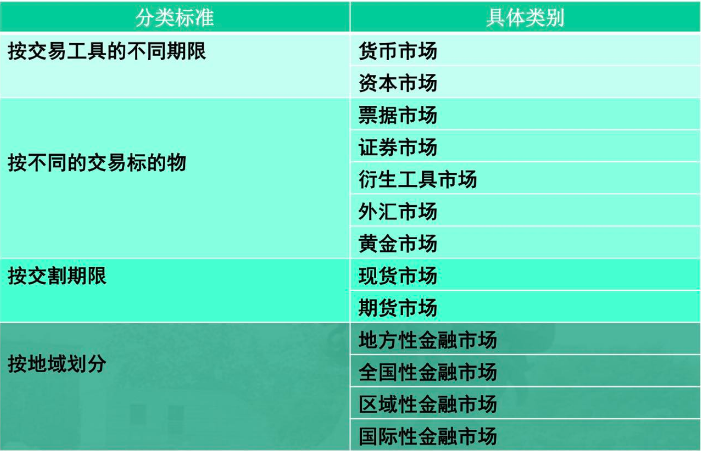
金融市场的分类

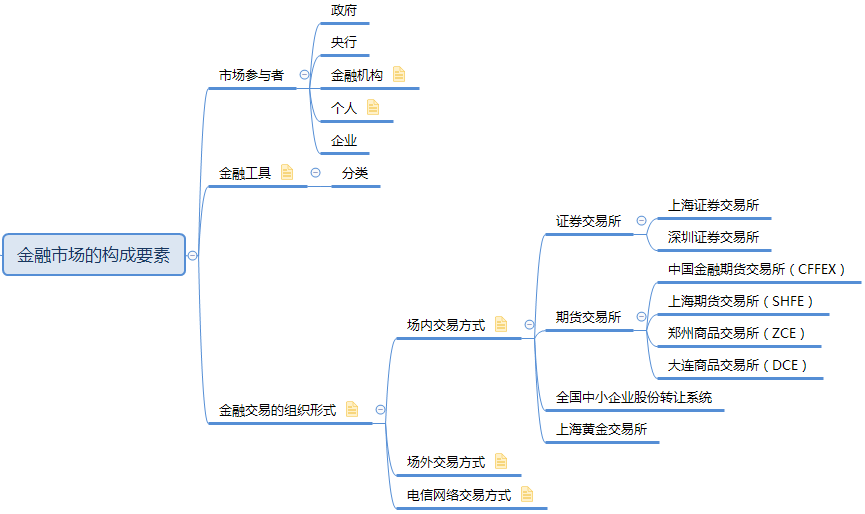
金融市场的构成要素

金融市场的构成要素

金融市场的构成三要素如下:

  • 市场参与者
  • 金融工具
  • 金融交易的组织形式

金融市场的构成要素

市场参与者

金融市场的参与者主要包括政府、中央银行、金融机构、个人和企业。

政府

中央银行

中央银行被称为银行的银行。如果把每家商业银行看作一家分行,央行相当于总行。

对于商业银行来说,中央银行扮演了三个角色:

  • 第一个角色,监管人。商业银行必须把吸纳的一部分存款,存到央行,称为存款准备金
  • 中央银行的第二个角色是,金融中心。商业银行之间转账,只需要在双方的央行准备金账户上增减数字,不需要实际转移资金。央行充当了交易清算的处理中心
  • 央行的第三个角色是,最终贷款人。如果一家商业银行没有足够的资金,可以进行银行间同业拆借(参考:shibor,上海银行间同业拆放利率,Shanghai Interbank Offered Rate);如果其它商业银行也没有足够的资金,他们有一个最终的求助对象,那就是央行。求助的途径有两个:
    • 再贷款,即商业银行向央行寻求贷款;
    • 再贴现,即商业银行把手中没有到期的票据卖给央行。

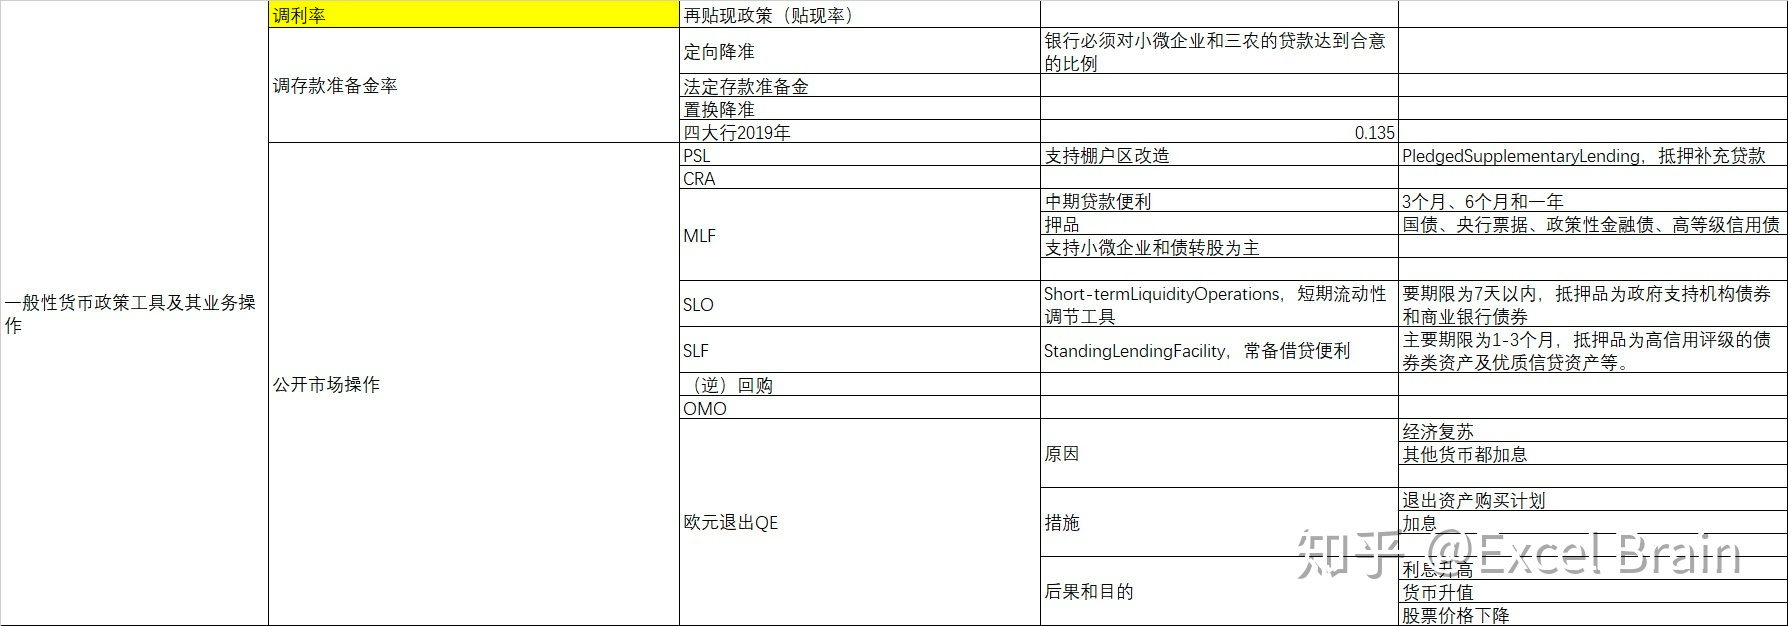
央行通过三大货币政策工具,最终决定全社会货币量:

  • 首先,央行通过再贷款和再贴现,可以扩大商业银行系统的贷款和投资规模,从而增加货币数量。

  • 其次,央行通过存款准备金率,设定了商业银行贷款和投资额度的上限,也就为货币的派生数量设定了上限。银行贷款派生存款(货币)过程如下:

    存款生贷款、贷款生存款,循环派生,但是每次新增贷款的数量都在减少,最终派生的货币数量会有上限,即创造的货币数量会有上限,它是初始存款金额的一个倍数,称为「派生倍数」,计算公式:1 / 准备金率。例如:100W / 20% = 500W,即 100W 的存款,理论上最多创造出 400W 货币,派生过程如下:

    80

    64

    51.2

    40.96

    32.768

    26.2144

    20.97152

    16.777216

    13.4217728

    10.73741824

    可见,存款准备金率和派生货币量存在反比关系。

  • 最后,央行还可以通过公开市场操作(OMO),影响商业银行体系的准备金数量,进而调节货币数量。(在多数发达国家,公开市场操作是中央银行吞吐基础货币,调节市场流动性的主要货币政策工具。)

货币政策工具

参考:

金融机构

金融机构是金融市场上最重要的中介机构,它的作用较为特殊:

  1. 它是金融市场上最重要的中介机构,是储蓄转化为投资的重要渠道。
  2. 金融机构在金融市场上充当资金的供给者、需求者和中间人等多重角色,它既发行、创造金融工具,也在市场上购买各类金融工具。既是金融市场的中介人,也是金融市场的投资者、货币政策的传递者和承受者。
  3. 金融机构作为机构投资者在金融市场具有支配性的作用。

金融机构的主要功能如下:

  • 便利支付结算
  • 促进资金融通
  • 降低交易成本
  • 改善信息不对称
  • 转移与管理风险
  • 创造信用与存款货币

金融机构的经营体制有两种:

  • 分业经营,即对金融机构业务范围进行某种程度的分离管制。
  • 混业经营,即允许各类金融机构业务范围有交叉,可以进行综合经营的金融制度。

两种经营体制存在的争论如下:

  • 对金融机构稳健经营的影响?
  • 混业经营是否会产生利益冲突?
  • 加强竞争和提高效率方面的比较?
  • 规模经济和范围经济优势的比较?

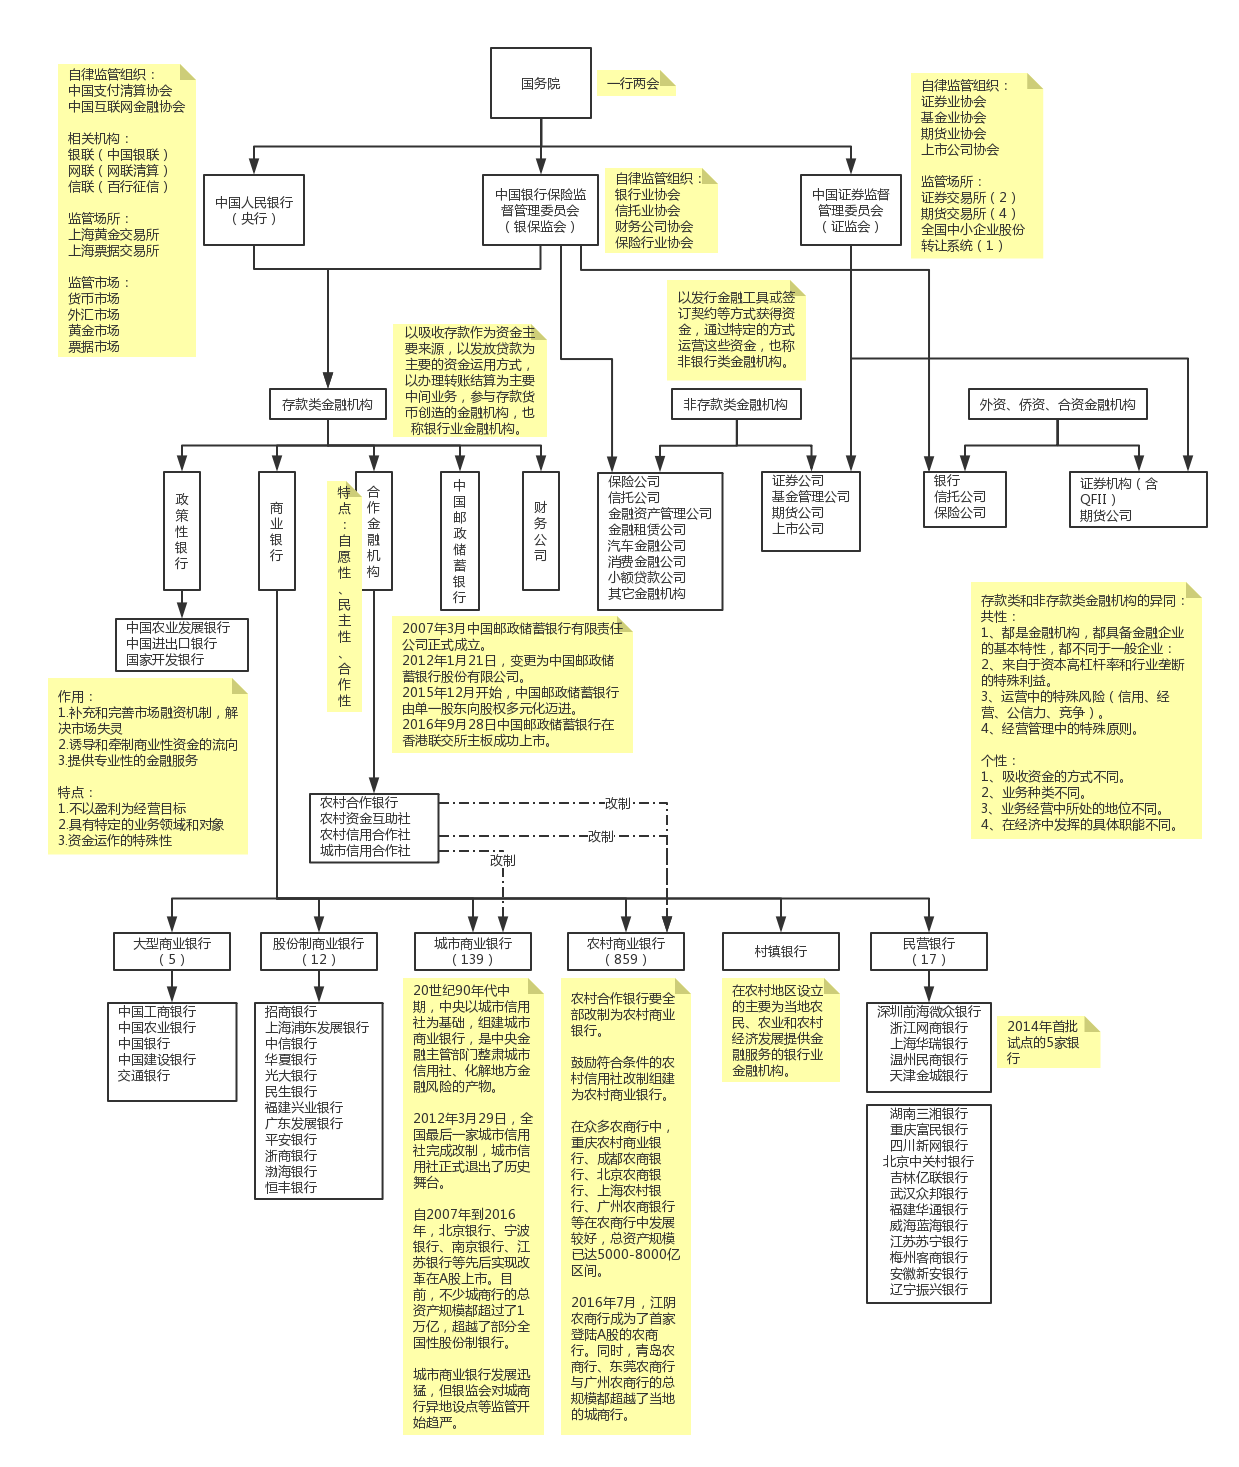
由于金融机构是如此重要,因此国家需要进行重点监管,避免出现系统性风险,下图我画了一张图总结中国的金融监管体系和金融机构体系:

中国的金融监管体系和金融机构体系

上图主要采用 IMF 的统计分类法,其将金融机构分为:

  • 存款类金融机构:以吸收存款作为资金主要来源,以发放贷款为主要的资金运用方式,以办理转账结算为主要中间业务,参与存款货币创造的金融机构,也称银行业金融机构。
  • 非存款类金融机构:以发行金融工具签订契约等方式获得资金,通过特定的方式运营这些资金,也称非银行类金融机构。

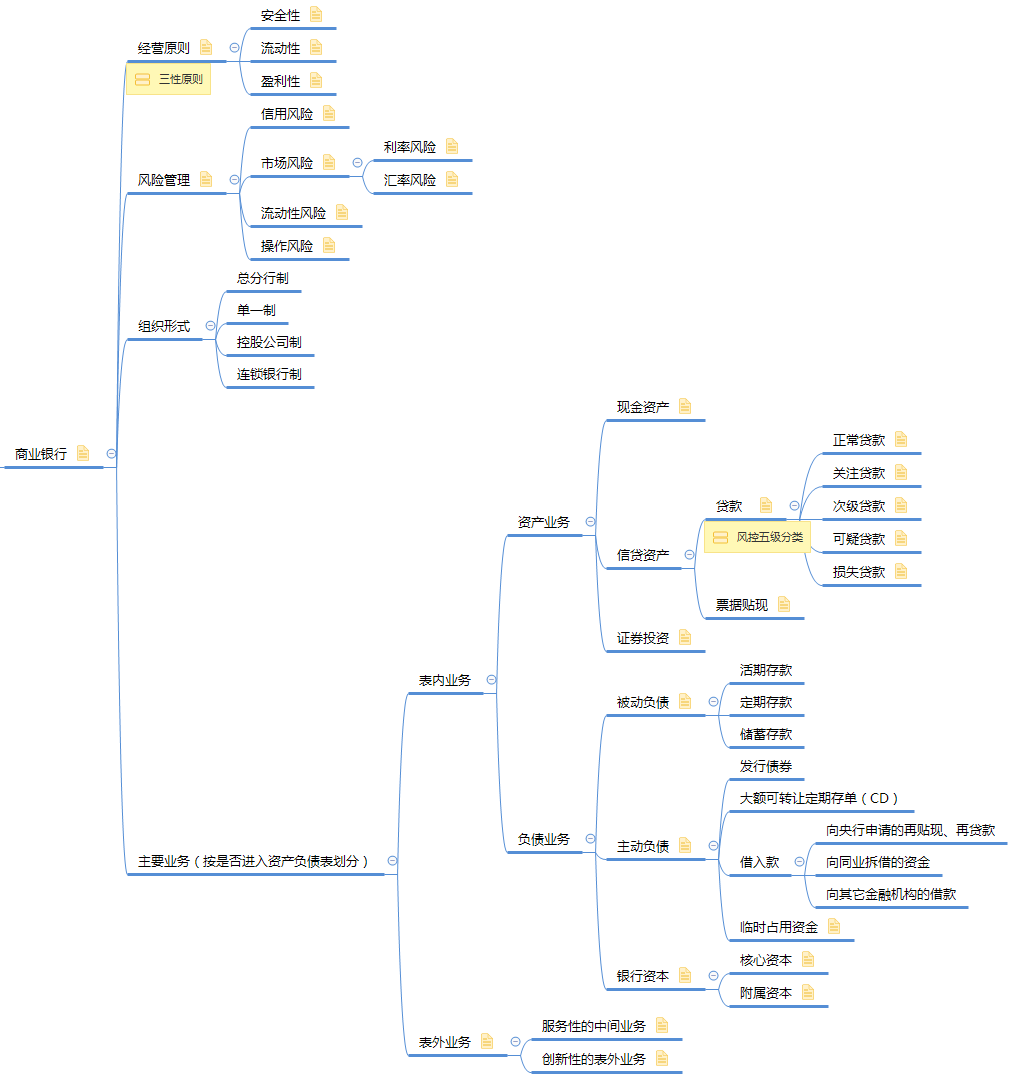
其中,商业银行作为存款类金融机构中最具代表性和占比最大的机构,其特点与主要业务如下:

商业银行

个人居民

个人居民是金融市场上主要的资金供给者。个人居民为了预防未来支出的不确定性或出于节俭等目的。将收入的一部分用于储蓄。不少个人居民动用储蓄资金投资于股票、债券、基金等资本市场工具,投资于保险市场或参与黄金市场交易。组合其金融资产,实现风险和收益的最佳匹配。个人居民投资者是金融市场供求均衡的重要力量。

金融工具

金融工具是金融市场上进行交易的载体。金融工具最初被称为信用工具,是证明债权债务关系并据以进行货币资金交易的合法凭证。金融工具是法律契约,交易双方的权利和义务受法律保护。

金融工具一般具有广泛的社会可接受性,随时可以流通转让。不同的金融工具具有不同的特点,能分别满足资金供需双方在数量、期限和条件等方面的不同需要,在不同的市场上为不同交易者服务。

金融工具的四个特征:

  • 法律性
  • 流动性
  • 收益性
  • 风险性

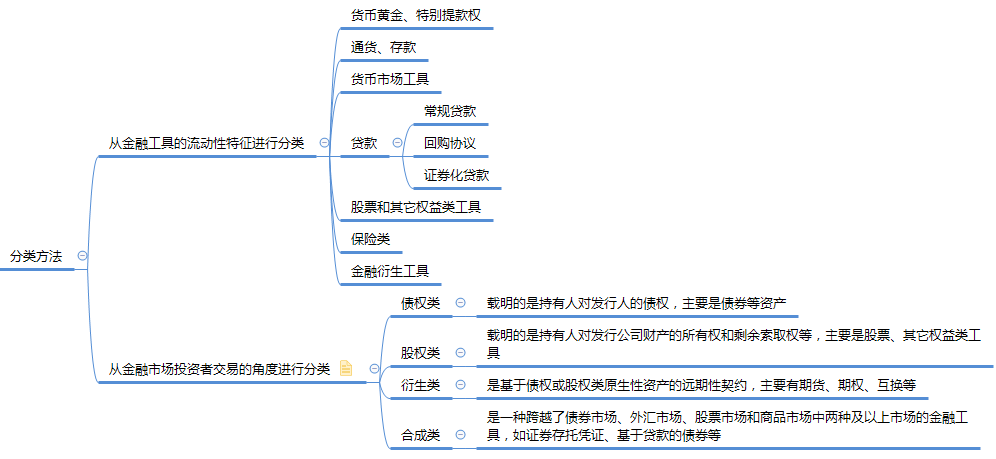
金融工具的分类方法如下:

金融工具的分类方法

在金融市场上,资金的供给者通过投资金融工具获得各种类型的金融资产。金融资产是代表未来收益或资产合法要求权的凭证,标示了明确的价值,表明了交易双方的所有权关系和债权关系。

金融交易的组织形式

金融交易的组织形式是指组织金融工具交易时采用的方式。受市场本身的发育程度、交易技术的发达程度、交易双方的交易意愿影响。
目前场内市场与场外市场之间的截然划分已经不复存在,出现了多层次的证券市场结构。很多传统意义上的场外市场由于报价商和电子撮合系统的出现而具有了集中交易特征,证券交易所市场也开始逐步推出兼容场外交易的交易组织形式,场内市场和场外市场的物理界限逐渐模糊。
如今,场内市场和场外市场的概念逐步演变为风险分层管理的概念,即不同层次市场按照上市品种的风险大小,通过对上市或挂牌条件、信息披露制度、交易结算制度、证券产品设计以及投资者约束条件等做出差异化安排,实现了资本市场交易产品的风险纵向分层。

参考

《金融学》——李健

国内银行业金融机构

17家民营银行大盘点

债权转让和收益权转让的区别?

年初也转投 IDEA 阵营了,相比 Eclipse 确实顺畅很多,尤其是多开项目的时候,已经有种回不去的感觉了。这里介绍一些两个 IDE 之间的区别。

版本选择

首先是 IDEA 版本的选择,建议使用 Community 社区免费版即可,对比 Ultimate 收费版并无太大区别。都支持 Java、Maven、Git 等基本功能。但社区版会少了一些插件,例如 Spring Initializr。

版本区别详见:https://www.jetbrains.com/idea/features/editions_comparison_matrix.html

创建项目

其次创建项目,需要了解 IDEA 的 Project 和 Module 两个概念:

  • IntelliJ 系中的 Module 相当于 Eclipse 系中的 Project;
  • IntelliJ 系中的 Project 相当于 Eclipse 系中的 Workspace。可以选择创建一个 Empty project without modules,之后再放入同一类型的 module 集合,此时只会生成一个 .idea 目录。也可以选择直接创建某一类型的 Project,如 Maven Project,此时需要添加 Maven 项目信息,完成后会生成 pom.xml、src 目录、*.iml。

最后尝试新建一个 HelloWorld 示例项目,.idea 文件夹和 HelloWorld.iml 是 IDEA 帮助我们建立的辅助文件夹和文件,类似于 Eclipse 在我们的 Workspace 下建立的 .settings 文件夹和 .classpath.project 文件。

IDEA Hello World

Project 作为工作空间可以自由切换、多开,从 File > Open Recent 中选择即可。

配置 Tomcat

1、下载 Tomcat

2、IDEA 新建 Tomcat(Run > Edit Configurations)

add_new_tomcat_server_config

3、新建完毕,配置本地 Tomcat 安装目录:

tomcat_server_config

4、配置端口号、必要的 VM options:

tomcat_server_config2

5、配置运行项目,配置上下文:

deployment

创建 java/resource 目录

Ctrl+Alt+Shift+S,打开 Project Structure > Modules:

Project Structure > Modules

场景演示

以特性开发与合版这个场景为例,看下如何利用 IDEA 完成整个流程:

特性开发

第一步,本地建一个工作目录,以特性名称命名:

1
$ mkdir feature-xxx

第二步,从远程仓库 clone 该特性涉及的所有模块到该工作目录:

1
2
3
$ cd !$
$ git clone module1
$ git clone moduleN

第三步,新建 Project。打开 IDEA,File > New > Project from Existing Sources… > 选择该工作目录,并按如下操作:

Import Module

Import Module

第四步,开始特性开发,批量从 master 分支 checkout 创建出特性分支 feature-xxx。并批量修改 pom.xml 的版本号:

new_branch

特性合版

第一步,项目管理员创建发布分支,根据本次发布周期涉及的所有特性,批量从 master 分支 checkout 创建出发布分支 release-xxx(操作同上)。该操作只能由项目管理员操作,因为 release-* 是受保护分支。

第二步,升级 pom.xml 版本号并推送。

第三步,批量 merge 特性分支:

merge_into_current

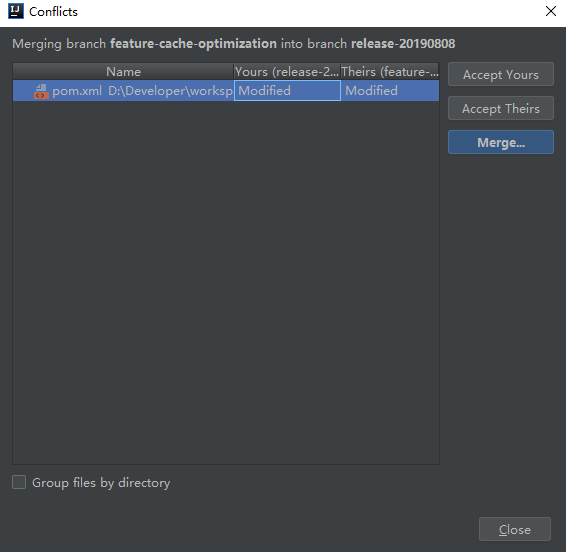
第四步,解决冲突(例如 pom.xml 版本号冲突、代码冲突,如有):

conflicts

version_control_local_changes

第五步,合版完毕,Ctrl+K 批量提交并推送到远程分支 release-xxx 即可。

全局配置

File > Other Setting > Default Settings

全局配置 IDE 的界面、编辑器、VCS、构建、终端等

File > Other Setting > Default Project Structure

全局配置项目的 SDK 版本、类库等。

JDK

File > Other Setting > Default Settings,Projects SDK 可控制全局版本,Language Level 可控制语言级别,方便使用其特性。配置后全部 project modules 都会生效。

Maven

File > Other Setting > Default Settings > Build, Execution, Deployment > Build Tools > Maven

  • 可配置 Maven home directoryUser settings file (自定义 setting.xml)、Local repository 本地仓库。

  • 自动下载源码:Importing,找到Automatically download 并勾选 SourcesDocumentation,然后 reimport 即可。

Terminal

File > Other Setting > Default Settings > Terminal,修改 Shell path 为:D:\Developer\PortableGit\bin\sh.exe,可配置 Terminal 终端为 GitBash。

Layout

调整完当前窗口的布局之后,可以保存当前的窗口布局,以便全局生效:Window > Store Current Layout as Default

Code Template

File > Other Setting > Default Settings > 搜索 File and Code Templates,打开 Includes > File Header,配置:

1
2
3
4
5
6
7
8
/**
* <p>
*
* </p>
*
* @author abc@xyz.com
* @since ${DATE}
**/

Auto Import

File > Settings > Editor > General > Auto Import,然后勾选:

Add unambiguous imports on the fly:快速添加明确的导入。

Optimize imports on the fly:快速优化导入,优化的意思即自动帮助删除无用的导入。

Quick documentation

File > Settings > Editor > General > 开启 Show quick documentation on mouse move,可用于鼠标放到类、方法、变量上时显示完整 java doc 注释

Show tabs in one row

File > Settings > Editor > General > Editor Tabs,去掉勾选 Show tabs in one row

字体

老版本可以安装 JetBrains Mono 字体,v2019.3 版本后自带。

插件

官方插件(内置):

  • Maven Integration:官方 Maven 插件,参考:IDEA Maven 插件
  • JUnit:快速创建、运行、查看单元测试,在单元测试和目标之间跳转。

官方插件(需安装):

  • IdeaVim:Vim 程序员必装。
  • NodeJS:运行前端项目、or 构建前端项目时都是需要的。

规范类:

代码生成类:

  • Lombok Plugin:用于精简冗余代码,必装。
  • Builder-Generator:如果项目可以使用 Lombok,就不必装。

MyBatis:

  • MyBatis Plugin:最强大的 MyBatis 插件,不过是收费版。
  • Free MyBatis plugin:免费的 MyBatis 插件,提供了一些基本的跳转和代码生成功能。
  • MyBatis Log Plugin:把 MyBatis 输出的 SQL 日志还原成完整的 SQL 语句。将日志输出的 SQL 语句中的问号 ? 替换成真正的参数值。

辅助类:

  • Maven Helper:方便查询依赖树及排除依赖
  • Grep Console:Grep, tail, filter, highlight… everything you need for a console. Also can highlight the editor - nice for analyzing logs…
  • SequenceDiagram for IntelliJ IDEA:查看类调用时序图
  • Rainbow Brackets:彩色括号
  • HighlightBracketPair:高亮提示括号的开始结尾

其它:

IdeaVim 如果与原 IDEA 快捷键冲突,可以修改如下:

IdeaVim

如果被墙导致无法连接到 Marketplace 或插件无法下载,可以配置如下:

IDEA 无法下载插件

Git

分支管理

git branch management

分支操作 对应命令
Checkout git checkout [selected-branch]
New Branch from Selected… git checkout -b [new-branch] [selected-branch]
Checkout and Rebase onto Current git rebase HEAD [selected-branch]
Rebase Current onto Selected git rebase [selected-branch]
Merge into Current git merge [selected-branch]
Delete git branch -d [selected-branch]

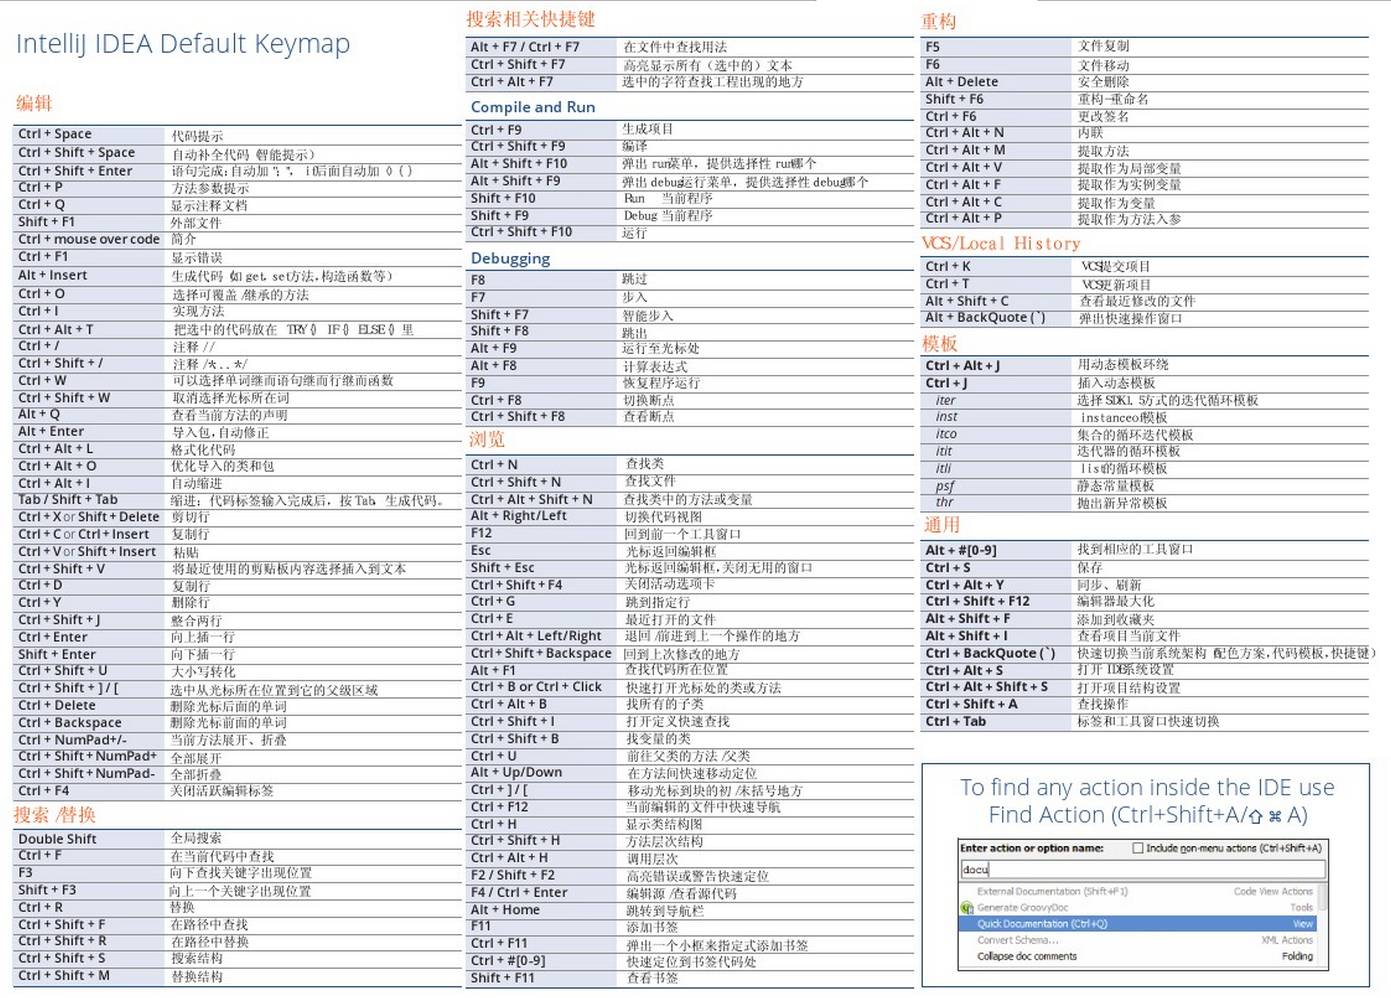
快捷键

自定义 keymap

自定义快捷键,例如我配置了:

功能 快捷键
Close Alt+W
Hide All Tool Windows Alt+M
Delete Line Alt+D
Redo Ctrl+Y
Rename Alt+R
Completion Alt+/

VCS

Git 自定义快捷键:

功能 快捷键
Reset HEAD Ctrl+Alt+Q
Annotate(git blame) Ctrl+Alt+1
Compare with the Same Repository Version Ctrl+Alt+2
Show History Ctrl+Alt+3
Commit File Ctrl+Alt+4
PULL Ctrl+Alt+5

Git 默认的其它命令:

功能 快捷键
Add Ctrl+Alt+A
Revert Changes 回退更改 Ctrl+Alt+Z
Commit Changes 提交更改 Ctrl+K
Push Commits 推送 Ctrl+Shift+K
Update Project(批量 git pull) Ctrl+T

创建类

Alt + Insert 创造万物

查找/替换类

Ctrl + F 在当前文件中查找(关键字)

Ctrl + R 在当前文件中替换(关键字)

Ctrl + Shift + F 在路径中查找(关键字)

Ctrl + Shift + R 在路径中替换(关键字)

浏览类

Ctrl+N 查找类

Ctrl+Shift+N 查找文件

Shift+Shift 查找所有(包括类、资源、配置项、方法等等)

Ctrl+E 最近打开的文件

Alt+F7 查找引用(Find Usage)

Ctrl+Shift+Backspace 回到上次修改的地方

Ctrl+Alt+Left/Right 返回/前进至上次浏览的位置

Ctrl+鼠标左键:打开接口(Declaration)

Ctrl+Alt+鼠标左键:打开实现(Implementation(s))

Ctrl+H 打开类层次窗口(继承关系)

Ctrl+F12 查看当前类的所有方法

Ctrl+Alt+U 类关系图、Maven关系图

编辑类

Ctrl+D 复制行

Ctrl+Y 删除行

Alt+Shift+向上箭头 Move Line Up

Alt+Shift+向下箭头 Move Line Down

Ctrl+Shift+U 大小写转换

Ctrl+Alt+L 格式化代码

Ctrl+W、Ctrl+Shift+W 这个动作的实际操作是选中更上一层的语法结构。例如,如果你在一个字符串的一个单词中,按一下Ctrl+W,会选中光标所在单词。再按一下,会选中整个字符串的内容,不包括引号。再按一下,会选中包括引号的字符串。再按一下,会选中整个表达式(如果表达式含有括号,会逐层选中)。再按一下,会选中整个语句块。再按一下,会选中整个方法。再按一下,会选中整个类。

重构类

// Ctrl+Alt+Shift+T 重构菜单

// Ctrl+f6 修改类\方法签名
https://www.jetbrains.com/help/idea/change-class-signature.html

// F6 Move 类、方法、变量移动

// Ctrl+Shift+f6 重构变量的类型

// Shift+f6 重命类、方法、变量

// Ctrl+Alt+C 提取常量
// Ctrl+Alt+V 提取变量
// Ctrl+Alt+F 提取成员变量
// Ctrl+Alt+P 提取方法入参

// Refactor | Generify 泛型自动补全
// Refactor | Invert Boolean 布尔类型取反
// Refactor | Make Static 将类、方法设置成静态
// Refactor | Find and Replace Code Duplicates

// Safe Delete 安全删除

// Ctrl+Alt+M 方法提取
// Ctrl+alt+N 方法内联(变量\方法\构造函数)
https://www.jetbrains.com/help/idea/inline.html

// Pull Members Up 将方法提升到父类
// Pull Members Down 将方法推迟到之类

调试类

调试:F7/F8/F9 分别对应 Step into,Step over,Continue。

运行:Alt+Shift+F10 运行程序,Shift+F9 启动调试,Ctrl+F2 停止。

总结

IDEA 快捷键

摘录 10 个最常用的快捷键:

Top #10切来切去:Ctrl+Tab

Top #9选你所想:Ctrl+W

Top #8代码生成:Template/Postfix +Tab

Top #7发号施令:Ctrl+Shift+A

Top #6无处藏身:Shift+Shift

Top #5自动完成:Ctrl+Shift+Enter

Top #4创造万物:Alt+Insert

Top #3智能补全:Ctrl+Shift+Space

Top #2自我修复:Alt+Enter

Top #1重构一切:Ctrl+Shift+Alt+T

参考

下载地址:
http://www.jetbrains.com/idea/download/#section=windows

插件:
https://plugins.jetbrains.com/idea

常用插件推荐

IDEA 重构官方文档:
https://www.jetbrains.com/help/idea/refactoring-source-code.html

IDEA 高级调试技巧:

http://www.mamicode.com/info-detail-1761996.html

https://en.wikipedia.org/wiki/Cryptography

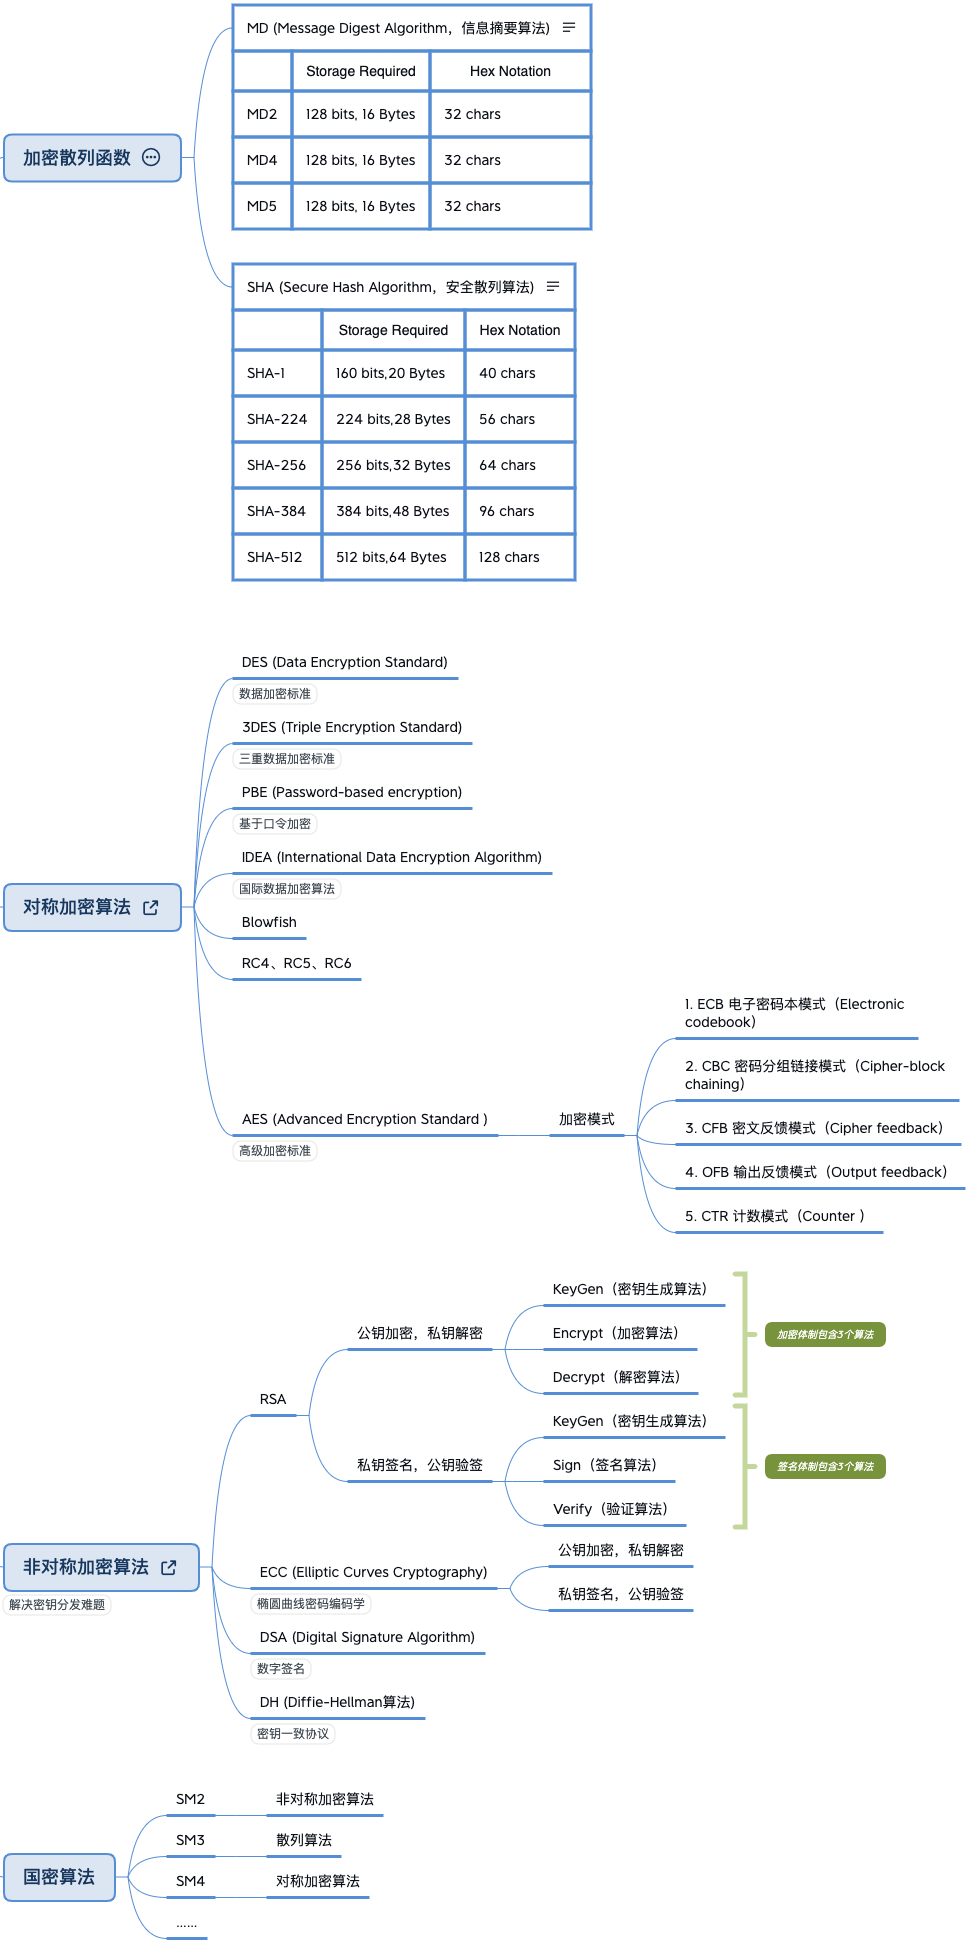
encryption_algorithm

加密散列函数

https://en.wikipedia.org/wiki/Cryptographic_hash_function

Cryptographic Hash Functions are cryptographic algorithms that are ways to generate and utilize specific keys to encrypt data for either symmetric or asymmetric encryption, and such functions may be viewed as keys themselves. They take a message of any length as input, and output a short, fixed-length hash, which can be used in (for example) a digital signature. For good hash functions, an attacker cannot find two messages that produce the same hash.

加密散列函数(Cryptographic Hash Function)又称为不可逆算法,使用单向散列函数实现。

加密散列函数一般用于生成消息摘要(Message Digest),可用于对数据进行签名和验签,以保证数据的:

  • 完整性(Integrity)
  • 真实性(Authenticity)
  • 不可抵赖性(Non-repudiation)

例如下图摘要(Digest)由 SHA-1 生成。SHA1 摘要长度为 20 Bytes (160 bit),一般用 40 位十六进制数表示(4 bit (2^4) = 1 位十六进制数,因此为 160 bit / 4 = 40 位十六进制数):

digest

两种破解方式:

Ideally, the only way to find a message that produces a given hash is to attempt a brute-force search of possible inputs to see if they produce a match, or use a rainbow table of matched hashes.

用途:

  • Verifying the integrity of messages and files

    Using a cryptographic hash and a chain of trust detects malicious changes to the file. Non-cryptographic error-detecting codes such as cyclic redundancy checks only prevent against non-malicious alterations of the file, since an intentional spoof can readily be crafted to have the colliding code value.

    • HMAC

      The MAC value protects a message’s data integrity, as well as its authenticity, by allowing verifiers (who also possess the secret key) to detect any changes to the message content.

  • Signature generation and verification

    数字签名作为维护数据信息安全的重要方法之一,可以解决伪造、抵赖、冒充和篡改等问题。其主要作用体现在以下几个方面:

    • 防冒充(身份认证)。在数字签名中,当使用私钥签名时,如果接收方或验证方用其公钥进行验证并获通过,那么可以肯定,签名人就是拥有私钥的那个人,因为私钥只有签名人拥有,其他人不可能冒充签名者。
    • 防伪造。其他人不能伪造对数据的签名,因为私钥只有签名者自己拥有,所以其他人不可能构造出正确的签名结果数据。
    • 防篡改。私钥加签后的摘要和数据一起发送给接收者,一旦信息被篡改,接收者可通过计算摘要和验证签名来判断该文件无效,从而保证了文件的完整性。
    • 防抵赖。数字签名既可以作为身份认证的依据,也可以作为签名者签名操作的证据。要防止接收者抵赖,可以在数字签名系统中要求接收者返回一个自己签名的表示收到的报文,给发送者或受信任第三方。如果接收者不返回任何消息,此次通信可终止或重新开始,签名方也没有任何损失,由此双方均不可抵赖。
    • 保密性。手写签字的文件一旦丢失,文件信息就极可能泄露。但在网络传输中,数字签名的公钥可以用于加密报文,以保证信息机密性。
  • Password verification

  • Proof-of-work

  • File or data identifier

    A message digest can also serve as a means of reliably identifying a file

    One of the main applications of a hash function is to allow the fast look-up of data in a hash table.

    • Being hash functions of a particular kind, cryptographic hash functions lend themselves well to this application too.
    • However, compared with standard hash functions, cryptographic hash functions tend to be much more expensive computationally. For this reason, they tend to be used in contexts where it is necessary for users to protect themselves against the possibility of forgery (the creation of data with the same digest as the expected data) by potentially malicious participants.

MD

Computes and checks MD2/MD4/MD5 message digest

Java 使用例子:https://www.baeldung.com/java-md5

SHA

Computes and checks SHA-1/SHA-2 message digests

Java 使用例子:https://www.baeldung.com/sha-256-hashing-java

对称加密算法

https://en.wikipedia.org/wiki/Symmetric-key_algorithm

Symmetric key encryption

3DES

Java 使用例子:https://www.baeldung.com/java-3des

AES

Java 使用例子:https://www.baeldung.com/java-secure-aes-key

Java 使用例子:https://www.baeldung.com/java-aes-encryption-decryption

非对称加密算法

https://en.wikipedia.org/wiki/Public-key_cryptography

公钥加密,私钥解密:

Public key encryption

私钥签名,公钥验签:

Private key signing

sign

RSA

Java 使用例子:https://www.baeldung.com/java-rsa

参考

科普 | 《码书:编码与解码的战争》:一场加解密的战争

图片理解数字签名和验签过程

日常工作中,经常需要关注互金及支付行业相关的政策法规及最新动向,本文整理了相关的资料,以供集中查阅,后续会持续更新:

央行支付类

编号 文件 解读 时间
261 号文 《中国人民银行关于加强支付结算管理防范电信网络新型违法犯罪有关事项的通知》 点我 2016.09.30 发布,2016.12.1 起实行
302 号文 《中国人民银行关于落实个人银行账户分类管理制度的通知》 点我 2016.11.25 晚间紧急发布
296 号文 《中国人民银行关于印发《条码支付业务规范(试行)》的通知》 点我 2017.12.25
217 号文 《关于进一步加强无证经营支付业务整治工作的通知》 点我 2017
281 号文 《关于规范支付创新业务通知》 点我 2017

互联网金融

全国性综合法律规范指引

文件 发文部门 发布时间
《关于开展 P2P 网络借贷机构合规检查工作的通知》 P2P 网贷风险专项整治工作领导小组办公室 2018.08.13
《网络借贷信息中介机构合规检查问题清单》 P2P 网贷风险专项整治工作领导小组办公室 2018.08.13
《互联网金融个体网络借贷电子合同安全规范》 中国互联网金融协会 2018.04.23
《互联网金融逾期债务催收自律公约(试行)》 中国互联网金融协会 2018.03.28
《关于做好 P2P 网络借贷风险专项整治改验收工作的通知》 P2P 网贷风险专项整治工作领导小组办公室 2017.12.13
《小额贷款公司网络业务风险专项整治实施方案》 P2P 网贷风险专项整治工作领导小组办公室 2017.12.08
《互联网金融个体络借贷资存管业务规范》 中国互联网金融协会 2017.12.07
《关于规范整顿 “现金贷 ”业务的通知》 P2P 网贷风险专项整治工作领导小组办公室 2017.12.01
《互联网金融个体网络借贷 借贷合同要素》 中国互联网金融协会 2017.09.21

地方性法律法规

广东省

文件 发布时间
广州市网络借贷信息中介机构业务退出指引(试行) 2018.07.30
广州互联网金融协会发布《关于下架计划类理财产品及打击逃废债行为的通知》 2018.07.27
深圳市关于积极稳妥应对当前 P2P 行业流动性风险及做好退出工作的通知 2018.07.13
广州市网络借贷信息中介机构整改验收工作方案 2018.03.21
广东省《关于贯彻落实网络借贷信息中介机构业务活动管理暂行办法的通知》 2018.02.11
广东省《网络借贷中介机构现场检查细则( 征求意见稿)》 2017.12.26
深圳市网络借贷信息中介机构业务退出指引 2017.09.29
深圳市网络借贷信息中介机构备案登记管理办法(征求意见稿) 2017.07.03

北京市

文件 发布时间
北京市网络借贷信息中介机构业务退出指引(草案) 2018.07.20
北京市加强业务合规性的风险提示函 2018.07.19
北京互金协会:关于防范化解 北京互金协会:关于防范化解 “多头借贷 ”、“高收益转贷 ”、“羊毛党”风险的提示函 2018.04.04

上海市

文件 发布时间
上海市网络借贷信息中介机构业务退出指导意见(试行) 2018.08.03
上海市规范整顿“现金贷”业务实施方案的通知 2017.01.13

附录

文件 发布时间
江苏省网络借贷信息中介机构备案登记管理暂行办法(征求意见稿) 2017.12.29
浙江省网络借贷信息中介机构备案登记管理实施细则(试行)(征求意见稿) 2017.12.18

电子合同

在合规备案的过程中,我主要负责了电子合同的工作。这里整理出一些相关的背景知识:

发展历程

电子签名的发展历程

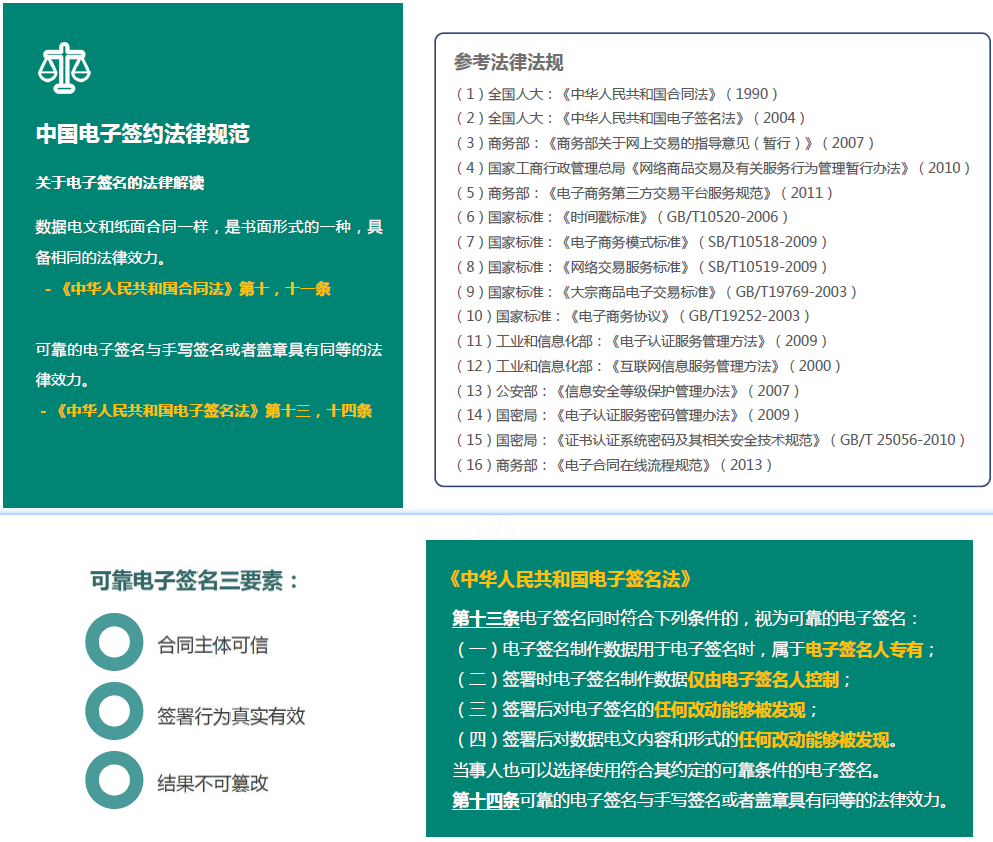
中国电子签约法律法规

中国电子签约法律法规

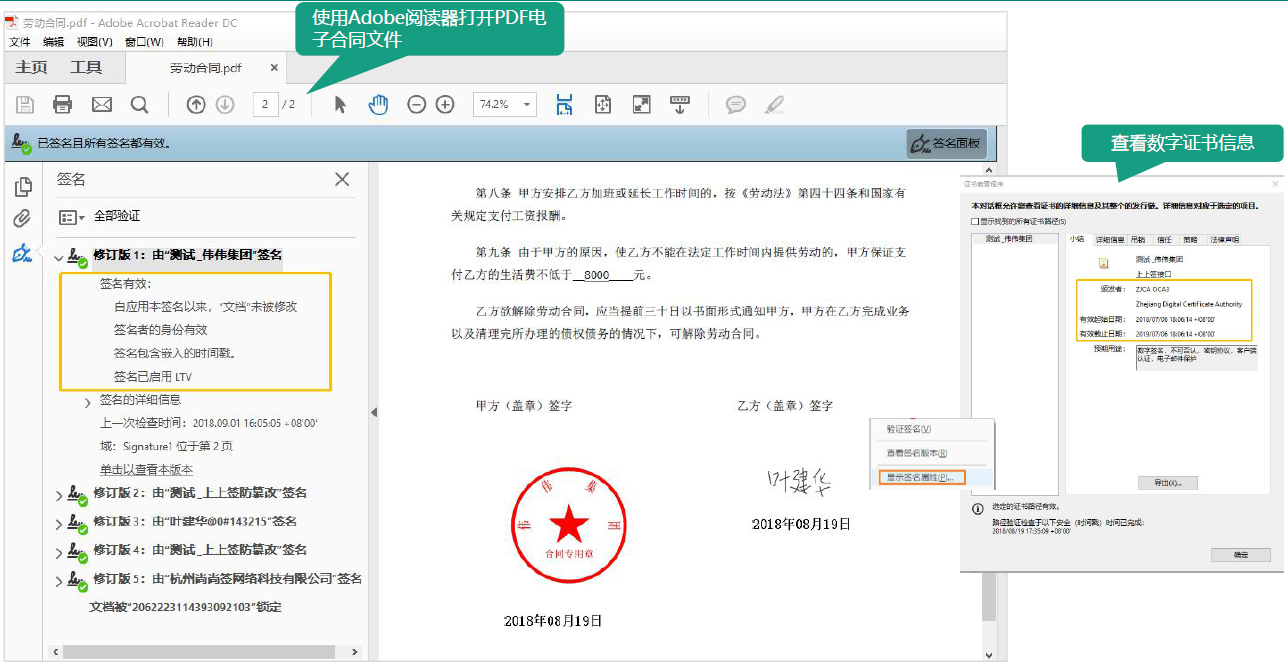
2018年4月,中国互联网金融协会发布《互联网金融个体网络借贷电子合同安全规范》,从内容上看,主要分为电子签名合法性要求、电子合同订立、电子合同存储和司法举证要求四个部分,对互联网金融领域中个体网络借贷合同的电子签名的合法性,及电子合同订立、存储、举证,做出了进一步详细的规定。

电子合同样式

电子合同样式

并发编程时,集合操作必须小心谨慎。Java SE 提供了两种并发编程方法:

  • 方案一:为集合通用实现添加线程同步功能。Collections 工具类提供了称为同步包装器(synchronization wrappers)的静态工厂方法可用于向许多非线程同步的集合添加同步行为。
  • 方案二:使用并发集合。Java SE 提供了各种并发友好的集合接口和实现类。这些接口和类性能优于同步包装器(synchronization wrappers),提供了并发编程中经常需要的各种功能。

线程同步包装器

Collections 工具类提供如下静态工厂方法:

1
2
3
4
5
6
7
8
synchronizedCollection
synchronizedSet
synchronizedSortedSet
synchronizedNavigableSet
synchronizedList
synchronizedMap
synchronizedSortedMap
synchronizedNavigableMap

synchronizedCollection 静态方法为例,源码实现如下:

1
2
3
4
5
6
7
8
9
10
11
12
13
14
15
16
17
18
19
20
21
22
23
24
25
26
27
28
29
30
31
32
33
34
35
36
/**
* Returns a synchronized (thread-safe) collection backed by the specified
* collection. In order to guarantee serial access, it is critical that
* <strong>all</strong> access to the backing collection is accomplished
* through the returned collection.<p>
*
* It is imperative that the user manually synchronize on the returned
* collection when traversing it via {@link Iterator}, {@link Spliterator}
* or {@link Stream}:
* <pre>
* Collection c = Collections.synchronizedCollection(myCollection);
* ...
* synchronized (c) {
* Iterator i = c.iterator(); // Must be in the synchronized block
* while (i.hasNext())
* foo(i.next());
* }
* </pre>
* Failure to follow this advice may result in non-deterministic behavior.
*
* <p>The returned collection does <i>not</i> pass the {@code hashCode}
* and {@code equals} operations through to the backing collection, but
* relies on {@code Object}'s equals and hashCode methods. This is
* necessary to preserve the contracts of these operations in the case
* that the backing collection is a set or a list.<p>
*
* The returned collection will be serializable if the specified collection
* is serializable.
*
* @param <T> the class of the objects in the collection
* @param c the collection to be "wrapped" in a synchronized collection.
* @return a synchronized view of the specified collection.
*/
public static <T> Collection<T> synchronizedCollection(Collection<T> c) {
return new SynchronizedCollection<>(c);
}

实现就是一行代码,返回一个静态内部类 SynchronizedCollection

1
2
3
4
5
6
7
8
9
10
11
12
13
14
15
16
17
18
19
20
21
22
23
24
25
26
27
28
29
30
31
32
33
34
35
36
37
38
39
40
41
42
43
44
45
46
47
48
49
50
51
52
53
54
55
56
57
58
59
60
61
62
63
64
65
66
67
68
69
70
71
72
73
74
75
76
77
78
79
80
81
82
83
84
85
86
static class SynchronizedCollection<E> implements Collection<E>, Serializable {
private static final long serialVersionUID = 3053995032091335093L;

final Collection<E> c; // Backing Collection
final Object mutex; // Object on which to synchronize

SynchronizedCollection(Collection<E> c) {
this.c = Objects.requireNonNull(c);
mutex = this;
}

SynchronizedCollection(Collection<E> c, Object mutex) {
this.c = Objects.requireNonNull(c);
this.mutex = Objects.requireNonNull(mutex);
}

public int size() {
synchronized (mutex) {return c.size();}
}
public boolean isEmpty() {
synchronized (mutex) {return c.isEmpty();}
}
public boolean contains(Object o) {
synchronized (mutex) {return c.contains(o);}
}
public Object[] toArray() {
synchronized (mutex) {return c.toArray();}
}
public <T> T[] toArray(T[] a) {
synchronized (mutex) {return c.toArray(a);}
}

public Iterator<E> iterator() {
return c.iterator(); // Must be manually synched by user!
}

public boolean add(E e) {
synchronized (mutex) {return c.add(e);}
}
public boolean remove(Object o) {
synchronized (mutex) {return c.remove(o);}
}

public boolean containsAll(Collection<?> coll) {
synchronized (mutex) {return c.containsAll(coll);}
}
public boolean addAll(Collection<? extends E> coll) {
synchronized (mutex) {return c.addAll(coll);}
}
public boolean removeAll(Collection<?> coll) {
synchronized (mutex) {return c.removeAll(coll);}
}
public boolean retainAll(Collection<?> coll) {
synchronized (mutex) {return c.retainAll(coll);}
}
public void clear() {
synchronized (mutex) {c.clear();}
}
public String toString() {
synchronized (mutex) {return c.toString();}
}
// Override default methods in Collection
@Override
public void forEach(Consumer<? super E> consumer) {
synchronized (mutex) {c.forEach(consumer);}
}
@Override
public boolean removeIf(Predicate<? super E> filter) {
synchronized (mutex) {return c.removeIf(filter);}
}
@Override
public Spliterator<E> spliterator() {
return c.spliterator(); // Must be manually synched by user!
}
@Override
public Stream<E> stream() {
return c.stream(); // Must be manually synched by user!
}
@Override
public Stream<E> parallelStream() {
return c.parallelStream(); // Must be manually synched by user!
}
private void writeObject(ObjectOutputStream s) throws IOException {
synchronized (mutex) {s.defaultWriteObject();}
}
}

从源码可见,其实就是返回一个包装类,内部实现使用了 synchronized 关键字加 mutex 对象作为互斥锁,对被包装集合的所有增删改查方法加锁,相当暴力。

并发集合

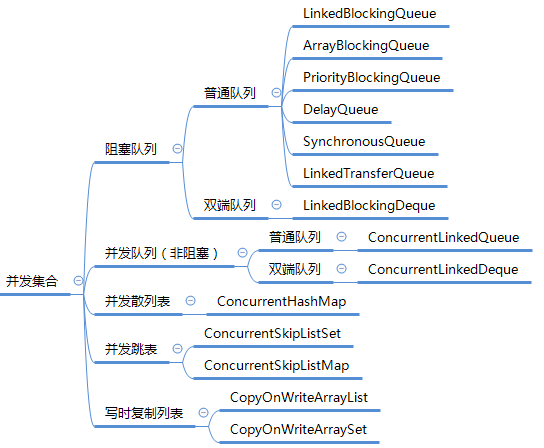
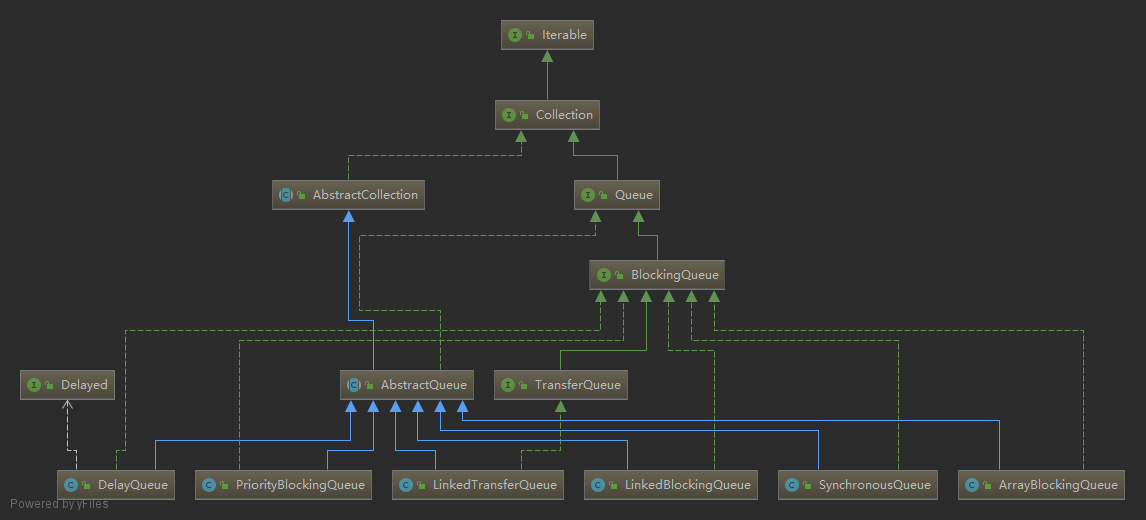
并发集合作为 java.util.concurrent 包的一部分,提供的并发集合类如下:

concurrent_collections

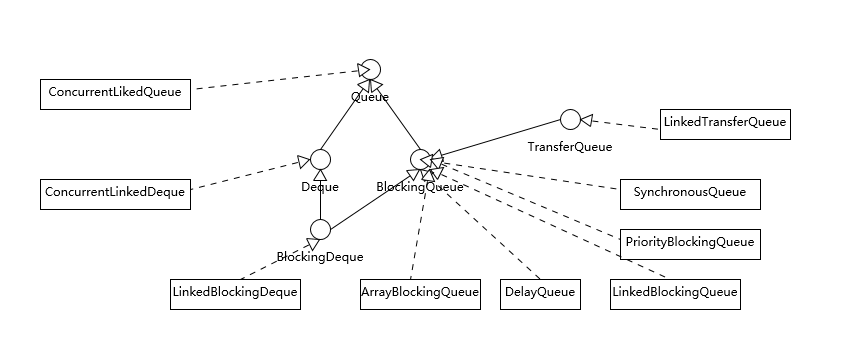
阻塞队列

Queue_implementations

参考:《Java 集合框架系列(六)线性表之 Queue 总结

并发队列(非阻塞实现)

ConcurrentLinkedQueue

ConcurrentLinkedDeque

并发散列表

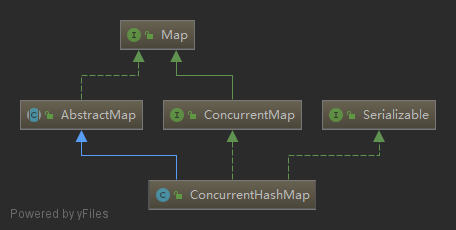
ConcurrentMap

  • ConcurrentHashMap

ConcurrentHashMap

并发跳表

ConcurrentSkipListSet

ConcurrentNavigableMap

  • ConcurrentSkipListMap

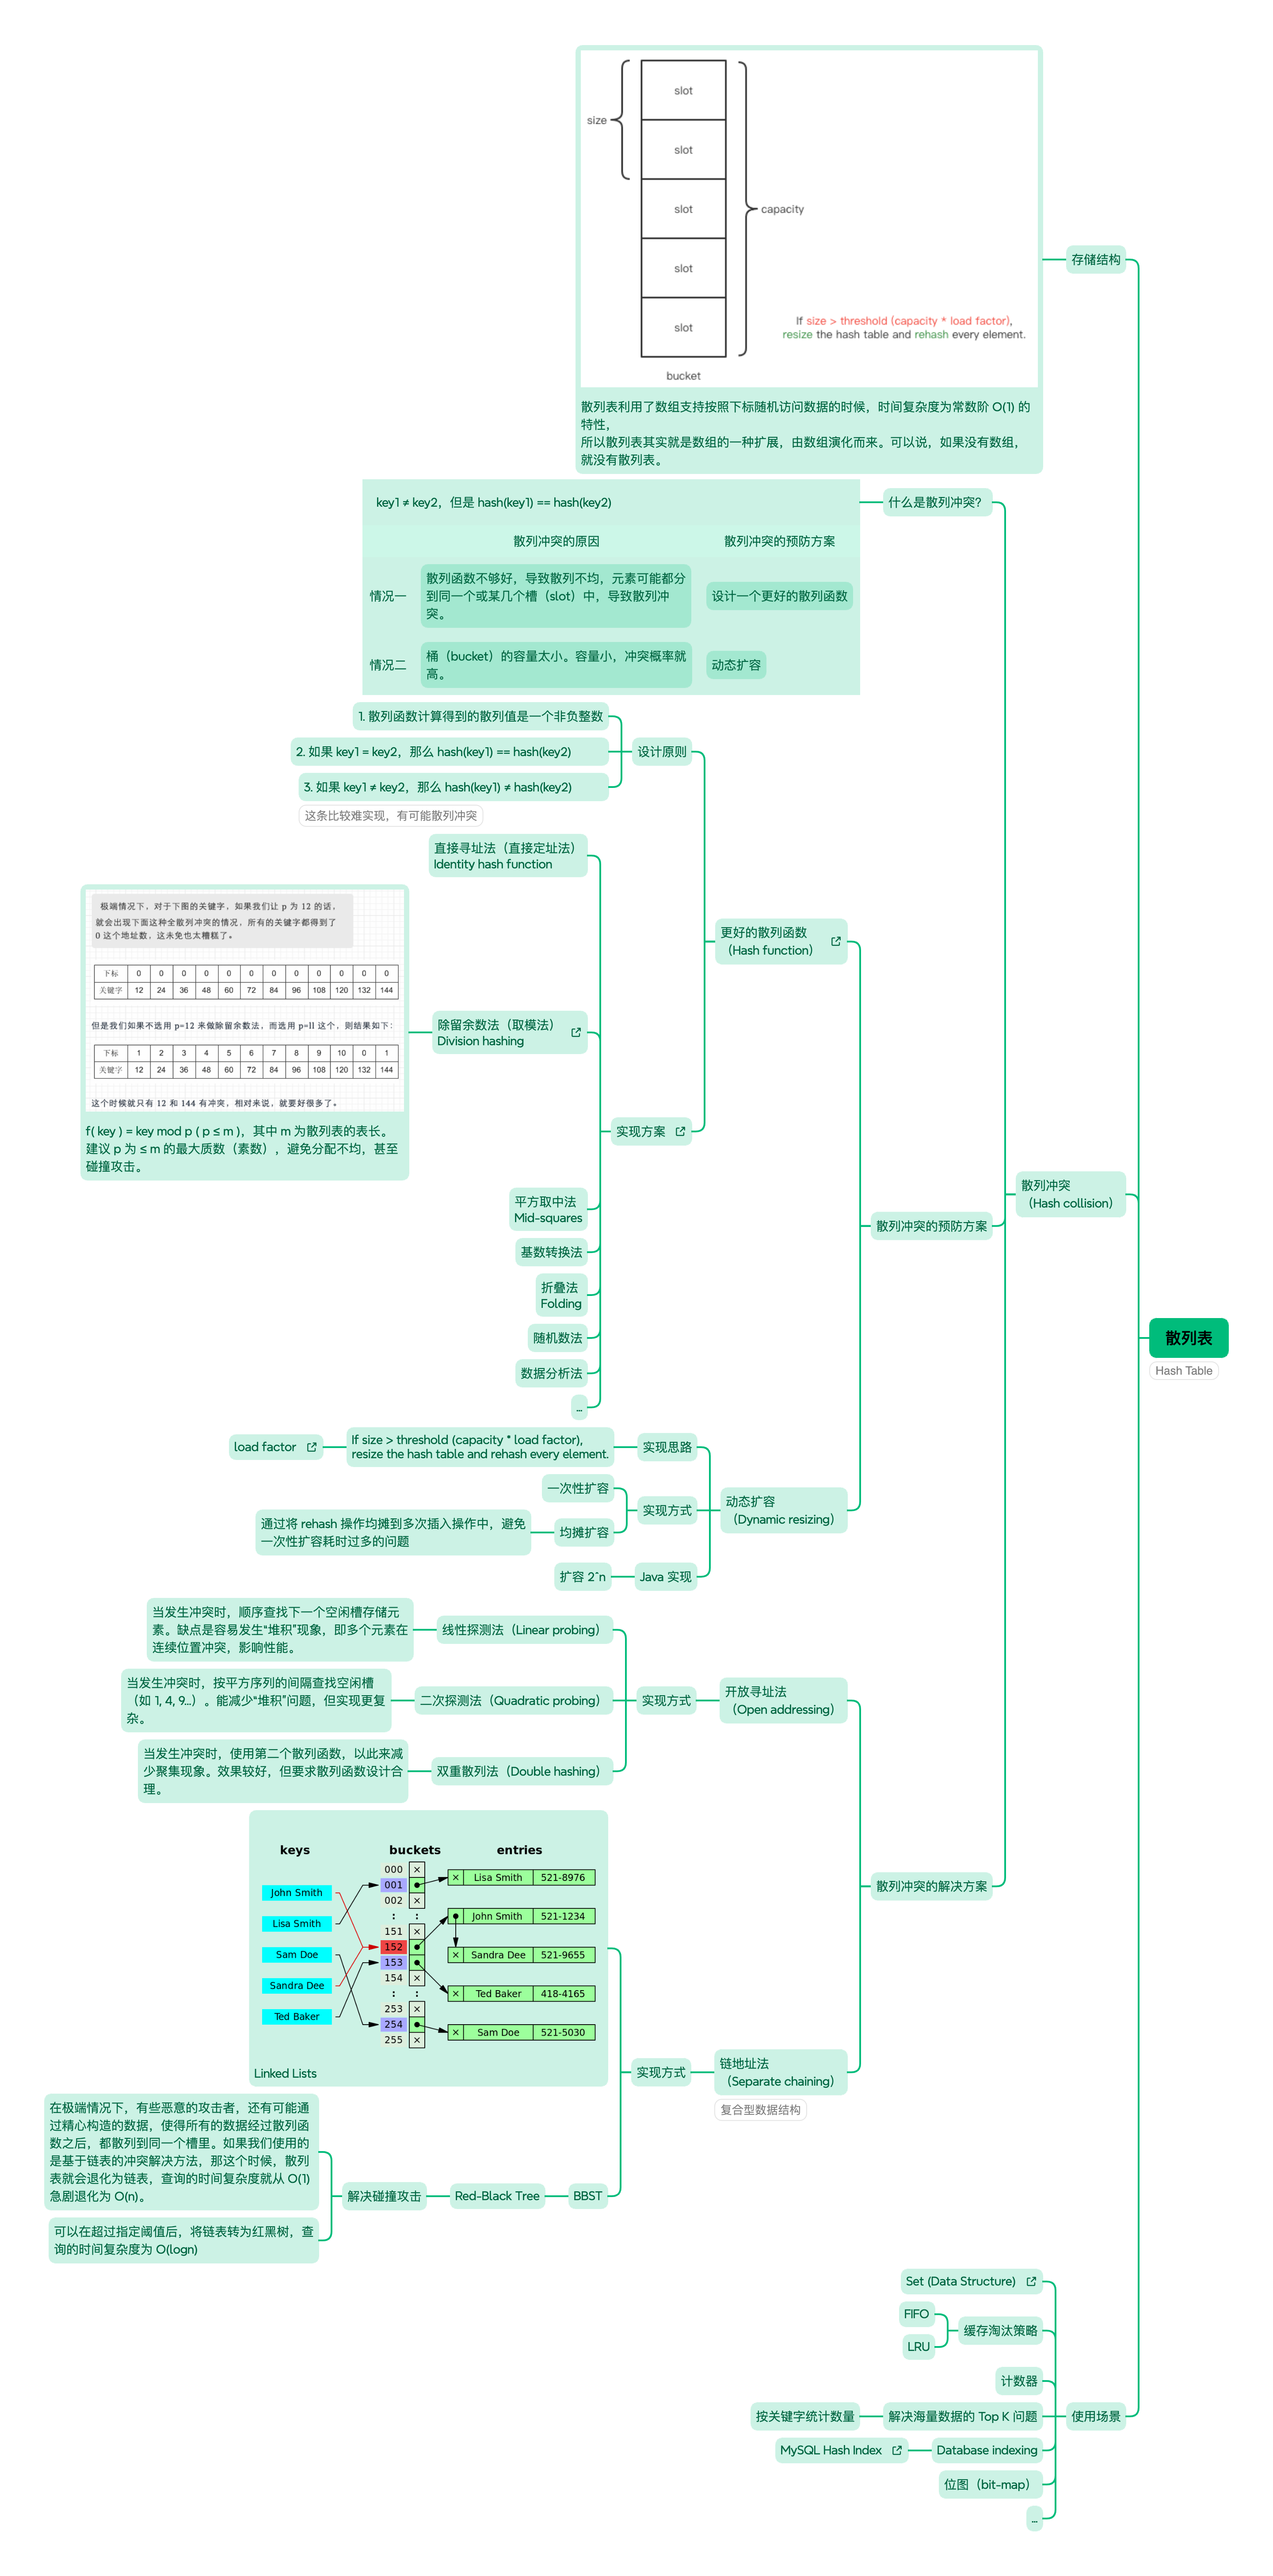
散列表

散列表的要点总结如下:

  • 数据元素的 key 和存储位置之间建立的对应关系 H 称为散列函数(Hash function)
  • key 通过散列函数获取存储位置的这种存储方式构造的存储结构称为散列表(Hash table)
  • 这一映射过程称为散列(Hash)
  • 如果选定了某个散列函数 H 及相应的散列表 L,则对每个数据元素 X,函数值 H(X.key) 就是 X 在散列表 L 中的存储位置,这个存储位置也称为散列地址(Hash code)
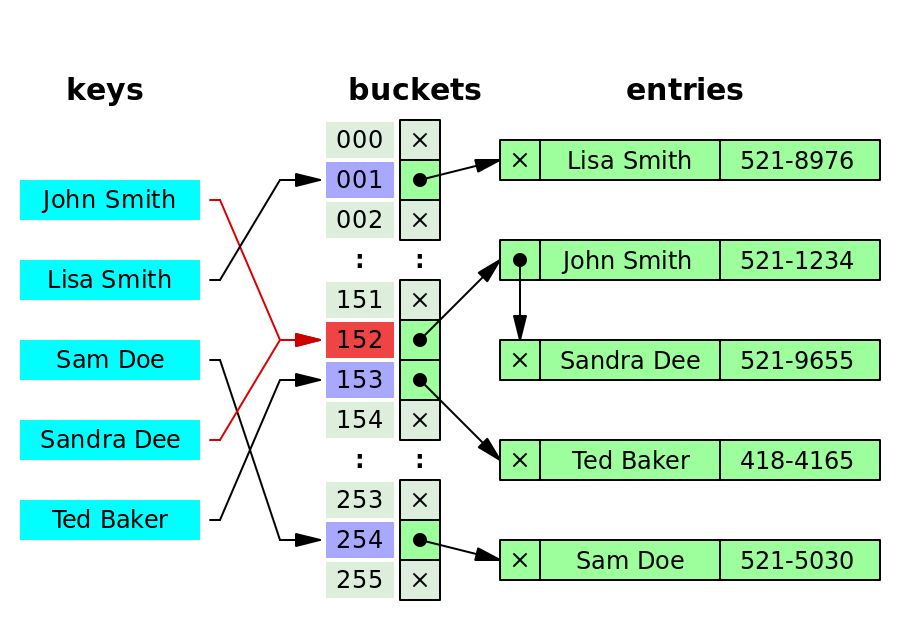
  • 理想情况下,应用的散列函数使每个 key 与散列地址是一一对应的,但在实际应用中,这种情况很少出现。设有散列函数 Hkey1key2,若 key1 ≠ key2,但是 H(key1) = H(key2),则称这种现象为散列沖突(Hash collision),且称 key1key2是相对于 H同义词
  • 因为,散列函数是从 key 集合到地址集合的映像,所以在一般情况下,冲突只能尽可能减少而不能完全避免。因此,采用散列技术时需要考虑两个问题:
    1. 如何构造(选择)“均匀的” 散列函数?
    2. 用什么方法 “有效地” 解決散列冲突?

HashTable Keynote

HashMap

节点设计

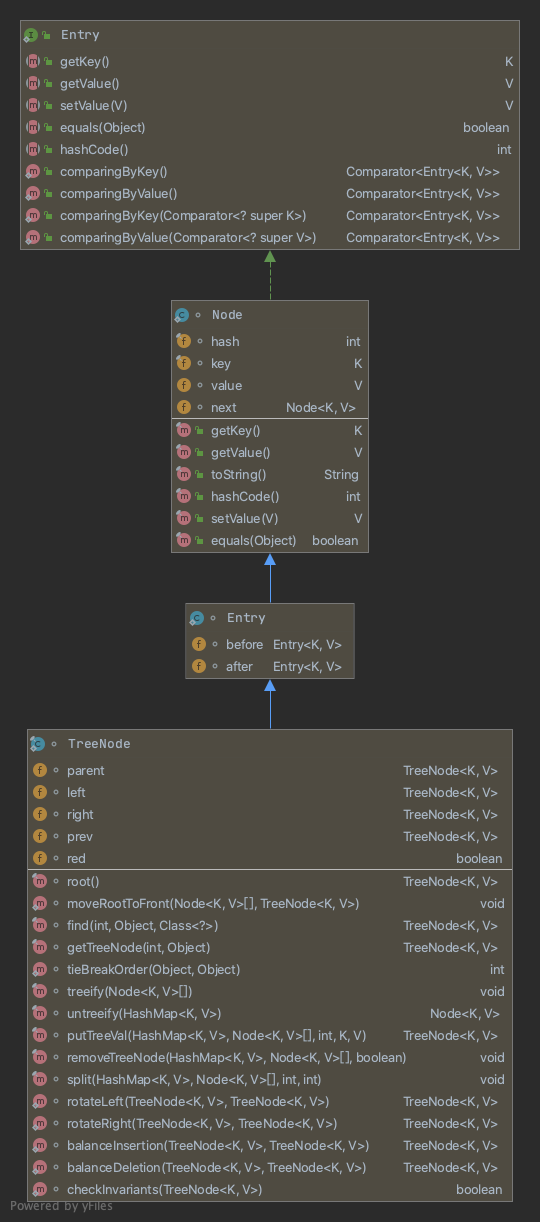
HashMap 的节点设计如下图:

Entry

接口和类 描述
java.util.Map#Entry Entry 接口定义了 getKeygetValuesetValueequalshashCode 五个待实现方法。
java.util.HashMap#Node 单链表节点实现,用于解决散列冲突
java.util.LinkedHashMap#Entry 单链表节点实现,并在此基础上增加了前驱节点 before、后继节点 after 以实现节点的顺序遍历
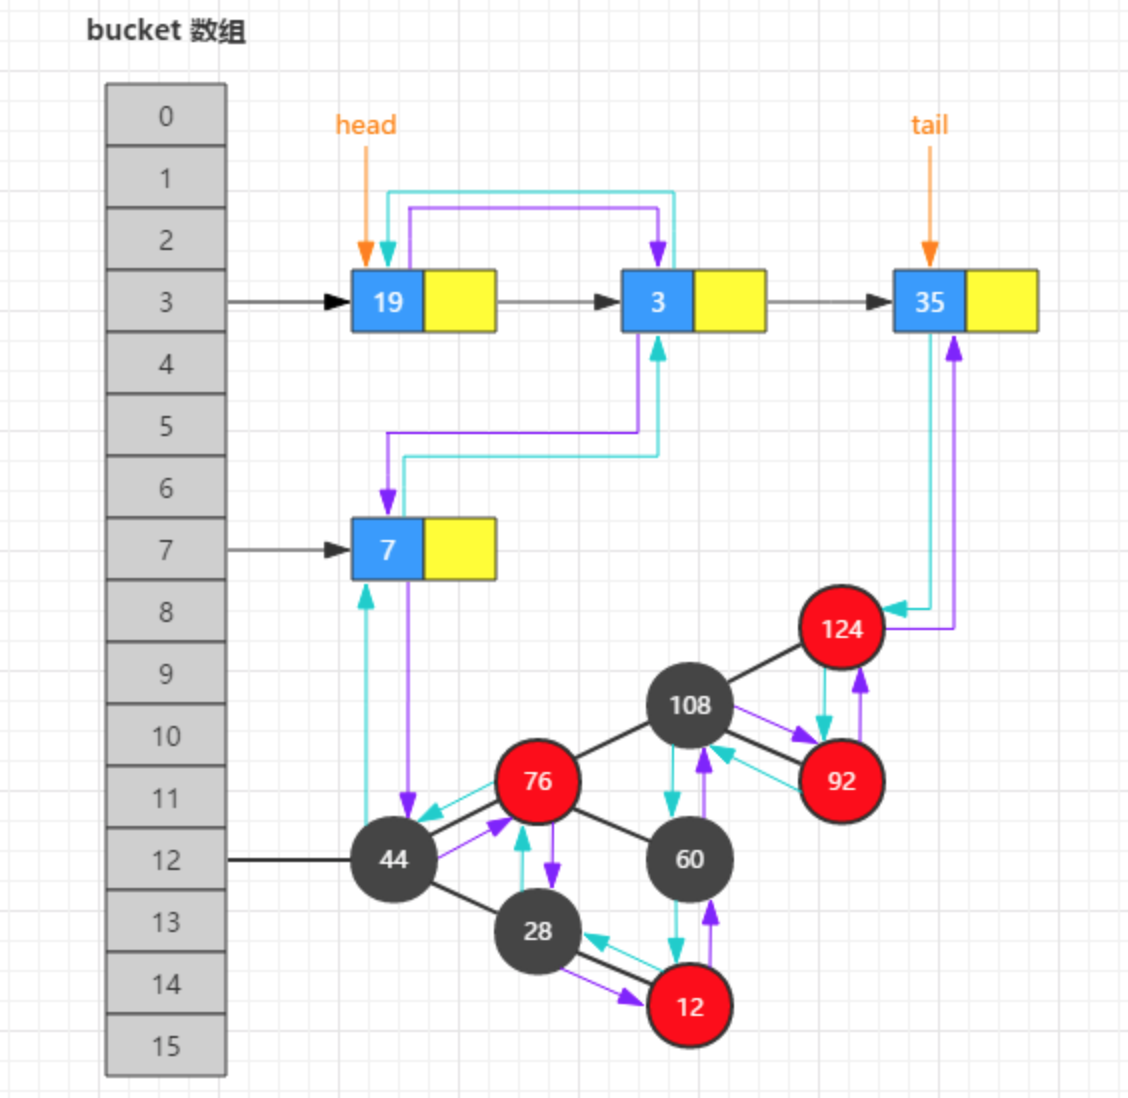
java.util.HashMap#TreeNode 红黑树节点实现,用于解决散列冲突。同时为了避免链表过长及散列表碰撞攻击,如果节点数超过 8 个,则进行树化 treeifyBin,避免大量散列冲突导致散列表退化成单链表,导致查询时间复杂度从 O(1) 退化成 O(n)。

单链表节点实现

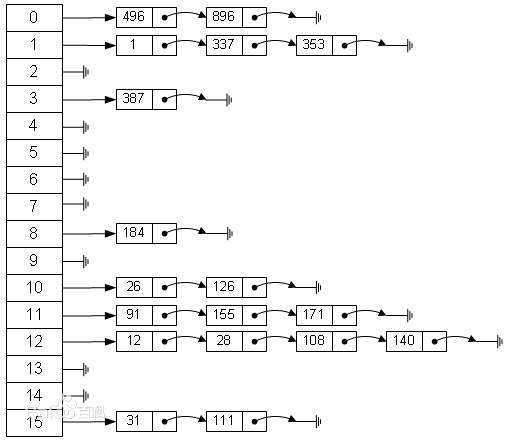
单链表节点的散列表结构,简化如下图。其中

  • 散列函数(Hash function)为 index=hash(key) % 16
  • 散列冲突(Hash collision)的解决方案为:链地址法(separate chaining

HashTable Collision resolution

实际存储结构如下图,bucket 的 slot 指向的是一个个完整的 entry,如果有多个 entry(如 152),则逐一比较 entry 的 key 与查询中的 key 是否相同,相同则返回该 entry 的 value

HashTable Collision resolution

源码如下:

1
2
3
4
5
6
7
8
9
10
11
12
13
14
15
16
17
18
19
20
21
22
23
24
25
26
27
28
29
30
31
32
33
34
35
36
37
38
39
40
41
42
/**
* Basic hash bin node, used for most entries. (See below for
* TreeNode subclass, and in LinkedHashMap for its Entry subclass.)
*/
static class Node<K,V> implements Map.Entry<K,V> {
final int hash;
final K key;
V value;
Node<K,V> next;

Node(int hash, K key, V value, Node<K,V> next) {
this.hash = hash;
this.key = key;
this.value = value;
this.next = next;
}

public final K getKey() { return key; }
public final V getValue() { return value; }
public final V setValue(V newValue) {
V oldValue = value;
value = newValue;
return oldValue;
}

public final boolean equals(Object o) {
if (o == this)
return true;
if (o instanceof Map.Entry) {
Map.Entry<?,?> e = (Map.Entry<?,?>)o;
if (Objects.equals(key, e.getKey()) && Objects.equals(value, e.getValue()))
return true;
}
return false;
}

public final int hashCode() {
return Objects.hashCode(key) ^ Objects.hashCode(value);
}

public final String toString() { return key + "=" + value; }
}

红黑树节点实现

源码如下:

1
2
3
4
5
6
7
8
9
10
11
12
13
14
15
16
17
18
19
/**
* Entry for Tree bins. Extends LinkedHashMap.Entry (which in turn
* extends Node) so can be used as extension of either regular or
* linked node.
*/
static final class TreeNode<K,V> extends LinkedHashMap.Entry<K,V> {
TreeNode<K,V> parent; // red-black tree links
TreeNode<K,V> left;
TreeNode<K,V> right;
TreeNode<K,V> prev; // needed to unlink next upon deletion
boolean red;

TreeNode(int hash, K key, V val, Node<K,V> next) {
super(hash, key, val, next);
}

......

}

常量及字段

HashMap_fields

常量值

1
2
3
4
5
6
7
8
9
10
11
12
13
14
15
16
17
18
19
20
21
22
23
24
25
26
27
28
29
30
31
32
33
34
35
36
37
38
39
40
41
42
43
44
45
46
47
48
49
50
51
/**
* The default initial capacity - MUST be a power of two.
* 数组默认初始容量为 16,必须是 2 的 n 次幂
*/
static final int DEFAULT_INITIAL_CAPACITY = 1 << 4; // aka 16

/**
* The maximum capacity, used if a higher value is implicitly specified
* by either of the constructors with arguments.
* MUST be a power of two <= 1<<30.
*
* 数组最大容量,,必须是 2 的 n 次幂,且小于等于 2^30
*/
static final int MAXIMUM_CAPACITY = 1 << 30;

/**
* The load factor used when none specified in constructor.
* 默认装载因子
*/
static final float DEFAULT_LOAD_FACTOR = 0.75f;

/**
* The bin count threshold for using a tree rather than list for a
* bin. Bins are converted to trees when adding an element to a
* bin with at least this many nodes. The value must be greater
* than 2 and should be at least 8 to mesh with assumptions in
* tree removal about conversion back to plain bins upon
* shrinkage.
*
* 桶树化时的阈值
*/
static final int TREEIFY_THRESHOLD = 8;

/**
* The bin count threshold for untreeifying a (split) bin during a
* resize operation. Should be less than TREEIFY_THRESHOLD, and at
* most 6 to mesh with shrinkage detection under removal.
*
* 桶非树化时的阈值
*/
static final int UNTREEIFY_THRESHOLD = 6;

/**
* The smallest table capacity for which bins may be treeified.
* (Otherwise the table is resized if too many nodes in a bin.)
* Should be at least 4 * TREEIFY_THRESHOLD to avoid conflicts
* between resizing and treeification thresholds.
*
* 树化时数组最小容量
*/
static final int MIN_TREEIFY_CAPACITY = 64;

字段

1
2
3
4
5
6
7
8
9
10
11
12
13
14
15
16
17
18
19
20
21
22
23
24
25
26
27
28
29
30
31
32
33
34
35
36
37
38
39
40
41
42
43
44
45
46
47
/**
* The table, initialized on first use, and resized as
* necessary. When allocated, length is always a power of two.
* (We also tolerate length zero in some operations to allow
* bootstrapping mechanics that are currently not needed.)
*
* 底层数组
*/
transient Node<K,V>[] table;

/**
* Holds cached entrySet(). Note that AbstractMap fields are used
* for keySet() and values().
*/
transient Set<Map.Entry<K,V>> entrySet;

/**
* The number of key-value mappings contained in this map.
*
* 实际存储的键值对数量
*/
transient int size;

/**
* The number of times this HashMap has been structurally modified
* Structural modifications are those that change the number of mappings in
* the HashMap or otherwise modify its internal structure (e.g.,
* rehash). This field is used to make iterators on Collection-views of
* the HashMap fail-fast. (See ConcurrentModificationException).
*
* 修改次数
*/
transient int modCount;

/**
* The next size value at which to resize (capacity * load factor).
*
* resize 操作的阈值(capacity * load factor)
*/
int threshold;

/**
* The load factor for the hash table.
*
* 装载因子
*/
final float loadFactor;

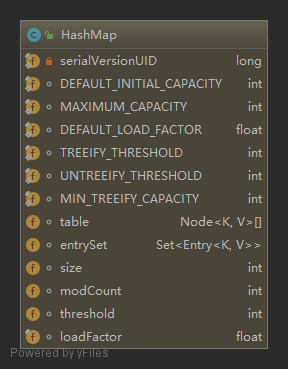
关键的几个字段:

  • table 散列表的底层数据结构为数组,其容量用 capacity 表示。此外,Java 通过链表法解决散列冲突的问题,因此数组类型为 Node<K,V>[] 节点数组。
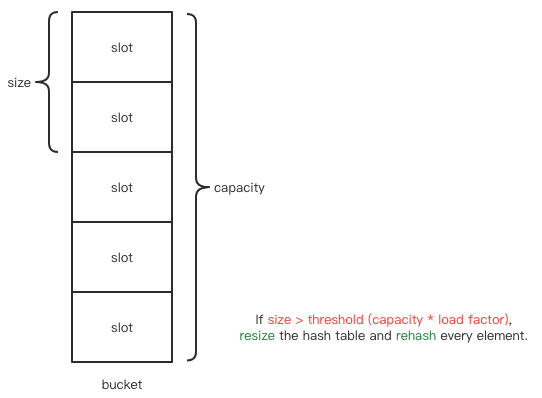
  • loadFactor 散列表的装载因子。当散列表中空闲位置不多的时候,散列冲突的概率就会大大提高。为了尽可能保证散列表的操作效率,一般情况下,会尽可能保证散列表中有一定比例的空闲槽位。我们用装载因子来表示散列表满的程度,默认值是 0.75f,也就是说默认情况下,当散列表中元素个数达到了容量的 3/4 时就会进行扩容。
  • threshold 散列表的扩容阈值,计算公式:threshold = capacity * load factor,即默认配置下的扩容阈值为:12=16*0.75
  • size 散列表实际存储的键值对数量,如果 size > threshold 则对 hash table 进行双倍扩容(resize),并对原数组每个元素进行重新散列(rehash)。
  • modCount 修改次数。

HashTable Dynamic resizing

构造方法

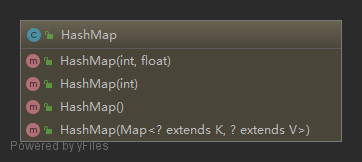
构造方法的参数主要用于指定数组的初始容量 initialCapacity、装载因子 loadFactor,并计算扩容阈值 threshold

HashMap_constructors

1
2
3
4
5
6
7
8
9
10
11
12
13
14
15
16
17
18
19
20
21
22
23
24
25
26
27
28
29
30
31
32
33
34
35
36
37
38
39
40
41
42
43
44
45
46
47
48
49
50
51
52
53
54
55
/**
* Constructs an empty <tt>HashMap</tt> with the specified initial
* capacity and load factor.
*
* @param initialCapacity the initial capacity
* @param loadFactor the load factor
* @throws IllegalArgumentException if the initial capacity is negative
* or the load factor is nonpositive
*/
public HashMap(int initialCapacity, float loadFactor) {
// 参数校验及默认值设置
if (initialCapacity < 0)
throw new IllegalArgumentException("Illegal initial capacity: " + initialCapacity);
if (initialCapacity > MAXIMUM_CAPACITY)
initialCapacity = MAXIMUM_CAPACITY;
if (loadFactor <= 0 || Float.isNaN(loadFactor))
throw new IllegalArgumentException("Illegal load factor: " + loadFactor);

// 装载因子及扩容阈值赋值
this.loadFactor = loadFactor;
this.threshold = tableSizeFor(initialCapacity);
}

/**
* Constructs an empty <tt>HashMap</tt> with the specified initial
* capacity and the default load factor (0.75).
*
* @param initialCapacity the initial capacity.
* @throws IllegalArgumentException if the initial capacity is negative.
*/
public HashMap(int initialCapacity) {
this(initialCapacity, DEFAULT_LOAD_FACTOR);
}

/**
* Constructs an empty <tt>HashMap</tt> with the default initial capacity
* (16) and the default load factor (0.75).
*/
public HashMap() {
this.loadFactor = DEFAULT_LOAD_FACTOR; // all other fields defaulted
}

/**
* Constructs a new <tt>HashMap</tt> with the same mappings as the
* specified <tt>Map</tt>. The <tt>HashMap</tt> is created with
* default load factor (0.75) and an initial capacity sufficient to
* hold the mappings in the specified <tt>Map</tt>.
*
* @param m the map whose mappings are to be placed in this map
* @throws NullPointerException if the specified map is null
*/
public HashMap(Map<? extends K, ? extends V> m) {
this.loadFactor = DEFAULT_LOAD_FACTOR;
putMapEntries(m, false);
}

初始容量

在集合初始化时,建议指定 initialCapacity 初始容量:

map_constructor

如果不想手工计算初始容量 initialCapacity,可以使用 Guava 的静态工厂方法 Maps.newHashMapWithExpectedSize,源码如下:

1
2
3
4
5
6
7
8
9
10
11
12
13
14
15
16
17
18
19
20
21
22
23
24
25
26
27
28
29
30
31
32
33
34
35
/**
* Creates a {@code HashMap} instance, with a high enough "initial capacity"
* that it <i>should</i> hold {@code expectedSize} elements without growth.
* This behavior cannot be broadly guaranteed, but it is observed to be true
* for OpenJDK 1.7. It also can't be guaranteed that the method isn't
* inadvertently <i>oversizing</i> the returned map.
*
* @param expectedSize the number of entries you expect to add to the
* returned map
* @return a new, empty {@code HashMap} with enough capacity to hold {@code
* expectedSize} entries without resizing
* @throws IllegalArgumentException if {@code expectedSize} is negative
*/
public static <K, V> HashMap<K, V> newHashMapWithExpectedSize(int expectedSize) {
return new HashMap<K, V>(capacity(expectedSize));
}

/**
* Returns a capacity that is sufficient to keep the map from being resized as
* long as it grows no larger than expectedSize and the load factor is >= its
* default (0.75).
*/
static int capacity(int expectedSize) {
if (expectedSize < 3) {
checkNonnegative(expectedSize, "expectedSize");
return expectedSize + 1;
}
if (expectedSize < Ints.MAX_POWER_OF_TWO) {
// This is the calculation used in JDK8 to resize when a putAll
// happens; it seems to be the most conservative calculation we
// can make. 0.75 is the default load factor.
return (int) ((float) expectedSize / 0.75F + 1.0F);
}
return Integer.MAX_VALUE; // any large value
}

不管是通过手工指定还是通过 Guava 的静态工厂方法,计算出来的初始容量都只是一个参考值。因为在随后 resize 会重新计算。

扩容阈值

第一个构造方法中调用了 tableSizeFor 方法,用于产生一个大于等于 initialCapacity 的最小的 2 的整数次幂。做法是通过右移操作让每一位都变为 1,最后 +1 变成 2 的 n 次幂:

1
2
3
4
5
6
7
8
9
10
11
12
/**
* Returns a power of two size for the given target capacity.
*/
static final int tableSizeFor(int cap) {
int n = cap - 1;
n |= n >>> 1;
n |= n >>> 2;
n |= n >>> 4;
n |= n >>> 8;
n |= n >>> 16;
return (n < 0) ? 1 : (n >= MAXIMUM_CAPACITY) ? MAXIMUM_CAPACITY : n + 1;
}

关键私有方法

hash

HashMap 源码中,散列函数是分三步走的:

hashcode

第一步,获取 keyhashcodehashCode 需要遵循以下规则:

equals_and_hashcode

扰动函数

第二步,hash 值的计算,源码如下:

1
2
3
4
5
6
7
8
9
10
11
12
13
14
15
16
17
18
19
20
/**
* Computes key.hashCode() and spreads (XORs) higher bits of hash
* to lower. Because the table uses power-of-two masking, sets of
* hashes that vary only in bits above the current mask will
* always collide. (Among known examples are sets of Float keys
* holding consecutive whole numbers in small tables.) So we
* apply a transform that spreads the impact of higher bits
* downward. There is a tradeoff between speed, utility, and
* quality of bit-spreading. Because many common sets of hashes
* are already reasonably distributed (so don't benefit from
* spreading), and because we use trees to handle large sets of
* collisions in bins, we just XOR some shifted bits in the
* cheapest possible way to reduce systematic lossage, as well as
* to incorporate impact of the highest bits that would otherwise
* never be used in index calculations because of table bounds.
*/
static final int hash(Object key) {
int h;
return (key == null) ? 0 : (h = key.hashCode()) ^ (h >>> 16);
}

该函数也叫扰动函数:先获取 32 位长度的 hashCode,再进行高 16 位与低 16 位异或,在低位加入高位特征,目的是减少碰撞冲突的概率。

参考:《HashMap 扰动函数解读

除留余数法

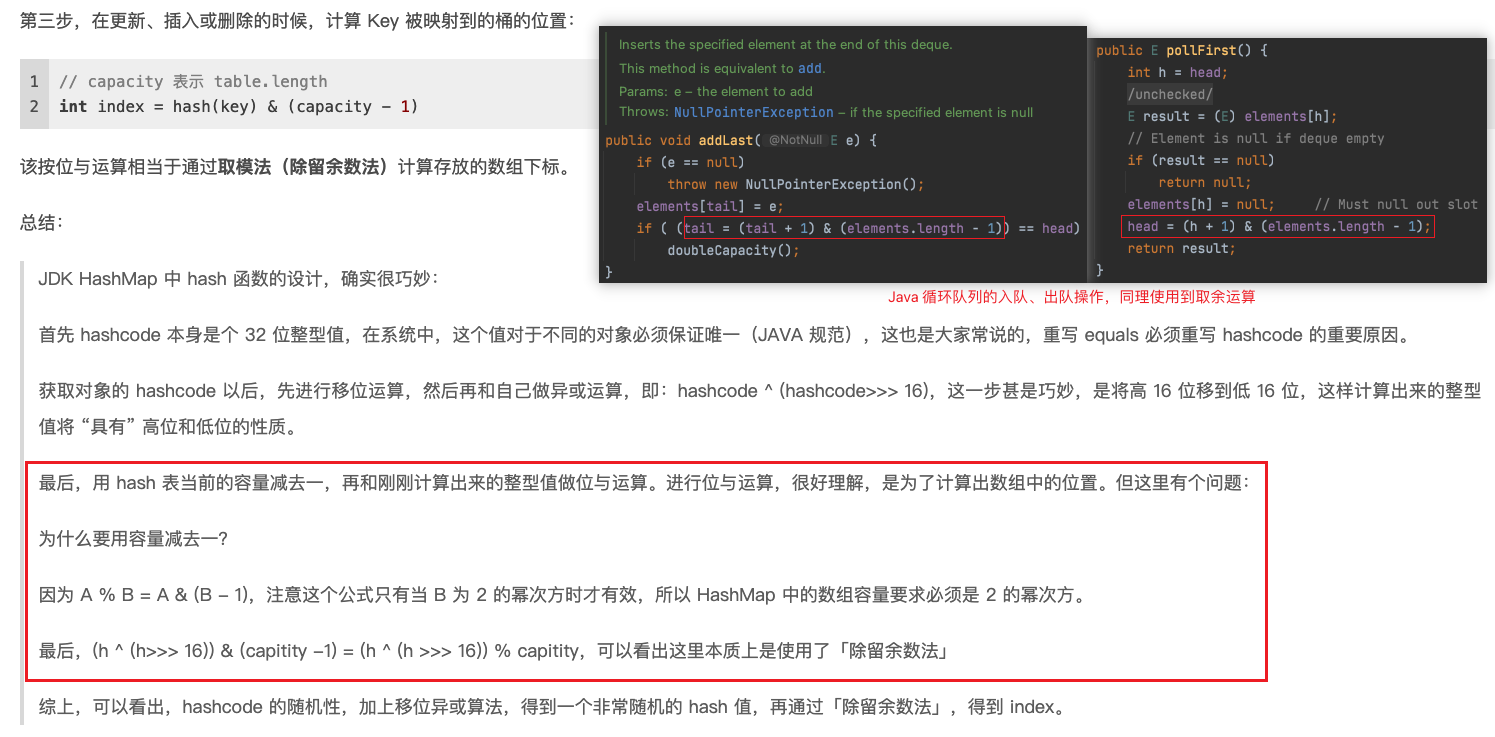
第三步,在更新、插入或删除的时候,计算 Key 被映射到哪个 bucket:

1
2
// capacity 表示 table.length
int index = hash(key) & (capacity - 1)

该按位与运算相当于通过取模法(除留余数法)计算存放的数组下标。

总结:

JDK HashMap 中 hash 函数的设计,确实很巧妙:

首先 hashcode 本身是个 32 位整型值,在系统中,这个值对于不同的对象必须保证唯一(JAVA 规范),这也是大家常说的,重写 equals 必须重写 hashcode 的重要原因。

获取对象的 hashcode 以后,先进行移位运算,然后再和自己做按位异或运算(^,即:hashcode ^ (hashcode >>> 16),这一步甚是巧妙,是将高 16 位右移(>>>到低 16 位,这样计算出来的整型值将“具有”高位和低位的性质。

最后,用 hash 表当前的容量减去一,再和刚刚计算出来的整型值做按位与运算(&。进行位与运算,很好理解,是为了计算出数组中的位置。但这里有个问题:

为什么要用容量减去一?

因为 A % B = A & (B - 1),注意这个公式只有当 B 为 2 的幂次方时才有效,所以 HashMap 中的数组容量要求必须是 2 的幂次方。

最后,(h ^ (h >>> 16)) & (capitity -1) = (h ^ (h >>> 16)) % capitity,可以看出这里本质上是使用了「除留余数法」

综上,可以看出,hashcode 的随机性,加上移位异或算法,得到一个非常随机的 hash 值,再通过「除留余数法」,得到 index。

整个散列函数的整体过程如下:

1
2
3
4
5
int hash(Object key) {
int h = key.hashCode();
h = h ^ (h >>> 16);
return h & (capitity - 1); //capicity 表示散列表的大小
}

putVal

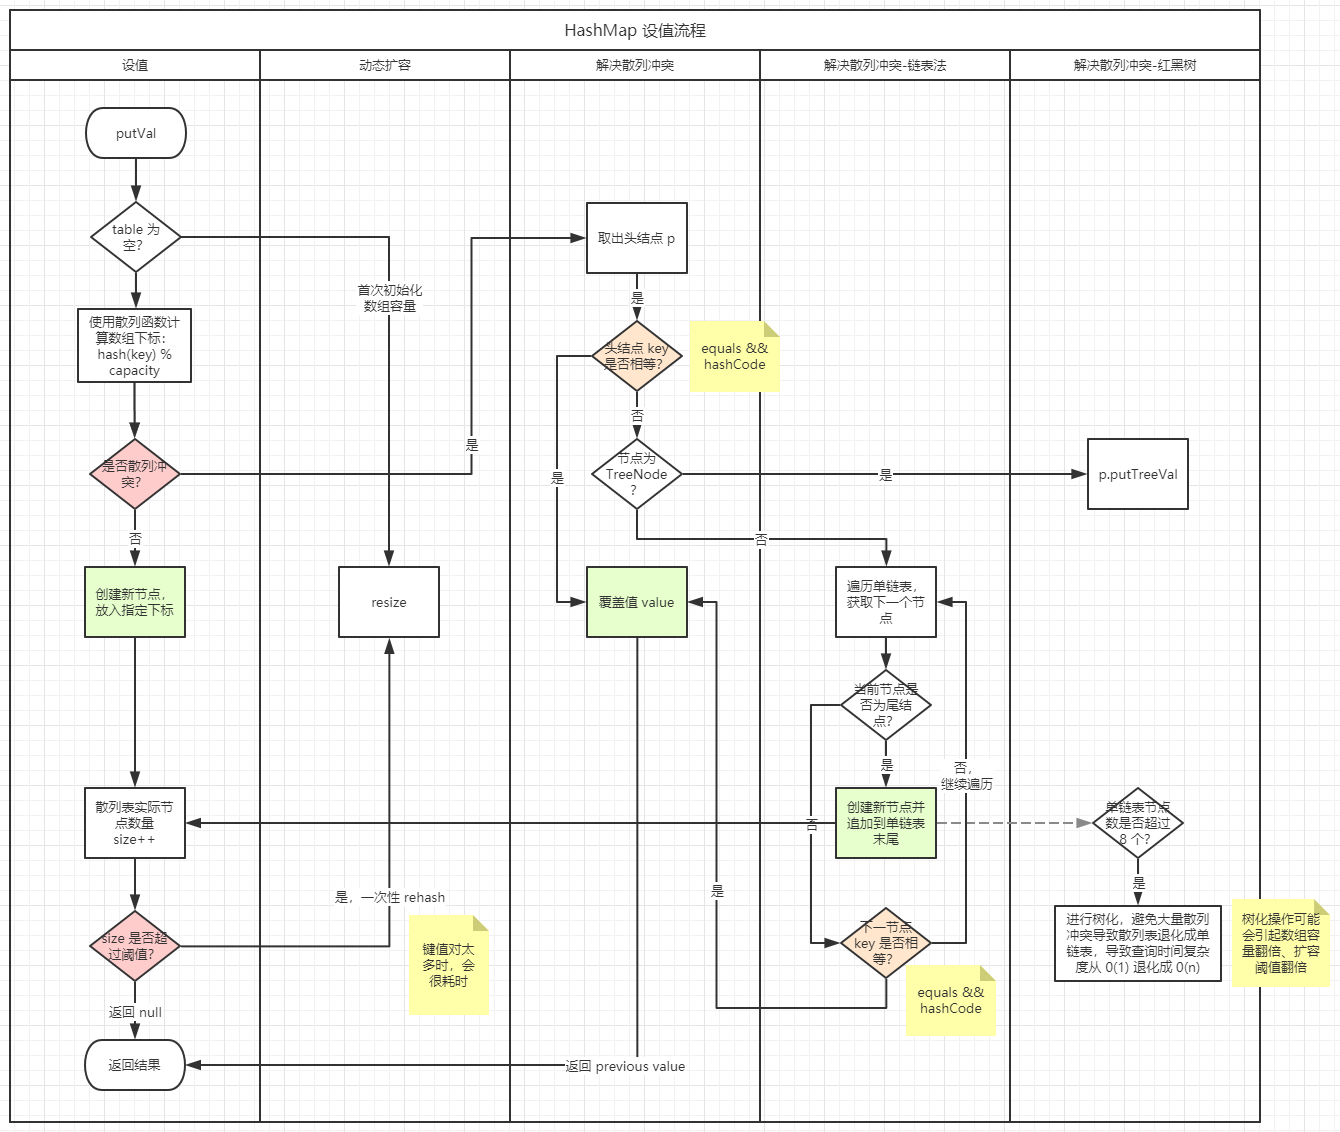
putVal 的核心流程如下:

putval_of_hashmap

一些关键代码分析:

  • 散列表只在首次设值时,才初始化;
  • 散列函数:(n - 1) & hash,通过取模法计算存放的数组下标。通过该散列函数将元素的键值(key)映射为数组下标,然后将数据存储在数组中对应的下标位置。当我们按照键值查询元素时,用同样的散列函数,将键值转化为数组下标,从对应的数组下标的位置取数据。因此散列函数在散列表中起着非常关键的作用。
  • 为了避免散列值冲突,除了对比散列值是否相等之外,还需要对比 key 是否相等;
  • 散列冲突解决方法:链表法。同时为了避免链表过长及散列表碰撞攻击,如果节点数超过 8 个,则进行树化 treeifyBin,避免大量散列冲突导致散列表退化成单链表,导致查询时间复杂度从 O(1) 退化成 O(n)
  • 如果实际映射数量超过阈值,则进行 resize 扩容。
1
2
3
4
5
6
7
8
9
10
11
12
13
14
15
16
17
18
19
20
21
22
23
24
25
26
27
28
29
30
31
32
33
34
35
36
37
38
39
40
41
42
43
44
45
46
47
48
49
50
51
52
53
54
55
56
57
58
59
60
61
62
63
64
65
66
67
68
69
70
71
/**
* Implements Map.put and related methods
*
* @param hash hash for key
* @param key the key
* @param value the value to put
* @param onlyIfAbsent if true, don't change existing value
* @param evict if false, the table is in creation mode.
* @return previous value, or null if none
*/
final V putVal(int hash, K key, V value, boolean onlyIfAbsent,
boolean evict) {
// tab 表示底层数组
// p 表示头结点
// n 表示数组长度
// i 表示数组下标
Node<K,V>[] tab; Node<K,V> p; int n, i;
// 节点数组为空,则首次初始化
if ((tab = table) == null || (n = tab.length) == 0)
n = (tab = resize()).length;

// 计算数组下标,并获取指定下标元素,如果为空,表示无散列冲突,则创建节点并放入指定下标对应的桶
// 无散列冲突情况:
if ((p = tab[i = (n - 1) & hash]) == null)
tab[i] = newNode(hash, key, value, null);
// 有散列冲突情况:
else {
// e 表示当前节点
Node<K,V> e; K k;
// 判断头结点是否为重复键,如果是则后续覆盖值
if (p.hash == hash && ((k = p.key) == key || (key != null && key.equals(k))))
e = p;
// 如果是根节点是树节点类型,则进行相关操作
else if (p instanceof TreeNode)
e = ((TreeNode<K,V>)p).putTreeVal(this, tab, hash, key, value);
// 否则就是单链表节点
else {
// 遍历单链表
for (int binCount = 0; ; ++binCount) {
// 找到尾结点
if ((e = p.next) == null) {
// 创建新节点并追加到单链表末尾
p.next = newNode(hash, key, value, null);
// 如果节点数超过 8 个,则进行树化,避免大量散列冲突导致散列表退化成单链表,导致查询时间复杂度从 0(1) 退化成 0(n)
if (binCount >= TREEIFY_THRESHOLD - 1) // -1 for 1st
// 树化操作可能会引起数组容量翻倍、扩容阈值翻倍
treeifyBin(tab, hash);
break;
}
// 如果桶中的节点有重复键,则后续覆盖值
if (e.hash == hash && ((k = e.key) == key || (key != null && key.equals(k))))
break;
p = e;
}
}
// 如果存在重复键,则覆盖值
if (e != null) { // existing mapping for key
V oldValue = e.value;
if (!onlyIfAbsent || oldValue == null)
e.value = value;
afterNodeAccess(e);
return oldValue;
}
}
++modCount;
// 实际数量加一。同时如果超过阈值,则进行扩容
if (++size > threshold)
resize();
afterNodeInsertion(evict);
return null;
}

树化前,会先判断数组容量是否达到阈值 MIN_TREEIFY_CAPACITY = 64,如果是则将指定散列值对应数组下标的桶中所有链表节点都替换为红黑树节点,否则进行 resize 扩容操作:

1
2
3
4
5
6
7
8
9
10
11
12
13
14
15
16
17
18
19
20
21
22
23
24
/**
* Replaces all linked nodes in bin at index for given hash unless
* table is too small, in which case resizes instead.
*/
final void treeifyBin(Node<K,V>[] tab, int hash) {
int n, index; Node<K,V> e;
if (tab == null || (n = tab.length) < MIN_TREEIFY_CAPACITY)
resize();
else if ((e = tab[index = (n - 1) & hash]) != null) {
TreeNode<K,V> hd = null, tl = null;
do {
TreeNode<K,V> p = replacementTreeNode(e, null);
if (tl == null)
hd = p;
else {
p.prev = tl;
tl.next = p;
}
tl = p;
} while ((e = e.next) != null);
if ((tab[index] = hd) != null)
hd.treeify(tab);
}
}

getNode

关键的 getNode 查找节点方法:

1
2
3
4
5
6
7
8
9
10
11
12
13
14
15
16
17
18
19
20
21
22
23
24
25
26
27
28
29
/**
* Implements Map.get and related methods
*
* @param hash hash for key
* @param key the key
* @return the node, or null if none
*/
final Node<K,V> getNode(int hash, Object key) {
Node<K,V>[] tab; Node<K,V> first, e; int n; K k;
// 判断散列表不为空,且通过散列函数(hash % n)得到的头节点存在
if ((tab = table) != null && (n = tab.length) > 0 && (first = tab[(n - 1) & hash]) != null) {
// 如是,且头节点散列值、key 都匹配,则返回该命中节点
if (first.hash == hash && // always check first node
((k = first.key) == key || (key != null && key.equals(k))))
return first;
// 否则遍历下一个节点
if ((e = first.next) != null) {
// 树节点
if (first instanceof TreeNode)
return ((TreeNode<K,V>)first).getTreeNode(hash, key);
// 顺序遍历单链表,查找匹配结果
do {
if (e.hash == hash && ((k = e.key) == key || (key != null && key.equals(k))))
return e;
} while ((e = e.next) != null);
}
}
return null;
}

removeNode

关键的 removeNode 删除节点方法:

1
2
3
4
5
6
7
8
9
10
11
12
13
14
15
16
17
18
19
20
21
22
23
24
25
26
27
28
29
30
31
32
33
34
35
36
37
38
39
40
41
42
43
44
45
46
47
/**
* Implements Map.remove and related methods
*
* @param hash hash for key
* @param key the key
* @param value the value to match if matchValue, else ignored
* @param matchValue if true only remove if value is equal
* @param movable if false do not move other nodes while removing
* @return the node, or null if none
*/
final Node<K,V> removeNode(int hash, Object key, Object value,
boolean matchValue, boolean movable) {
Node<K,V>[] tab; Node<K,V> p; int n, index;
if ((tab = table) != null && (n = tab.length) > 0 && (p = tab[index = (n - 1) & hash]) != null) {
Node<K,V> node = null, e; K k; V v;
if (p.hash == hash && ((k = p.key) == key || (key != null && key.equals(k))))
node = p;
else if ((e = p.next) != null) {
if (p instanceof TreeNode)
node = ((TreeNode<K,V>)p).getTreeNode(hash, key);
else {
do {
if (e.hash == hash && ((k = e.key) == key || (key != null && key.equals(k)))) {
node = e;
break;
}
p = e;
} while ((e = e.next) != null);
}
}
if (node != null && (!matchValue || (v = node.value) == value || (value != null && value.equals(v)))) {
if (node instanceof TreeNode)
((TreeNode<K,V>)node).removeTreeNode(this, tab, movable);
else if (node == p)
tab[index] = node.next;
else
p.next = node.next;

++modCount;
--size;
afterNodeRemoval(node);

return node;
}
}
return null;
}

resize

用于初始化或扩容散列表。

1
2
3
4
5
6
7
8
9
10
11
12
/**
* Initializes or doubles table size. If null, allocates in
* accord with initial capacity target held in field threshold.
* Otherwise, because we are using power-of-two expansion, the
* elements from each bin must either stay at same index, or move
* with a power of two offset in the new table.
*
* @return the table
*/
final Node<K,V>[] resize() {
...
}

常用方法

设值

主要使用到了关键的 hashputValresize 方法:

1
2
3
4
5
6
7
8
9
10
11
12
13
14
15
16
17
18
19
20
21
22
23
24
25
26
27
28
29
30
31
32
33
34
35
36
37
38
39
40
41
42
43
44
45
46
47
48
49
@Override
public V put(K key, V value) {
return putVal(hash(key), key, value, false, true);
}

@Override
public V putIfAbsent(K key, V value) {
return putVal(hash(key), key, value, true, true);
}

/**
* Copies all of the mappings from the specified map to this map.
* These mappings will replace any mappings that this map had for
* any of the keys currently in the specified map.
*
* @param m mappings to be stored in this map
* @throws NullPointerException if the specified map is null
*/
@Override
public void putAll(Map<? extends K, ? extends V> m) {
putMapEntries(m, true);
}

/**
* Implements Map.putAll and Map constructor
*
* @param m the map
* @param evict false when initially constructing this map, else
* true (relayed to method afterNodeInsertion).
*/
final void putMapEntries(Map<? extends K, ? extends V> m, boolean evict) {
int s = m.size();
if (s > 0) {
if (table == null) { // pre-size
float ft = ((float)s / loadFactor) + 1.0F;
int t = ((ft < (float)MAXIMUM_CAPACITY) ?
(int)ft : MAXIMUM_CAPACITY);
if (t > threshold)
threshold = tableSizeFor(t);
}
else if (s > threshold)
resize();
for (Map.Entry<? extends K, ? extends V> e : m.entrySet()) {
K key = e.getKey();
V value = e.getValue();
putVal(hash(key), key, value, false, evict);
}
}
}

查找和替换

下面这组方法都使用到了关键的 getNode 方法查找指定节点:

1
2
3
4
5
6
7
8
9
10
11
12
13
14
15
16
17
18
19
20
21
22
23
24
25
26
27
28
29
30
31
32
33
34
35
36
37
38
39
40
41
42
43
44
45
46
47
48
49
50
51
52
53
54
55
56
@Override
public V get(Object key) {
Node<K,V> e;
return (e = getNode(hash(key), key)) == null ? null : e.value;
}


@Override
public V getOrDefault(Object key, V defaultValue) {
Node<K,V> e;
return (e = getNode(hash(key), key)) == null ? defaultValue : e.value;
}

@Override
public boolean containsKey(Object key) {
return getNode(hash(key), key) != null;
}

@Override
public boolean containsValue(Object value) {
Node<K,V>[] tab; V v;
if ((tab = table) != null && size > 0) {
for (int i = 0; i < tab.length; ++i) {
for (Node<K,V> e = tab[i]; e != null; e = e.next) {
if ((v = e.value) == value ||
(value != null && value.equals(v)))
return true;
}
}
}
return false;
}

@Override
public boolean replace(K key, V oldValue, V newValue) {
Node<K,V> e; V v;
if ((e = getNode(hash(key), key)) != null &&
((v = e.value) == oldValue || (v != null && v.equals(oldValue)))) {
e.value = newValue;
afterNodeAccess(e);
return true;
}
return false;
}

@Override
public V replace(K key, V value) {
Node<K,V> e;
if ((e = getNode(hash(key), key)) != null) {
V oldValue = e.value;
e.value = value;
afterNodeAccess(e);
return oldValue;
}
return null;
}

删除节点

1
2
3
4
5
6
7
8
9
10
11
@Override
public V remove(Object key) {
Node<K,V> e;
return (e = removeNode(hash(key), key, null, false, true)) == null ?
null : e.value;
}

@Override
public boolean remove(Object key, Object value) {
return removeNode(hash(key), key, value, true, true) != null;
}

清空 map

1
2
3
4
5
6
7
8
9
10
11
12
@Override
public void clear() {
Node<K,V>[] tab;
modCount++;

// 内部数组不为空,则遍历并清空所有元素
if ((tab = table) != null && size > 0) {
size = 0;
for (int i = 0; i < tab.length; ++i)
tab[i] = null;
}
}

参考

https://en.wikipedia.org/wiki/Hash_table

散列函数设计:除留余数法

Java中hash算法细述

HashMap的负载因子不设置成1?

HashMap的loadFactor为什么是0.75?

自问自答 - HashMap的底层原理探索

java.util.Map 用于映射键值对(map keys to values)。

本文总结了几种 Map 的使用场景,例如:

  • 如何实现有序遍历;
  • 如何实现缓存淘汰策略;
  • 如何解决 Top K 问题。

创建 Map

使用 Guava 快速创建不可变的 Map:

1
Map<String, String> map = ImmutableMap.of("A", "Apple", "B", "Boy", "C", "Cat");

使用 Guava 快速创建指定 initialCapacity 初始容量的 Map:

1
Maps.newHashMapWithExpectedSize(10);

Guava 的 Maps 还提供了更多的 API,可以自行研究使用。

实现有序遍历

集合视图

Map 接口提供了三种集合视图(collection views):

Map Views

注意:从 keySet() 返回类型可知,由于受限于 Set 的三大特性之一「互异性」,Map 不能包含重复的键(Key)。两个键重复与否取决于 equalshashCode() 方法。

Many methods in Collections Framework interfaces are defined in terms of the equals method. For example, the specification for the containsKey(Object key) method says: “returns true if and only if this map contains a mapping for a key k such that (key==null ? k==null : key.equals(k)).” This specification should not be construed to imply that invoking Map.containsKey with a non-null argument key will cause key.equals(k) to be invoked for any key k. Implementations are free to implement optimizations whereby the equals invocation is avoided, for example, by first comparing the hash codes of the two keys. (The Object.hashCode() specification guarantees that two objects with unequal hash codes cannot be equal.) More generally, implementations of the various Collections Framework interfaces are free to take advantage of the specified behavior of underlying Object methods wherever the implementor deems it appropriate.

hashCode 需要遵循以下规则:

equals_and_hashcode

遍历 API

Java 提供了下面几种 API 用于遍历 Map 接口的三种集合视图(collection views):

The order of a map is defined as the order in which the iterators on the map’s collection views return their elements. Some map implementations, like the TreeMap class, make specific guarantees as to their order; others, like the HashMap class, do not.

内部循环 API

1
2
// key 遍历
map.forEach((key, value) -> {});

外部循环 API

1
2
3
4
5
6
7
8
// key 遍历
for (String key : map.keySet()) {}

// value 遍历
for (String value : map.values()) {}

// entry 遍历
for (Map.Entry<String, String> entry : map.entrySet()) {}
1
2
3
4
5
6
7
8
// entry 显式迭代器
Iterator<Map.Entry<String, String>> it = map.entrySet().iterator();
while (it.hasNext()) {
Map.Entry<String, String> entry = it.next();
}

// foreach 循环增强,不再需要显式迭代器,简化迭代集合操作
for (Map.Entry<String, String> entry : map.entrySet()) {}

map_entryset

遍历顺序

遍历顺序取决于 Map 接口使用了何种数据结构实现。

众所周知,散列表这种动态数据结构虽然支持非常高效的数据插入、删除、查找操作(平均时间复杂度都为常数阶 O(1)),但由于散列表中的数据都是通过散列函数运算之后无序存储的,因此散列表的遍历结果也是无序的,例如 HashMap

要实现某种有序遍历的解决方案:

  • 排序算法。每当我们希望按照某种顺序遍历散列表中的数据时,自行将散列表中的数据拷贝到数组中,然后通过某种排序算法完成排序,再进行遍历。但如此一来,效率势必会很低。

  • 换一种数据结构实现,例如:红黑树(TreeMap)。

  • 设计一种复合型数据结构,例如将散列表与链式队列结合在一起(LinkedHashMap),实现某种排序,从而达到有序遍历。

无序(no order)

1
2
3
4
5
6
7
8
9
10
11
12
13
14
15
16
17
18
19
/**
* HashMap 按散列函数(取余运算)后获得的索引顺序进行存储
*
* (32, 1), 32 % 16 = 0
* (16, 2), 16 % 16 = 0
* (65, 4), 65 % 16 = 1
* (4, 5), 4 % 16 = 4
* (15, 3), 15 % 16 = 15
*/
@Test
public void testHashMap() {
Map<Integer, String> map = new HashMap<>(16);
map.put(32, "1");
map.put(16, "2");
map.put(15, "3");
map.put(65, "4");
map.put(4, "5");
map.forEach((key, value) -> log.info("({}, {}), {} % 16 = {}", key, value, key, key % 16));
}

按自然顺序(natual order)

1
2
3
4
5
6
7
8
9
10
11
12
13
14
15
16
17
18
19
20
21
/**
* TreeMap 按自然顺序进行排序(红黑树实现,查找的时间复杂度为 O(log(n)))
*
* (4, 5)
* (15, 3)
* (16, 2)
* (32, 1)
* (65, 4)
*/
@Test
public void testTreeMap() {
// Map<Integer, String> map = new TreeMap<>((o1, o2) -> o1.compareTo(o2));
// Map<Integer, String> map = new TreeMap<>(Comparator.naturalOrder());
Map<Integer, String> map = new TreeMap<>();
map.put(32, "1");
map.put(16, "2");
map.put(15, "3");
map.put(65, "4");
map.put(4, "5");
map.forEach((key, value) -> log.info("({}, {})", key, value));
}

排序由键(Key)的自然顺序决定,通过 ComparatorComparable

按插入顺序(insertion order)

1
2
3
4
5
6
7
8
9
10
11
12
13
14
15
16
17
18
19
/**
* LinkedHashMap 大部分构造方法 默认按插入顺序进行排序(accessOrder=false)。底层维护了一个链式队列,可用于实现 FIFO 缓存淘汰策略
*
* (32, 1)
* (16, 2)
* (15, 3)
* (65, 4)
* (4, 5)
*/
@Test
public void testLinkedHashMap() {
Map<Integer, String> map = new LinkedHashMap<>(16);
map.put(32, "1");
map.put(16, "2");
map.put(15, "3");
map.put(65, "4");
map.put(4, "5");
map.forEach((key, value) -> log.info("({}, {})", key, value));
}

按访问顺序(access order)

1
2
3
4
5
6
7
8
9
10
11
12
13
14
15
16
17
18
19
20
21
22
/**
* LinkedHashMap 唯一一个构造方法 用于按访问顺序进行排序(accessOrder=true)。底层维护了一个链式队列,可用于实现 LRU 缓存淘汰策略
* (15, 3)
* (65, 4)
* (4, 5)
* (16, 2)
* (32, 1)
*/
@Test
public void testLinkedHashMap2() {
Map<Integer, String> map = new LinkedHashMap<>(16, .75F, true);
map.put(32, "1");
map.put(16, "2");
map.put(15, "3");
map.put(65, "4");
map.put(4, "5");

map.get(16);
map.get(32);

map.forEach((key, value) -> log.info("({}, {})", key, value));
}

数据结构实现

HashMap

参考:《Map 接口的散列表实现总结

TreeMap

红黑树实现。

LinkedHashMap

LinkedHashMap 继承自 HashMap,是一种复合型数据结构。它在散列表的基础上,通过维护一个有界队列(双向链表实现)来实现「键值对」排序。

注意:LinkedHashMap 中的“Linked”实际上是指「链式队列」,而非指用链表法解决散列冲突。

这种行为适用于一些特定应用场景,例如:构建一个空间占用敏感的有限资源池,按某种淘汰策略自动淘汰「过期」元素:

排序方式 使用场景
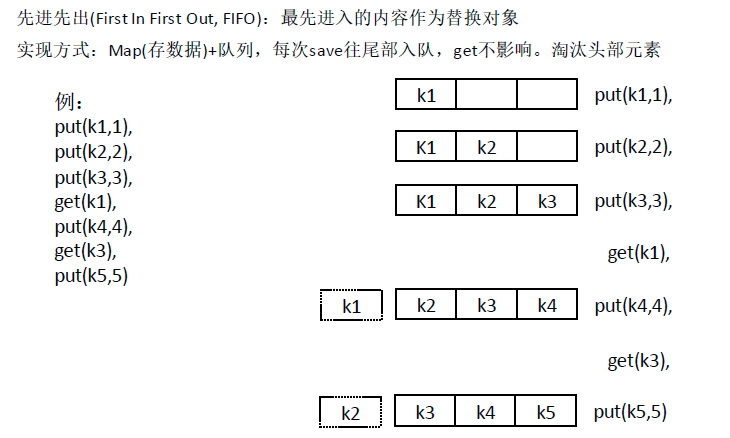
按插入顺序(accessOrder = false 实现 FIFO 缓存淘汰策略
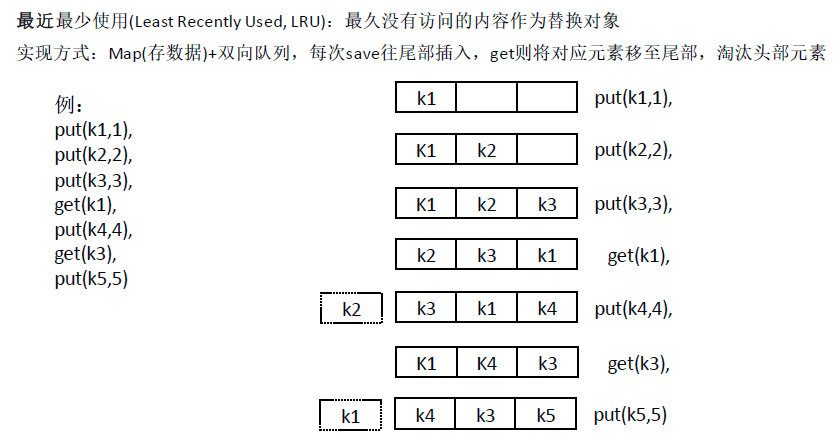
按访问顺序(accessOrder = true 实现 LRU 缓存淘汰策略

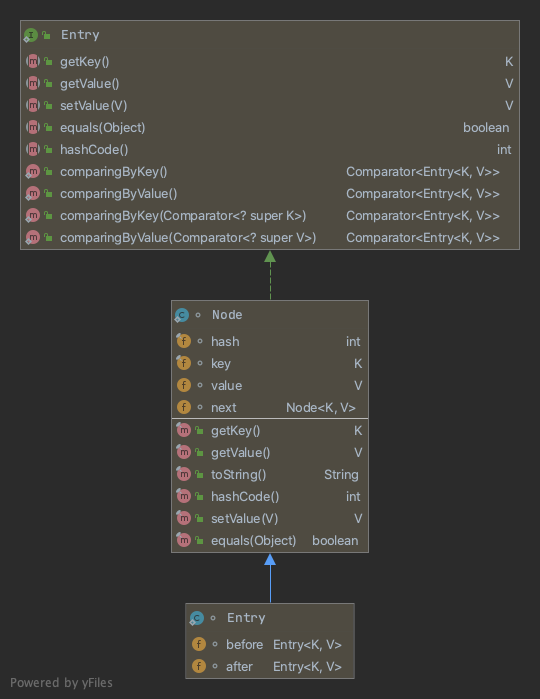
通过源码分析,LinkedHashMap 继承自 HashMap,同时 LinkedHashMap 的节点 Entry 也继承自 HashMapNode,并且在此基础上增加了两个属性:

  • 前驱节点 Entry<K, V> before
  • 后继节点 Entry<K, V> after

LinkedHashMap Entry

通过这两个属性就可以维护一条有序排列的双向链表,如下图:

LinkedHashMap Entry

实现缓存淘汰策略

FIFO (First In First Out)

FIFO (First In First Out)

1
2
3
4
5
6
7
8
9
10
11
12
13
14
15
16
17
18
19
20
21
22
23
24
25
26
27
28
29
/**
* (1: one) removed
* (2: two) removed
* (3, three) hit
* (4, four) hit
* (5, five) hit
*/
@Test
public void FIFO() {
Map<Integer, String> map = new LinkedHashMap<Integer, String>(3, .75F, false) {
@Override
protected boolean removeEldestEntry(Map.Entry eldest) {
if (size() > 3) {
log.info("({}: {}) removed", eldest.getKey(), eldest.getValue());
return true;
} else {
return false;
}
}
};
map.put(1, "one");
map.put(2, "two");
map.put(3, "three");
map.get(1);
map.put(4, "four");
map.get(3);
map.put(5, "five");
map.forEach((key, value) -> log.info("({}, {}) hit", key, value));
}

LRU (Least Recently Used)

LRU (Least Recently Used)

1
2
3
4
5
6
7
8
9
10
11
12
13
14
15
16
17
18
19
20
21
22
23
24
25
26
27
28
29
/**
* (2: two) removed
* (1: one) removed
* (4, four) hit
* (3, three) hit
* (5, five) hit
*/
@Test
public void LRU() {
Map<Integer, String> map = new LinkedHashMap<Integer, String>(3, .75F, true) {
@Override
protected boolean removeEldestEntry(Map.Entry eldest) {
if (size() > 3) {
log.info("({}: {}) removed", eldest.getKey(), eldest.getValue());
return true;
} else {
return false;
}
}
};
map.put(1, "one");
map.put(2, "two");
map.put(3, "three");
map.get(1);
map.put(4, "four");
map.get(3);
map.put(5, "five");
map.forEach((key, value) -> log.info("({}, {}) hit", key, value));
}

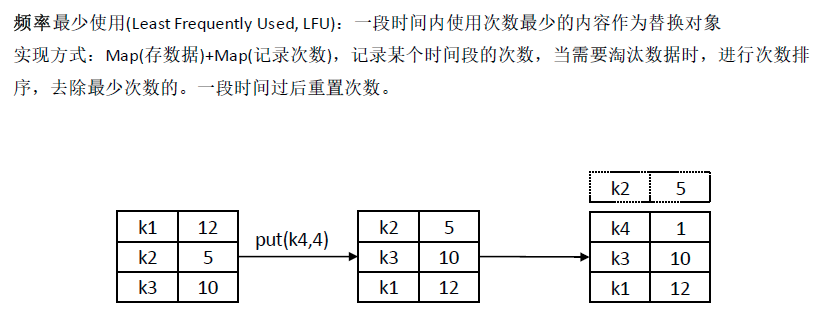
LFU (Least Frequently Used)

LFU (Least Frequently Used)

实现合并

Modifier and Type Method and Description
default V merge(K key, V value, BiFunction<? super V,? super V,? extends V> remappingFunction)
If the specified key is not already associated with a value or is associated with null, associates it with the given non-null value.

Merging Two Maps with Java 8

实现计数器

Java 8 为 Map 接口引入了一组新的 default 默认方法,用于简化 Map 的日常使用。API 如下:

Modifier and Type Method and Description
default V putIfAbsent(K key, V value)
If the specified key is not already associated with a value (or is mapped to null) associates it with the given value and returns null, else returns the current value.
default V computeIfAbsent(K key, Function<? super K,? extends V> mappingFunction)
If the specified key is not already associated with a value (or is mapped to null), attempts to compute its value using the given mapping function and enters it into this map unless null.
default V computeIfPresent(K key, BiFunction<? super K,? super V,? extends V> remappingFunction)
If the value for the specified key is present and non-null, attempts to compute a new mapping given the key and its current mapped value.
default V compute(K key, BiFunction<? super K,? super V,? extends V> remappingFunction)
Attempts to compute a mapping for the specified key and its current mapped value (or null if there is no current mapping).

要实现类似 Redis 散列表的原子递增命令 HINCRBY key field increment 的效果,使用 compute 实现的代码,对比传统代码更紧凑:

1
2
3
4
5
6
7
8
9
10
11
12
13
14
15
16
17
18
19
20
21
22
private static final Map<String, Integer> IP_STATS = new HashMap<>();

// 老版本
public synchronized int oldIpStats(String ip) {
if (!IP_STATS.containsKey(ip)) {
IP_STATS.put(ip, 1);
} else {
IP_STATS.put(ip, IP_STATS.get(ip) + 1);
}
return IP_STATS.get(ip);
}

// 新版本
public synchronized int newIpStats(String ip) {
return IP_STATS.compute(ip, (key, oldValue) -> {
if (oldValue == null) {
return 1;
} else {
return oldValue + 1;
}
});
}

最终结果:

1
2
3
4
5
6
// result is 1
log.info("result is {}", newIpStats("127.0.0.1"));
// result is 2
log.info("result is {}", newIpStats("127.0.0.1"));
// result is 3
log.info("result is {}", newIpStats("127.0.0.1"));

解决 Top K 问题

解题思路:

  • 数据规模大的,就先分而治之(hash 映射);
  • 数据规模小的:
    • 首先,按「键值对」保存统计数据(key 为关键字,value 为统计次数)
    • 然后,按「值」倒序
    • 最后,取 Top K 个「键」
1
2
3
4
5
6
7
8
9
10
11
12
13
14
15
16
17
18
19
20
21
22
23
24
25
26
27
28
29
30
31
/**
* 统计 N 个随机数中最热门的 K 个
*/
@Test
public void topK() {
int N = 100;
// 「键值对」底层实现使用散列表即可,因为无须有序
Map<Integer, Integer> numStats = Maps.newHashMapWithExpectedSize(N);

Random random = new Random();
for (int i = 0; i < N; i++) {
int num = random.nextInt(10);
// 首先,按「键值对」保存统计数据(key 为关键字,value 为统计次数)
numStats.compute(num, (key, oldVal) -> {
if (oldVal == null) {
return 1;
} else {
return oldVal + 1;
}
});
}
log.info("Before sort:");
numStats.forEach((key, val) -> log.info("({}, {})", key, val));

log.info("After sorted by statistics desc:");
// 然后,按「值」倒序
List<Map.Entry<Integer, Integer>> entries = new ArrayList<>(numStats.entrySet());
entries.sort(Map.Entry.comparingByValue(Comparator.reverseOrder()));
// 最后,取 Top K 个「键」
entries.forEach(entry -> log.info("({}, {})", entry.getKey(), entry.getValue()));
}

输出结果:

1
2
3
4
5
6
7
8
9
10
11
12
13
14
15
16
17
18
19
20
21
22
23
Before sort:
(0, 12)
(1, 15)
(2, 6)
(3, 8)
(4, 12)
(5, 16)
(6, 5)
(7, 10)
(8, 9)
(9, 7)

After sorted by statistics desc:
(5, 16)
(1, 15)
(0, 12)
(4, 12)
(7, 10)
(8, 9)
(3, 8)
(9, 7)
(2, 6)
(6, 5)

解码 Huffman coding

参考维基百科 Huffman coding 的定义:

In computer science and information theory, a Huffman code is a particular type of optimal prefix code that is commonly used for lossless data compression.

前缀编码(prefix code) 的定义:

如果在一个编码方案中,任何一个编码都不是其它任何编码的前缀(最左子串),则称该编码是前缀编码。前缀编码可以保证对压缩数据进行解码时不产生二义性,确保正确解码。

前缀编码有两种编码方案:

Huffman coding 是一种最优前缀编码,属于不等长编码方案。

参考:https://www.csdn.net/tags/MtTaMgysMjE3NjItYmxvZwO0O0OO0O0O.html

题目:已知字符对应的前缀编码表,给定一串编码,将其解码为字符串。

解答:https://blog.csdn.net/qq_45273552/article/details/109176832

参考

https://docs.oracle.com/javase/8/docs/api/java/util/Map.html

Guava 源码分析之Cache的实现原理

本文介绍一种运算受限的线性表 —— Queue 队列在 Java 中的实现与使用。

队列接口

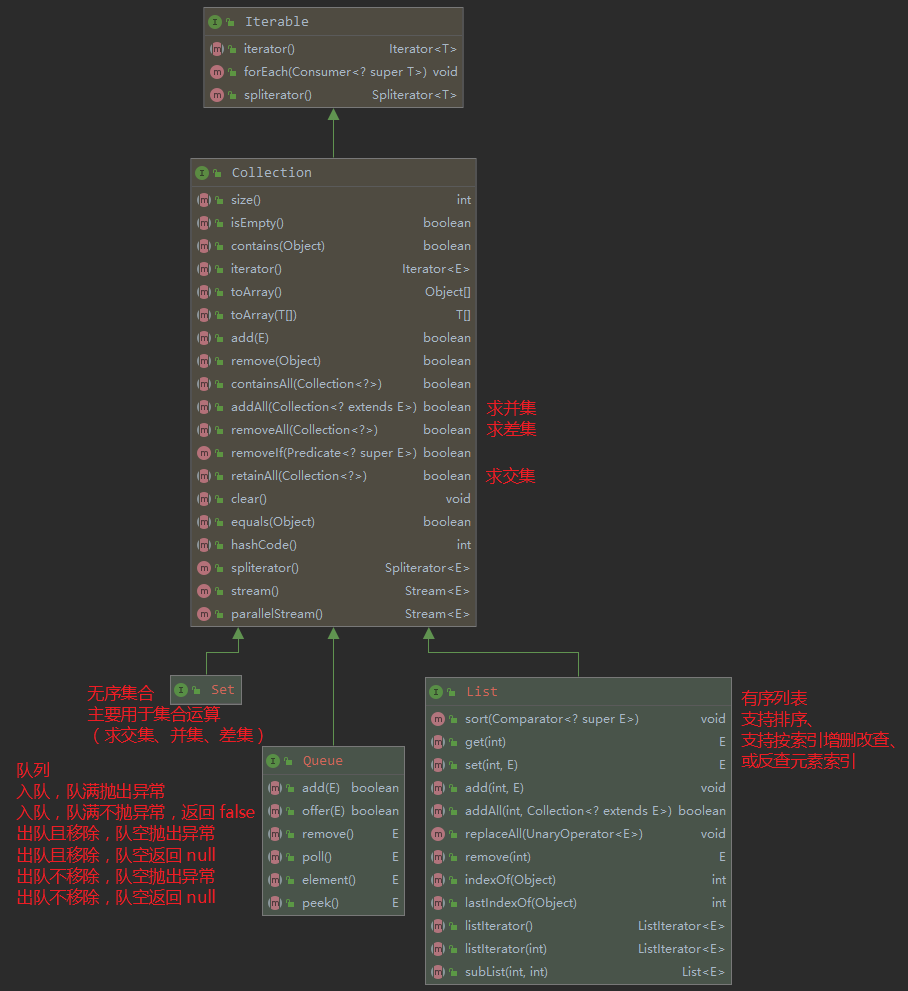
Queue 接口的继承关系及提供的方法如下:

Queue 接口提供的方法

入队/出队/队头

Queue 接口提供的六个方法差别如下:

Throws exception Returns special value
Insert add(e) offer(e)
Remove remove() poll()
Examine element() peek()

遍历队列

参考:《Iterate over a Queue in Java

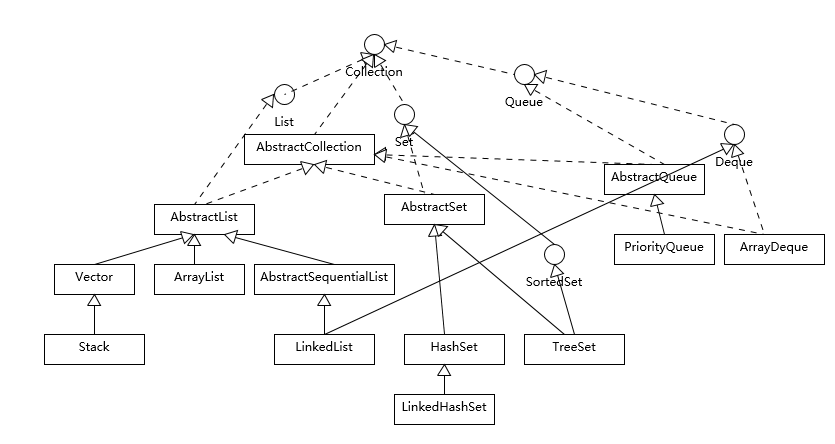
队列实现

Java 提供的队列实现如下图:

collection_impl

顺序队列

使用如下:

1
2
3
4
5
// 单端顺序队列
Queue<Integer> queue = new ArrayDeque<>(10);

// 双端顺序队列
Deque<Integer> deque = new ArrayDeque<>(10);

ArrayDeque 底层存储结构为一维数组,默认队列容量为 16。其成员变量定义如下:

1
2
3
4
5
6
7
8
9
10
11
12
13
14
15
16
17
18
19
20
21
22
23
24
/**
* The array in which the elements of the deque are stored.
* The capacity of the deque is the length of this array, which is
* always a power of two. The array is never allowed to become
* full, except transiently within an addX method where it is
* resized (see doubleCapacity) immediately upon becoming full,
* thus avoiding head and tail wrapping around to equal each
* other. We also guarantee that all array cells not holding
* deque elements are always null.
*/
transient Object[] elements; // non-private to simplify nested class access

/**
* The index of the element at the head of the deque (which is the
* element that would be removed by remove() or pop()); or an
* arbitrary number equal to tail if the deque is empty.
*/
transient int head;

/**
* The index at which the next element would be added to the tail
* of the deque (via addLast(E), add(E), or push(E)).
*/
transient int tail;

在反复入队、出队时,为了解决了一维数组的“空间浪费”及“假溢出”问题,有两种解决方案:

  • 在出队时,将剩余数组元素全部往前挪动一个位置,但这个动作的时间复杂度 O(n),影响性能。
  • 使用循环队列。

ArrayDeque 是一个循环队列。当进行出队、入队操作时,并不是简单是 head++tail++,而是自增后进行取模运算,确保 headtail 在容量范围内进行反复循环。其实现如下图:

入队/出队

ArrayDeque 是一个无界队列。当队满时,会进行双倍空间的动态扩容(底层实现为新建一个双倍容量的新数组,并使用 System#arraycopy 方法进行数组拷贝)。源码实现如下:

1
2
3
4
5
6
7
8
9
10
11
12
13
14
15
16
17
18
19
/**
* Doubles the capacity of this deque. Call only when full, i.e.,
* when head and tail have wrapped around to become equal.
*/
private void doubleCapacity() {
assert head == tail;
int p = head;
int n = elements.length;
int r = n - p; // number of elements to the right of p
int newCapacity = n << 1;
if (newCapacity < 0)
throw new IllegalStateException("Sorry, deque too big");
Object[] a = new Object[newCapacity];
System.arraycopy(elements, p, a, 0, r);
System.arraycopy(elements, 0, a, r, p);
elements = a;
head = 0;
tail = n;
}

这里我用 C 语言自己实现了一个简单的循环队列,代码如下:

https://github.com/qidawu/cpp-data-structure/blob/main/src/cycleQueue.cpp

实现过程中,有一些注意点:

队列实现注意点

链式队列

使用如下。链式队列也是一个无界队列

1
2
3
4
5
// 单端链式队列
Queue<Integer> queue = new LinkedList<>();

// 双端链式队列
Deque<Integer> deque = new LinkedList<>();

阻塞队列

并发队列有两种实现方式:

  • 阻塞队列(BlockingQueue
  • 并发队列(非阻塞实现)

Queue_implementations

下面重点看下 BlockingQueue,其扩展自 Queue 接口,主要新增了两组接口(下表后两列),其常用方法差别如下表:

Throws exception Returns Special value Times out Blocks
Insert add(e) offer(e) offer(e, time, unit) put(e)
Remove remove() poll() poll(time, unit) take()
Examine element() peek() not applicable not applicable

而线程池 ThreadPoolExecutor 目前就使用了 BlockingQueue 的这些方法:

  • 入队 offer(e)
  • 出队 poll(time, unit)take()

阻塞队列实现

阻塞队列 BlockingQueue 的实现如下图:

BlockingQueue

  • 有界队列(数组实现):

    • ArrayBlockingQueue,基于数组实现的有界阻塞队列。
  • 无界队列(链表实现):

    • LinkedBlockingQueue,基于链表实现的可选无界阻塞队列。默认用于 Executors.newFixedThreadPool(...)newSingleThreadExecutor(...)
    • LinkedTransferQueue
    • PriorityBlockingQueue,基于堆实现(底层是数组)的具有优先级的无界阻塞队列。
    • DelayedQueue
  • 无容量队列:

    • SynchronousQueue,无容量阻塞队列,每个插入操作都必须等待另一个线程的移除操作,反之亦然。默认用于 Executors.newCachedThreadPool(...)

阻塞双端队列 BlockingDeque 的实现如下图:

BlockingDeque_implementations

参考

[java 队列]——ArrayBlockingQueue

ConcurrentLinkedQueue 和 LinkedBlockingQueue 区别