Qida's Blog

纸上得来终觉浅,绝知此事要躬行。

Bean Validation 规范

Bean Validation 为 JavaBean 和方法验证定义了一组元数据模型和 API 规范,常用于后端数据的声明式校验。

RoadMap

Bean Validation 规范最早在 Oracle Java EE 下维护。

2017 年 11 月,Oracle 将 Java EE 移交给 Eclipse 基金会。 2018 年 3 月 5 日,Eclipse 基金会宣布 Java EE (Enterprise Edition) 被更名为 Jakarta EE。因此 Bean Validation 规范经历了从 JavaEE Bean Validation 到 Jakarta Bean Validation 的两个阶段:

Bean Validation 1.0 (JSR 303)

Bean Validation 1.0 (JSR 303) was the first version of Java’s standard for object validation.

It was released in 2009 and is part of Java EE 6.

1
2
3
4
5
6
<!-- https://mvnrepository.com/artifact/javax.validation/validation-api -->
<dependency>
<groupId>javax.validation</groupId>
<artifactId>validation-api</artifactId>
<version>1.0.0.GA</version>
</dependency>

Bean Validation 1.1 (JSR 349)

Bean Validation 1.1 (JSR 349) was finished in 2013. Changes between Bean Validation 1.0 and 1.1

It is part of Java EE 7.

1
2
3
4
5
6
<!-- https://mvnrepository.com/artifact/javax.validation/validation-api -->
<dependency>
<groupId>javax.validation</groupId>
<artifactId>validation-api</artifactId>
<version>1.1.0.Final</version>
</dependency>

Bean Validation 2.0 (JSR 380)

Bean Validation 2.0 (JSR 380) was finished in August 2017. Changes between Bean Validation 2.0 and 1.1

It’s part of Java EE 8 (but can of course be used with plain Java SE as the previous releases).

1
2
3
4
5
6
<!-- https://mvnrepository.com/artifact/javax.validation/validation-api -->
<dependency>
<groupId>javax.validation</groupId>
<artifactId>validation-api</artifactId>
<version>2.0.1.Final</version>
</dependency>

Jakarta Bean Validation 2.0

Jakarta Bean Validation 2.0 was published in August 2019. There are no changes between Jakarta Bean Validation 2.0 and Bean Validation 2.0 except for the GAV: it is now jakarta.validation:jakarta.validation-api.

It’s part of Jakarta EE 8 (but can of course be used with plain Java SE as the previous releases).

1
2
3
4
5
6
<!-- https://mvnrepository.com/artifact/jakarta.validation/jakarta.validation-api -->
<dependency>
<groupId>jakarta.validation</groupId>
<artifactId>jakarta.validation-api</artifactId>
<version>2.0.2</version>
</dependency>

Jakarta Bean Validation 3.0

Jakarta Bean Validation 3.0 was released in Wednesday, October 7, 2020.

This release is part of Jakarta EE 9.

1
2
3
4
5
6
<!-- https://mvnrepository.com/artifact/jakarta.validation/jakarta.validation-api -->
<dependency>
<groupId>jakarta.validation</groupId>
<artifactId>jakarta.validation-api</artifactId>
<version>3.0.0</version>
</dependency>

Constraints

Constraints 约束是 Bean Validation 规范的核心。约束是通过约束注解和一系列约束验证实现的组合来定义的。约束注解可应用于类型、字段、方法、构造函数、参数、容器元素或其它约束注解。

一个 constraint 通常由 annotation 和相应的 constraint validator 组成,它们是一对多的关系。也就是说可以有多个 constraint validator 对应一个 annotation。在运行时,Bean Validation 框架本身会根据被注释元素的类型来选择合适的 constraint validator 对数据进行验证。

有些时候,在用户的应用中需要一些更复杂的 constraint。Bean Validation 提供扩展 constraint 的机制。可以通过两种方法去实现,一种是组合现有的 constraint 来生成一个更复杂的 constraint,另外一种是开发一个全新的 constraint。

下表列出了常用 Constraints:

内置 Constraints

表 1. Bean Validation 1.x 内置的 Constraints,如下:

Constraint 详细信息
@Null 被注释的元素必须为 null
@NotNull 被注释的元素必须不为 null
@AssertTrue 被注释的元素必须为 true
@AssertFalse 被注释的元素必须为 false
@Min(value) 被注释的元素必须是一个数字,其值必须大于等于指定的最小值
@Max(value) 被注释的元素必须是一个数字,其值必须小于等于指定的最大值
@DecimalMin(value) 被注释的元素必须是一个数字,其值必须大于等于指定的最小值
@DecimalMax(value) 被注释的元素必须是一个数字,其值必须小于等于指定的最大值
@Size(max, min) 被注释的元素的大小必须在指定的范围内
@Digits (integer, fraction) 被注释的元素必须是一个数字,其值必须在可接受的范围内
@Past 被注释的元素必须是一个过去的日期
@Future 被注释的元素必须是一个将来的日期
@Pattern(value) 被注释的元素必须符合指定的正则表达式

Bean Validation 2.0 内置的 Constraints,参考:https://beanvalidation.org/2.0/spec/#builtinconstraints

Bean Validation 3.0 内置的 Constraints,参考官方新版规范:Jakarta Bean Validation specification

第三方 Constraints

表 2. Hibernate Validator 附加的 Constraints,更多 Constraints 详见:Additional constraints

Constraint 详细信息
@Email 被注释的元素必须是电子邮箱地址
@Length 被注释的字符串的大小必须在指定的范围内
@NotEmpty 被注释的字符串的必须非空
@Range 被注释的元素必须在合适的范围内

其它第三方 Constraints:

核心 API

核心类 Validation 作为 Bean Validation 的入口点,提供了三种引导方式。下面代码演示了以最简单的方式创建默认的 ValidatorFactory,并获取 Validator 用以验证 Java Bean。涉及的 API 如下:

  • 核心类 javax.validation.Validation

    Note:

    • The ValidatorFactory object built by the bootstrap process should be cached and shared amongst Validator consumers.
    • This class is thread-safe.
  • 接口 javax.validation.ValidatorFactory

    Factory returning initialized Validator instances.

    Implementations are thread-safe and instances are typically cached and reused.

  • 接口 javax.validation.Validator

    Validates bean instances. Implementations of this interface must be thread-safe.

代码如下:

1
2
3
4
5
6
7
8
9
10
11
12
13
14
15
16
17
18
19
20
21
22
23
24
25
26
import lombok.experimental.UtilityClass;

import javax.validation.ConstraintViolation;
import javax.validation.Validation;
import javax.validation.ValidatorFactory;
import javax.validation.Validator;
import java.util.Set;

/**
* JavaBean 校验器
*/
@UtilityClass
public class ValidatorUtil {

private static final Validator VALIDATOR = Validation.buildDefaultValidatorFactory().getValidator();

/**
* 校验参数
* @param obj 参数
* @return 校验结果
*/
public <T> Set<ConstraintViolation<T>> validate(T obj) {
return VALIDATOR.validate(obj);
}

}

Bean Validation 实现

Hibernate Validator

Hibernate 框架提供了各种子项目,如下:
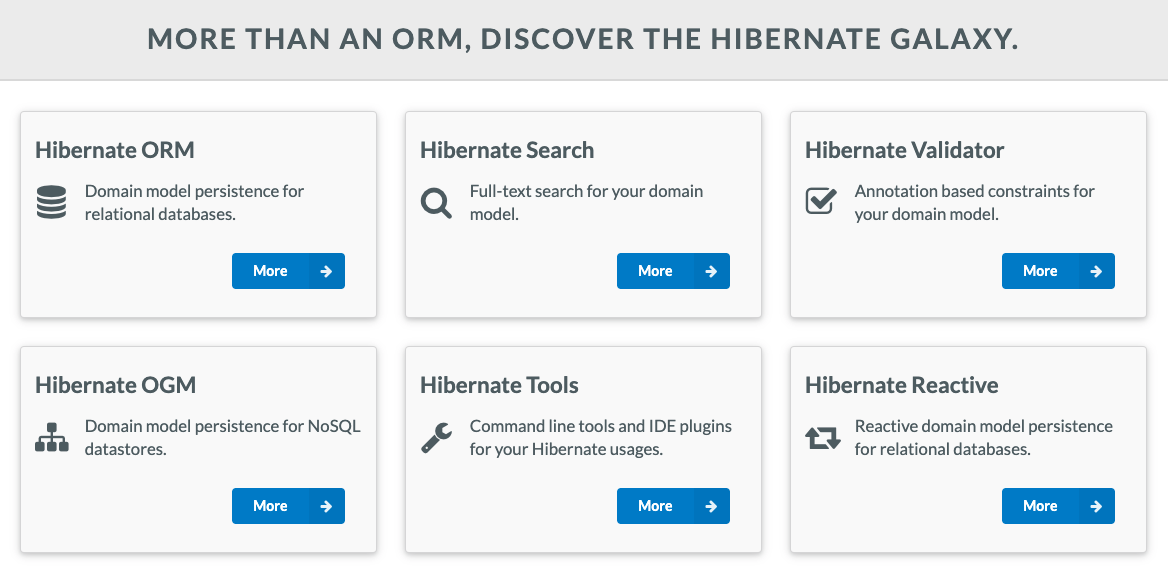
Hibernate Projects

其中,子项目 Hibernate Validator 是 Bean Validation 规范的官方认证实现

要在 Maven 项目中使用 Hibernate Validator,需要添加如下依赖项:

  • 新版实现。6.x 及以上版本已完全从 Hibernate 持久化框架中剥离并被移至新 group:

    hibernate-validator is entirely separate from the persistence aspects of Hibernate. So, by adding it as a dependency, we’re not adding these persistence aspects into the project.

    1
    2
    3
    4
    5
    6
    <!-- https://mvnrepository.com/artifact/org.hibernate.validator/hibernate-validator -->
    <dependency>
    <groupId>org.hibernate.validator</groupId>
    <artifactId>hibernate-validator</artifactId>
    <version>7.0.0.Final</version>
    </dependency>
  • 遗留实现,可以下载到 5.x 及之前的老版本,例如:

    1
    2
    3
    4
    5
    6
    <!-- https://mvnrepository.com/artifact/org.hibernate/hibernate-validator -->
    <dependency>
    <groupId>org.hibernate</groupId>
    <artifactId>hibernate-validator</artifactId>
    <version>5.4.3.Final</version>
    </dependency>

下表汇总了 Hibernate Validator 各版本的传递依赖:

Hibernate Validator Java Bean Validation 规范 Expression Language (EL) 规范
7.0 series 8, 11 or 17 Jakarta EE 9 - Bean Validation 3.0 Jakarta EE 9 - Expression Language 4.0
6.2 series 8, 11 or 17 Jakarta EE 8 - Bean Validation 2.0 Jakarta EE 8 - Expression Language 3.0
6.1 series 8, 11 or 17 Jakarta EE 8 - Bean Validation 2.0 Jakarta EE 8 - Expression Language 3.0
6.0 series 8, 11 or 17 JavaEE 8 - Bean Validation 2.0 (JSR 380) Java EE 7 - Expression Language 3.0 (JSR 341)
5.0 series 6 or 7 JavaEE 7 - Bean Validation 1.1 (JSR 349) Java EE 7 - Expression Language 3.0 (JSR 341)

引入 Hibernate Validator 后,将传递依赖 Bean Validation API 规范相应的版本,无需重复引入:

Hibernate’s Jakarta Bean Validation reference implementation. This transitively pulls in the dependency to the Bean Validation API.

详见如下

使用方式

分组约束

如果我们想在新增的情况验证 id 和 name,而修改的情况验证 name 和 password,可以使用分组约束功能。

https://blog.csdn.net/win7system/article/details/51241837

组合约束

参考 Bean Validation 文档:Constraint composition

Constraint composition is useful in several ways:

  • Avoid duplication and facilitate reuse of more primitive constraints.
  • Expose primitive constraints as part of a composed constraint in the metadata API and enhance tool awareness.

Composition is done by annotating a constraint annotation with the composing constraint annotations.

compose constraints via a logical OR or NOT

参考 Hibernate 文档:Boolean composition of constraints

Jakarta Bean Validation specifies that the constraints of a composed constraint are all combined via a logical AND. This means all of the composing constraints need to return true to obtain an overall successful validation.

Hibernate Validator offers an extension to this and allows you to compose constraints via a logical OR or NOT. To do so, you have to use the @ConstraintComposition annotation and the enum CompositionType with its values AND, OR and ALL_FALSE.

自定义约束

参考 Bean Validation 文档:Constraint validation implementation

Dubbo 参数验证

https://dubbo.apache.org/zh/docs/v2.7/user/examples/parameter-validation/

Spring MVC 参数验证

参考:

Spring MVC 方法参数验证

SpringBoot 中使用 @Valid 注解 + 全局异常处理器 优雅处理参数验证

@Validated 和 @Valid 的区别

  • @Valid 由 Bean Validation 提供,由 Hibernate Validator 实现。
  • @Validated 由 Spring Validator 提供,是 @Valid 的变种,在使用上并没有区别,但在分组、注解位置、嵌套验证等功能上有所不同。

常见问题

缺少 Expression Language 依赖

以 Hibernate Validator 6.0 series 为例,查看其 pom.xml,会发现 Expression Language 依赖被声明为 provided

1
2
3
4
5
<dependency>
<groupId>org.glassfish</groupId>
<artifactId>javax.el</artifactId>
<scope>provided</scope>
</dependency>

这表示该依赖在运行时由 Java EE container 容器提供,因此无须重复引入。但对于 Spring Boot 应用来说,则需要添加此依赖。如果缺少该依赖,则报错如下:

1
HV000183: Unable to load 'javax.el.ExpressionFactory'. Check that you have the EL dependencies on the classpath, or use ParameterMessageInterpolator instead

问题原因:缺少 Unified Expression Language (EL) 规范的实现依赖,即 Glassfish。

解决方案:

Hibernate Validator also requires an implementation of the Unified Expression Language (JSR 341) for evaluating dynamic expressions in constraint violation messages.

When your application runs in a Java EE container such as WildFly, an EL implementation is already provided by the container.

In a Java SE environment, however, you have to add an implementation as dependency to your POM file. For instance, you can add the following dependency to use the JSR 341 reference implementation:

1
2
3
4
5
<dependency>
<groupId>org.glassfish</groupId>
<artifactId>javax.el</artifactId>
<version>3.0.0</version>
</dependency>

注意,要使用与 Hibernate Validator 匹配的 Unified Expression Language (EL) 的依赖版本。

参考:https://stackoverflow.com/questions/24386771/javax-validation-validationexception-hv000183-unable-to-load-javax-el-express

参考

https://docs.oracle.com/javaee/7/index.html

https://docs.oracle.com/javaee/7/api/index.html

https://jakarta.ee/

https://jakarta.ee/specifications/bean-validation/

https://beanvalidation.org/

https://beanvalidation.org/2.0/spec/

http://hibernate.org/validator/

baeldung
后台表单校验(JSR303)

Spring Boot参数校验以及分组校验的使用
Jakarta Annotations defines a collection of annotations representing common semantic concepts that enable a declarative style of programming that applies across a variety of Java technologies.
通过在 Java 平台中添加 JSR 175(Java 编程语言的元数据工具),我们设想各种技术将使用注解来实现声明式编程风格。如果这些技术各自为共同概念独立定义自己的注解,那将是不幸的。在 Jakarta EE 和 Java SE 组件技术中保持一致性很有价值,但在 Jakarta EE 和 Java SE 之间实现一致性也很有价值。

本规范的目的是定义一小组通用注解,这些注解可在其它规范中使用。希望这将有助于避免在不同 Jakarta EE 规范中定义的注解之间不必要的冗余或重复。这将允许我们将通用注解集中在一个地方,让技术引用此规范,而不是在多个规范中指定它们。这样,所有技术都可以使用相同版本的注解,并且跨平台使用的注解将保持一致。

这些通用注解详见如下:

Specifications Description Compatible Implementations
Jakarta Servlet A server-side API for handling HTTP requests and responses Eclipse GlassFish
Jakarta Server Pages (JSP) Defines a template engine for web applications Eclipse GlassFish
Jakarta Standard Tag Library (JSTL) Provides a set of tags to simplify the JSP development Eclipse GlassFish
Jakarta Expression Language (EL) Defines an expression language for Java applications Eclipse Expression Language
Jakarta Server Faces (JSF) MVC framework for building user interfaces for web apps Eclipse Mojarra
Jakarta MVC Standardizes the action-based model-view-controller pattern Eclipse Krazo
Jakarta RESTful Web Services (JAX-RS) API to develop web services following the REST pattern Eclipse Jersey
Jakarta Enterprise Web Services Web Services for Jakarta EE architecture Eclipse GlassFish
Jakarta WebSocket API for Server and Client Endpoints for WebSocket protocol Eclipse Tyrus
……

一点关于 EL 的历史:

Expression Language (EL) 最初受到 ECMAScript 和 XPath 表达式语言的启发。在其成立之初,参与的专家非常不愿意设计另一种表达语言,并试图使用这些语言中的每一种,但他们在不同的领域都有所欠缺。

因此,JSP Standard Tag Library (JSTL) version 1.0 (based on JSP 1.2) 首先引入了一种表达式语言,使前端页面开发者可以轻松访问和操作应用程序数据,而无需掌握如 Java、JavaScript 等编程语言相关的复杂性。

鉴于其成功,EL 随后被移入 JSP 规范(JSP 2.0/JSTL 1.1),使其在 JSP 页面中普遍可用(而不仅仅用于 JSTL 标记库的属性)。

JavaServer Faces 1.0 定义了用于构建用户界面组件的标准框架,并且构建在 JSP 1.2 技术之上。由于 JSP 1.2 技术没有集成的表达语言,并且 JSP 2.0 EL 不能满足 Faces 的所有需求,因此为 Faces 1.0 开发了一个 EL 变体。Faces 专家组试图使该语言尽可能与 JSP 2.0 兼容,但是还是有一些区别。

显然需要一种单一、统一的表达语言来满足各种 Web 层技术的需求。因此,Faces 和 JSP 专家组共同制定了统一表达式语言的规范,该规范在 JSR 245 中定义,并在 JSP 2.1 和 Faces 1.2 版本中生效。

JSP/JSTL/Faces 专家组也意识到 EL 的用处超出了他们自己的规范。3.0 规范是第一个将表达式语言定义为独立规范的 JSR,不依赖于其它技术。

参考

JSP 标签总结

JSP 标准标签库(JSTL)总结

JSP EL 表达式总结

Java Documentation

Standard Edition

Java Platform, Standard Edition Documentation

Roadmap

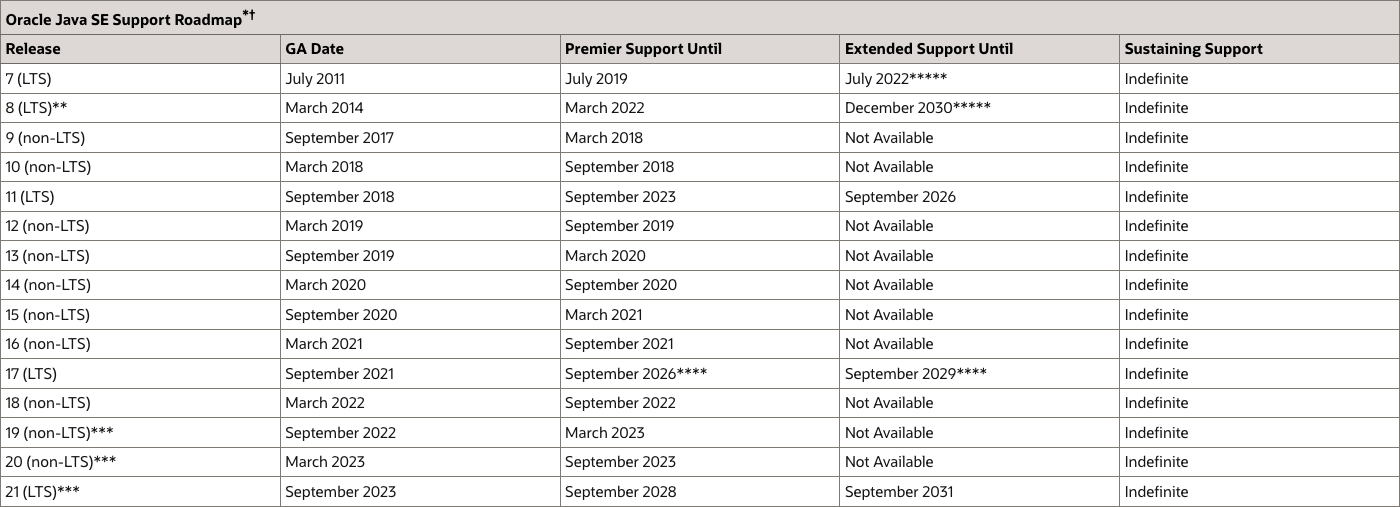
详见:Oracle Java SE Support Roadmap

Oracle Java SE Support Roadmap

参考:

一文详解|从JDK8飞升到JDK17,再到未来的JDK21 | 阿里技术

Java SE 8

Java Platform, Standard Edition (Java SE) Overview

Reference

Oracle has two products that implement Java Platform Standard Edition (Java SE) 8:

  • Java SE Development Kit (JDK) 8. JDK 8 is a superset of JRE 8, and contains everything that is in JRE 8, plus tools such as the compilers and debuggers necessary for developing applets and applications.

  • Java SE Runtime Environment (JRE) 8. JRE 8 provides the libraries, the Java Virtual Machine (JVM), and other components to run applets and applications written in the Java programming language. Note that the JRE includes components not required by the Java SE specification, including both standard and non-standard Java components.

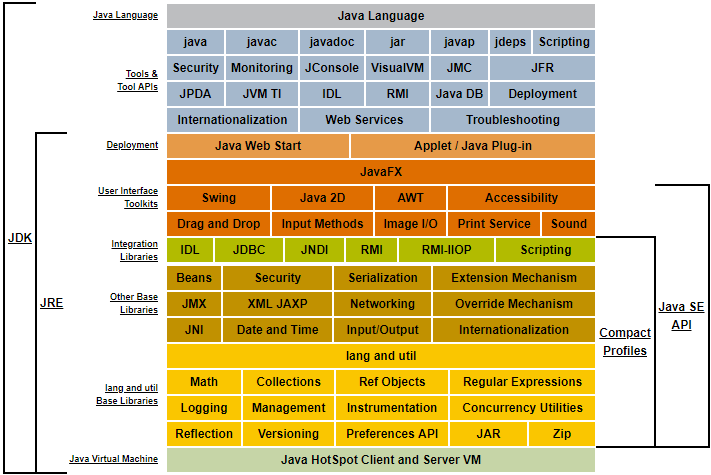
The following conceptual diagram illustrates the components of Oracle’s Java SE products:

Description of Java Conceptual Diagram

JDK

一些术语:

  • JCP 是 Java Community Process(Java社区进程)的简称,社会各界组成的 Java 社区,规划和领导 Java 的发展。
  • JSR 是 Java Specification Requests(Java 规范请求)的简称,是 JCP 成员向委员会提交的 Java 发展议案,经过一系列流程后,如果通过会成为 JEP,最终会体现在未来的 Java 中。
  • JEP 是 JDK Enhancement Proposals (Java 增强提案)的简称,为了保证日后 JDK 研发能够更加顺利地进行,从 JDK 8 开始,Oracle 启用 JEP 来定义和管理纳入新版 JDK 发布范围的功能特性。JDK 的版本变化将从这些提案中选取。例如:

一些历史:参考《JDK 历代版本变化

JDK 从 1.5 版本开始,在官方的正式文档与宣传资料中已经不再使用类似“JDK 1.5”的名称,只有程序员内部使用的开发版本号(Developer Version,例如 java -version 的输出)才继续沿用 1.5、1.6 和 1.7 的版本号(JDK 10 之后又改为了采用年份加月份作为开发版本号,例如 18.3),而公开版本号(Product Version)则改为 JDK 5、JDK 6 和 JDK 7 的命名方式。

从 JDK 10 开始,每年的 3 月和 9 月各发布一个大版本,目的就是避免众多功能特性被集中捆绑到一个 JDK 版本上而引发交付风险。同时为了降低维护成本,每六个 JDK 大版本中才会被划出一个长期支持(Long Term Suppot,LTS)版本,只有 LTS 版的 JDK 能够获得为期三年的支持和更新,普通版的 JDK 就只有短短六个月的生命周期。

JDK 8 和 JDK 11 是 LTS 版本,再下一个就到 2021 年发布的 JDK 17。

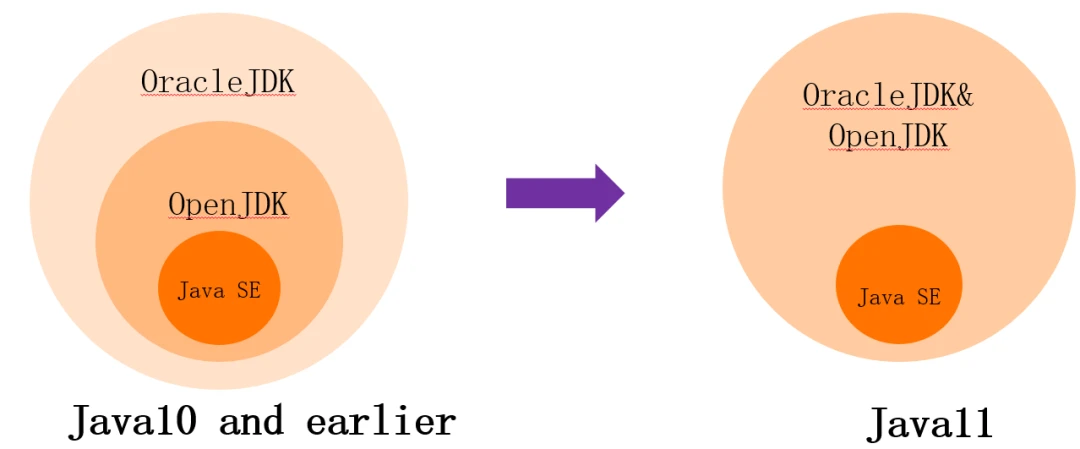
在 2018 年发布的 Java 11, Oracle 已经让 OpenJDK 和 Oracle JDK 两者的二进制文件在功能上尽可能相互接近,尽管 OpenJDK 与 Oracle JDK 两者在一些选项之间仍然存在一些差异。参考:<Differences Between Oracle JDK and OpenJDK>。

JDK

根据 JEP-320 的内容,计划于 2018 年 9 月发布的 JDK 11 将不包括 Java EE 模块:JAX-WS( JSR-224 )、JAXB( JSR-222 )、JAF( JSR-925 )、Commons Annotations( JSR-250 )和 JTA( JSR-907 ),而这些模块已在 JDK 中存在了多年。计划在 JDK 11 中移除的四个 Java EE 模块最终将进入 EE4J。

常见 JDK 版本:《你该选择什么样的 JDK?

  • Oracle JDK 商业版

    OTN 协议下发行的传统的 Oracle JDK,个人可以免费使用,但若在生产环境中商用就必须付费,可以有三年时间的更新支持。

  • OpenJDK 开源版

    GPLv2+CE 协议下由 Oracle 发行的 OpenJDK,可以免费在开发、测试、生产环境中使用,但是只有半年时间的更新支持。

    由于 Oracle 不愿意在旧版本的 OpenJDK 上继续耗费资源,而 RedHat (IBM) 又乐意扩大自己在 Java 社区的影响力,因此 RedHat 代替 Oracle 成为了 OpenJDK 历史版本的维护者,接过了 OpenJDK 6、7、8、11 的管理权力和维护职责。

  • OpenJDK 的变种版本:

JRE

不需要考虑 JDK 与 JRE 的关系了

JDK 和 JRE 都是 Java 的重要组成部分,但它们的角色和用途是不同的。JDK 是 Java 开发工具包,主要用于开发 Java 应用。它包含了 JRE,同时还提供了一些额外的工具,如编译器(javac)、调试器(jdb)等。JRE 则是运行 Java 应用程序所需的环境。它包含了 Java 虚拟机(JVM)和 Java 类库,也就是 Java 应用程序运行时所需的核心类和其他支持文件。

在 JDK 8 及之前的版本中,Oracle 会提供独立的 JRE 和 JDK 供用户下载。也就是说,你可以只安装 JRE 来运行 Java 程序,也可以安装 JDK 来开发 Java 程序。

然而从 JDK 9 开始,Oracle 不再单独发布 JRE。取而代之的是 jlink 工具,可以使用这个工具来生成 定制的运行时镜像。这种方式简化了 Java 应用的部署,因你只需要分发包含你的应用和定制运行时镜像的包,不需要单独安装 JRE。

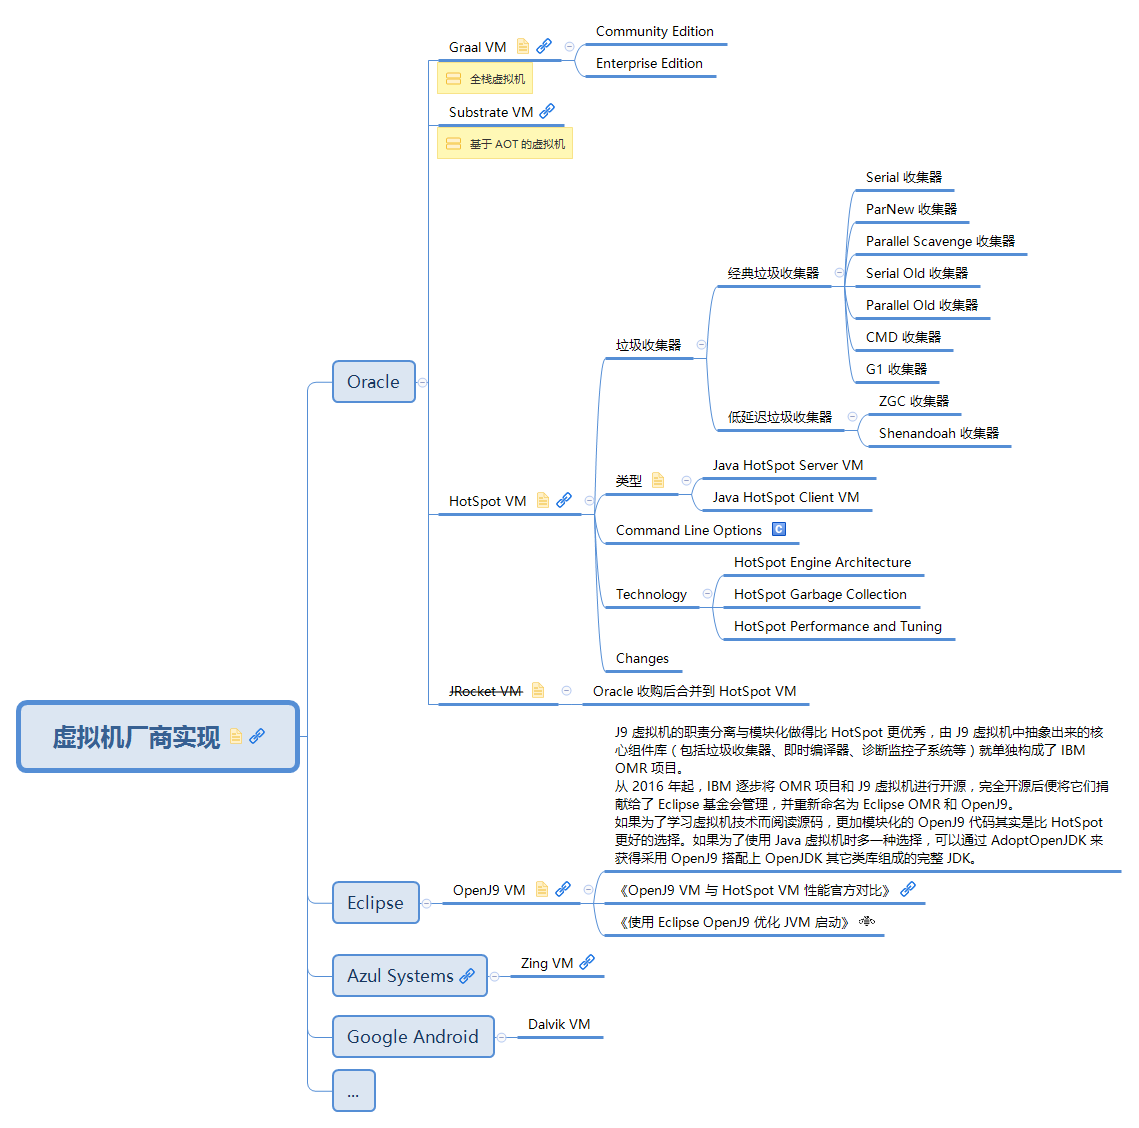
JVM

除了官方 HotSpotVM、GraalVM 实现,其它厂商实现如下:

参考:Java 虚拟机系列

Enterprise Edition

Roadmap

作为分水岭,2017 年 11 月,Oracle 将 Java EE 移交给 Eclipse 基金会。 2018 年 3 月 5 日,Eclipse 基金会宣布 Java EE (Enterprise Edition) 被更名为 Jakarta EE。

参考:《Java EE 规范重命名为 Jakarta EE

规范 创建组织 发布时间
Java EE 1.3 (JSR-058) Java Community Process
Java EE 1.4 (JSR-151) Java Community Process
Java EE 5 (JSR-244) Java Community Process 2005
Java EE 6 (JSR-316) Java Community Process 2007
Java EE 7 (JSR-342) Java Community Process May 28, 2013
Java EE 8 (JSR-366) Java Community Process Aug 21, 2017
Jakarta EE 8 Jakarta EE Platform Specification Project with guidance provided by the Jakarta EE Working Group 2019.9
Jakarta EE 9 Jakarta EE Platform Specification Project with guidance provided by the Jakarta EE Working Group 2020.9

Java EE

Java Platform, Enterprise Edition

Java EE 和 Spring 之间复杂的关系:

Spring 诞生于 2004 年,由 Rod Johnson 发起,作为对 J2EE(Java 2 Platform,Enterprise Edition)和 EJB 2 复杂性的反击。从那个时候开始,Spring 和 Java EE 之间就没有停止过竞争,并彼此影响对方:

  • Spring(以及 Hibernate)的出现刺激了 Java EE 社区,促使他们推出了 EJB 3 和 JAP 1.0。
  • Spring Batch 直接影响到了 Batch 规范(JSR 352)。
  • Spring Dependency Injection 启发了 CDI(Context and Dependency Injection)。
  • Spring 恰到好处地使用了 J2EE 和 Java EE 中的某些标准,如 Servlet、JMS 和 JPA。
  • Spring 5 宣称兼容 Java EE 8。

从 2006 年开始,Java EE 也将提升易用性和对开发者的友好放在首位,但在演进速度方面还是很慢,主要有两个原因:

  • JCP 制定规范需要很长时间:即使是一个轻量级的规范,也需要多方参与,需要更长的时间才能达成一致。
  • 实现和认证:在规范发布之后,需要几个月时间才能找到符合认证的应用服务器。

而最近,这方面的差距在加大:

  • Spring Boot 将“以约定代替配置(Convention Over Configuration)”的原则发挥到了极致,进一步提升易用性。
  • Spring Cloud 利用 Netflix 的开源组件解决了与云原生应用开发相关的问题,如服务注册、服务发现、弹性、负载均衡、监控……
  • Spring 5 将响应式编程(Reactive Programming)提升为一等公民。

Java EE 在这方面的速度要慢的多。在 2013 年发布 Java EE 7 之后,经历了一段消停期。2016 年,在社区的压力下,Oracle 才发布了一个新的路线图。

Java EE 8 发布于 2017 年 9 月,虽然人们对其期望甚高,但并非革命性的。人们还是把更多的目光投向了 Java EE 9,期望下一个版本会有更多的创新。

与此同时,Eclipse 基金会于 2016 年中启动 Microprofile.io 项目,旨在以微服务架构为基准来优化企业版 Java,以此来推动 Java EE 生态系统的发展。Microprofile 1.0 涵盖了 JAX-RS 2.0、CDI 1.2 和 JSON-P 1.0,1.2 版本于 2017 年 9 月发布,加入了更多特性,如配置、容错、JWT、度量指标和健康检测,2.0 版本有望与 Java EE 8 看齐。

Jakarta EE

Eclipse Foundation Projects

Architecture

Jakarta EE 平台的架构关系如下图所示。(请注意,此图显示了元素间的逻辑关系;它并不意味着将元素间物理关系为单独的机器、进程、地址空间或虚拟机。)

下面分别描述每个矩形及其之间的关系:

  • 容器(如 Web Container)作为 Jakarta EE 运行时环境,为 Application Components(如 Server Pages、Servlet)提供所需服务;
  • 而所提供的服务,由矩形下半部分的方框表示。例如, Web Container 为 Servlet 提供了 Bean Validation API。详见 Jakarta EE 标准服务
  • Java SE 的 API 受 Java SE 运行时环境(JRE)的支持,适用于每种类型的 Application Components。
  • 箭头表示需要访问 Jakarta EE 平台的其它部分。例如,Web Container 通过 JDBC™ API 为 Server Pages、Servlet 提供数据库访问能力。

Jakarta EE Architecture Diagram

Application Components

Jakarta EE 运行时环境定义了 Jakarta EE 产品必须支持的四种 Application Components 类型:

Application Components 描述
Application clients 通常是在台式计算机上执行的 GUI 程序。提供类似于本机应用程序的用户体验,并且可以访问 Jakarta EE 中间层的所有设施。
Applets 通常是在 Web 浏览器中执行的 GUI 组件,但也可以在支持 Applet 编程模型的各种其它应用程序或设备中执行。
Web Components (Servlets, Server Pages, Server Faces Applications, Filters, and Web Event Listeners) 通常在 Web 容器中执行,并可能响应来自 Web 客户端的 HTTP 请求。
Enterprise Beans 在支持事务的托管环境中执行。可以使用 SOAP/HTTP 协议直接提供 Web 服务。

Containers

容器为 Jakarta EE Application Components 提供运行时支持。

容器为 Application Components 提供了一套底层 Jakarta EE API 的联合视图。Jakarta EE Application Components 从不直接与其它 Jakarta EE Application Components 交互。它们使用容器的协议和方法来相互交互以及与平台服务交互。在 Application Components 和 Jakarta EE 服务之间插入一个容器,可以使该容器透明地注入该组件所需的服务,例如声明式事务管理,安全检查,资源池和状态管理。

This specification requires that containers provide a Java Compatible™ runtime environment, as defined by the Java Platform, Standard Edition, v8 specification (Java SE).

Database

The Jakarta EE platform requires a database, accessible through the JDBC API, for the storage of business data. The database is accessible from:

  • Web Components
  • Enterprise Beans
  • Application clients

Jakarta EE Standard Services

https://jakarta.ee/specifications/platform/9/jakarta-platform-spec-9.html#a84

参考

教程:

2017 年

2019 年

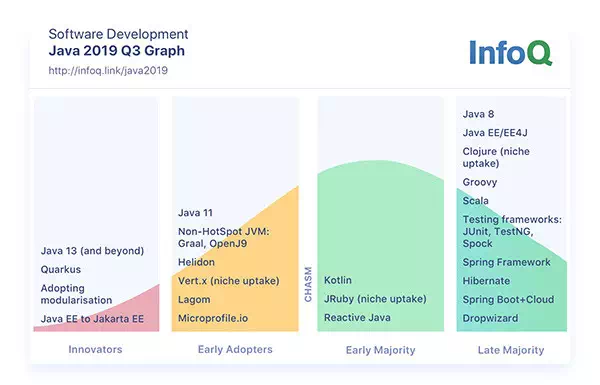
  • InfoQ 2019 年 Java 发展趋势报告

  • 2019 中国 Java 发展趋势报告

    Java 作为使用最为广泛的语言,最近几年还是有比较大进步的,无论从语法的易用性上还是性能上都有很大程度的提升。吸收了函数式编程的思想,lambda 表达式、Parallem stream、Var 变量等提升了开发人员的效率与代码的简洁性。ZGC 无疑是一项重大的改进,在一定程度上解决了 Java 天生的 GC 延迟问题。

    Java 的编程复杂度并没有明显的降低,比如 I/O 处理、并发 / 并⾏计算,以及类加载等等。再者是 Java 与操作系统之间的交互仍不够充分,尽管 Java 9 开始提供了不少的 API,然⽽了解和使用的群体不⾜。Java 在这方面明显不及 GO 语言。

    从语⾔层⾯来看,Java 正在向主流非 Java 语⾔融合,解决其中鸿沟的关键是语法的变化,比如 Java 8 的 Lambda 表达式 和 Java 10 的局部变量类型( var )等。个人认为这是一件好事,未来前后端不分家,相互渗透,对于彼此语言都是良性。

2020 年

2021 年

2022 年

2023 年:

从 Java 8 升级到 Java 17 踩坑全过程

从 JDK8 飞升到 JDK17,再到未来的 JDK21 | 阿里技术

升级指南之 JDK 11+ 新特性和阿里巴巴 AJDK | 阿里技术

从 JDK 9 到 19,我们帮您提炼了和云原生场景有关的能力列表 | 阿里技术

从 JDK 9 到 19,认识一个新的 Java 形态(内存篇)| 阿里技术

从 JDK 9 开始,一些关键特性 | 阿里技术

问题背景

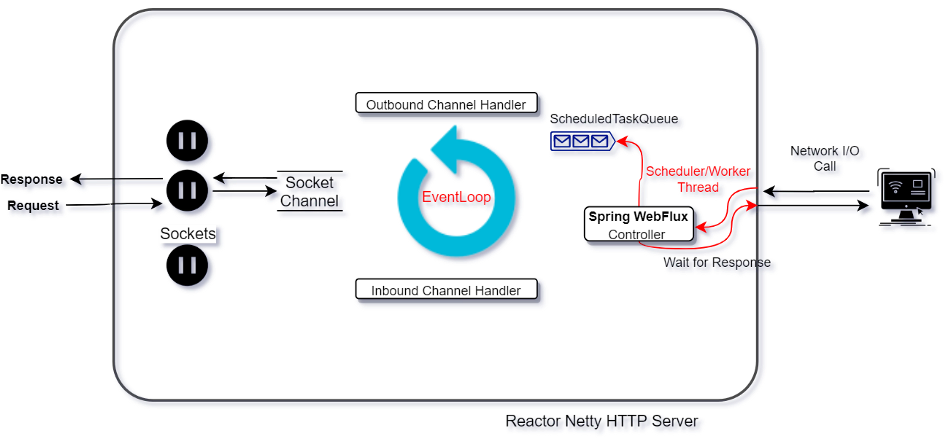
<Spring Webflux: EventLoop vs Thread per Request Model>

EventLoop is a Non-Blocking I/O Thread (NIO) which runs continuously and takes new requests from a range of socket channels.

What happens if an application block the EventLoop for a long time due to any of the following reasons?

  • High CPU intensive work
  • Database operations like read/write etc.
  • File read/write
  • Any call to another application over the network.

In these cases, EventLoop will get blocked and we could be in the same situation where our application could become slow or unresponsive very soon.

EventLoop should delegate the request to another worker thread (Worker Thread perform these long tasks) and return the result asynchronously via a callback to unblock the EventLoop for new request handling.

Event Loop Working with Worker Thread

These Worker threads can be created by the developer or can choose the ‘Scheduler’ strategy from reactive libraries like Reactor, RxJava or other. Remember to use these threads on an ad-hoc basis to keep the resource utilization minimum.

This approach helps when an application has multiple APIs and some of them are slow due to network calls or high CPU intensive work. Here, applications can still be partially available and responsive to user requests.

Ideally, to make your application fully reactive, there shouldn’t be any single thread which can block. Thus far, we are able to unblock our request handling thread i.e. EventLoop. But our Worker Threads are still handling blocking tasks and we can’t increase these thread count indefinitely when more such requests come, as that could also lead us to a new problem of managing large threads which can severely affect CPU utilization and memory usage. In such a case, we would need to use Worker Threads efficiently and strategically.

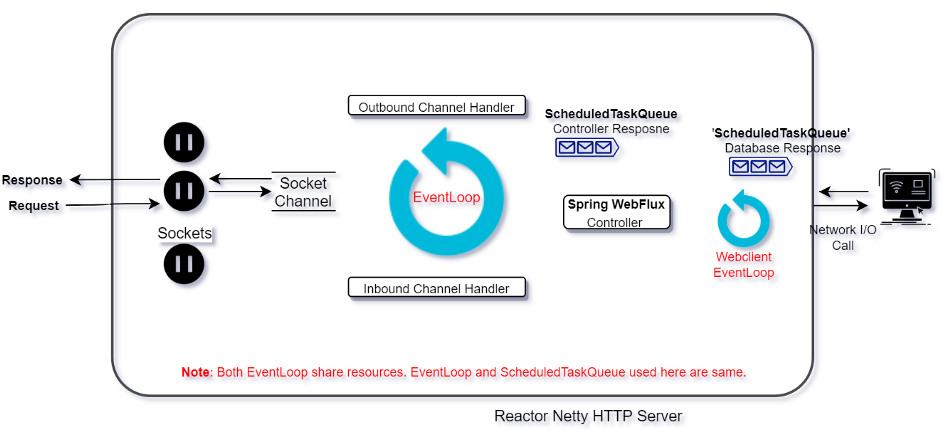
For most of the blocking cases mentioned above, it’s better to use a fully reactive approach. We have to choose DBs which provide reactive drivers for DB calls. Also, we have reactive Http Client to make call to another application over network e.g. Spring Webflux Reactive WebClient, which basically use Reactor Netty library i.e. EventLoop model. So, if our application uses Netty and Reactive Webclient, then EventLoop resources will be shared.

Fully Reactive approach with Webclient

Advantage:

  1. Lightweight request processing thread
  2. Optimum utilization of hardware resources
  3. Single EventLoop can be shared between http client and request processing.
  4. Single thread can handle requests over many sockets i.e. from different clients.
  5. This model provides support for backpressure handling in case of infinite stream response.

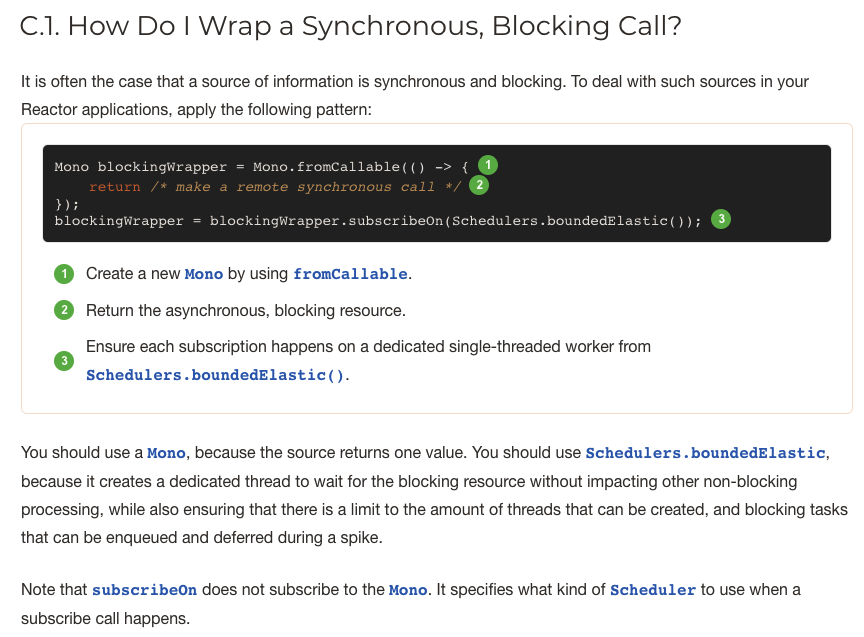
如何包装同步阻塞调用?

How Do I Wrap a Synchronous, Blocking Call?

什么是 Scheduler?

In Netty, worker threads are often named scheduler (or similar) because of the way they manage and schedule tasks in the network I/O processing loop, specifically the event loop.

如何创建 Scheduler?

通过工厂类 Schedulers 创建 Scheduler:

https://projectreactor.io/docs/core/release/api/reactor/core/scheduler/Schedulers.html

Return a shared instance Return a new instance Description Notes
immediate() / No execution context at processing time, the submitted Runnable will be directly executed, effectively running them on the current Thread (can be seen as a “null object” or no-op Scheduler).
single() newSingle(...) A single, reusable thread. Note that this method reuses the same thread for all callers, until the Scheduler is disposed.
elastic() newElastic(...) An unbounded elastic thread pool. This one is no longer preferred with the introduction of Schedulers.boundedElastic(), as it has a tendency to hide backpressure problems and lead to too many threads (see below).
boundedElastic() newBoundedElastic(...) A bounded elastic thread pool. Like its predecessor elastic(), it creates new worker pools as needed and reuses idle ones. Worker pools that stay idle for too long (the default is 60s) are also disposed.
Unlike its predecessor elastic(), it has a cap on the number of backing threads it can create (default is number of CPU cores x 10). Up to 100 000 tasks submitted after the cap has been reached are enqueued and will be re-scheduled when a thread becomes available.
This is a better choice for I/O blocking work. While it is made to help with legacy blocking code if it cannot be avoided. Schedulers.boundedElastic() is a handy way to give a blocking process its own thread so that it does not tie up other resources. See How Do I Wrap a Synchronous, Blocking Call?, but doesn’t pressure the system too much with new threads.
parallel() newParallel(...) A fixed pool of workers that is tuned for parallel work. It creates as many workers as you have CPU cores.
fromExecutorService(ExecutorService) A Customize thread pool. Create a Scheduler out of any pre-existing ExecutorService

delayElements
Signals are delayed and continue on the parallel default Scheduler
Signals are delayed and continue on an user-specified Scheduler

如何使用 Scheduler?

Reactor offers two means of switching the execution context (or Scheduler) in a reactive chain: publishOn and subscribeOn. Both take a Scheduler and let you switch the execution context to that scheduler. But the placement of publishOn in the chain matters, while the placement of subscribeOn does not. To understand that difference, you first have to remember that nothing happens until you subscribe.

Let’s have a closer look at the publishOn and subscribeOn operators:

例子一

演示流是运行在 subscribe() 方法调用的线程上,且大多数操作符继续在前一个操作符执行的线程中工作。

most operators continue working in the Thread on which the previous operator executed. Unless specified, the topmost operator (the source) itself runs on the Thread in which the subscribe() call was made. The following example runs a Mono in a new thread:

1
2
3
4
5
6
7
8
9
10
11
12
13
14
15
16
17
18
// The Mono<String> is assembled in thread main.
final Mono<String> mono =
Mono.fromSupplier(() -> {
log.info("fromSupplier");
return "hello";
})
.map(msg -> {
log.info("map");
return msg + " world";
});

Thread t = new Thread(() ->
// However, it is subscribed to in thread Thread-0.
// As a consequence, all callbacks (fromSupplier, map, onNext) actually run in Thread-0
mono.subscribe(log::info)
);
t.start();
t.join();

输出结果:

1
2
3
21:02:18.436 [Thread-0] INFO FluxTest - fromSupplier
21:02:18.436 [Thread-0] INFO FluxTest - map
21:02:18.437 [Thread-0] INFO FluxTest - hello world

例子二

演示如何使用 subscribeOn 方法,简化上述例子一。

1
2
3
4
5
6
7
8
9
10
11
12
13
14
15
16
17
CountDownLatch countDownLatch = new CountDownLatch(1);

// The Mono<String> is assembled in thread main.
Mono.fromSupplier(() -> {
log.info("fromSupplier");
return "hello";
})
.map(msg -> {
log.info("map");
return msg + " world";
})
.doOnTerminate(countDownLatch::countDown)
// However, the subscribeOn switches the whole sequence on a Thread picked from Scheduler.
.subscribeOn(Schedulers.newSingle("subscribeOn"))
.subscribe(log::info);

countDownLatch.await();

输出结果:

1
2
3
21:31:52.563 [subscribeOn-1] INFO FluxTest - fromSupplier
21:31:52.563 [subscribeOn-1] INFO FluxTest - map
21:31:52.563 [subscribeOn-1] INFO FluxTest - hello world

例子三

演示 publishOn 如何影响其后续操作符的执行线程。

publishOn takes signals from upstream and replays them downstream while executing the callback on a worker from the associated Scheduler. Consequently, it affects where the subsequent operators execute (until another publishOn is chained in), as follows:

1
2
3
4
5
6
7
8
9
10
11
12
13
14
15
16
17
18
19
20
21
22
23
CountDownLatch countDownLatch = new CountDownLatch(1);

// 1、The Mono<String> is assembled in thread main.
Mono.fromSupplier(() -> {
log.info("fromSupplier");
return "hello";
})
.map(msg -> {
log.info("first map");
return msg + " world";
})
// 3、The publishOn affects where the subsequent operators execute.
.publishOn(Schedulers.newSingle("publishOn"))
.map(msg -> {
log.info("second map");
return msg + " again";
})
.doOnTerminate(countDownLatch::countDown)
// 2、However, the subscribeOn switches the whole sequence on a Thread picked from Scheduler.
.subscribeOn(Schedulers.newSingle("subscribeOn"))
.subscribe(log::info);

countDownLatch.await();

输出结果:

1
2
3
4
21:32:36.975 [subscribeOn-1] INFO FluxTest - fromSupplier
21:32:36.976 [subscribeOn-1] INFO FluxTest - first map
21:32:36.977 [publishOn-2] INFO FluxTest - second map
21:32:36.977 [publishOn-2] INFO FluxTest - hello world again

参考

Reactor Core Features - Threading and Schedulers

Exposing Reactor metrics

Appendix C.1. How Do I Wrap a Synchronous, Blocking Call?

Appendix C.6. How Do I Ensure Thread Affinity when I Use publishOn()?

https://www.woolha.com/tutorials/project-reactor-publishon-vs-subscribeon-difference

面试官:为什么数据库连接池不采用 IO 多路复用?

The Reactive Relational Database Connectivity (R2DBC) project brings reactive programming APIs to relational databases.

In contrast to the blocking nature of JDBC, R2DBC allows you to work with SQL databases using a reactive API.

Reactive Streams 规范并未提供任何操作符(Operators),而 Reactor 框架的核心价值之一就是提供了丰富的操作符。从简单的转换、过滤到复杂的编排和错误处理,涉及方方面面。

推荐通过参考文档而不是 JavaDoc 来学习 Mono/Flux API 和 Operator 操作符。参考:Appendix A: Which operator do I need?

注意点

使用 Reactor API 时,有以下几个注意点:

一、每个 Operator API 都会返回新实例

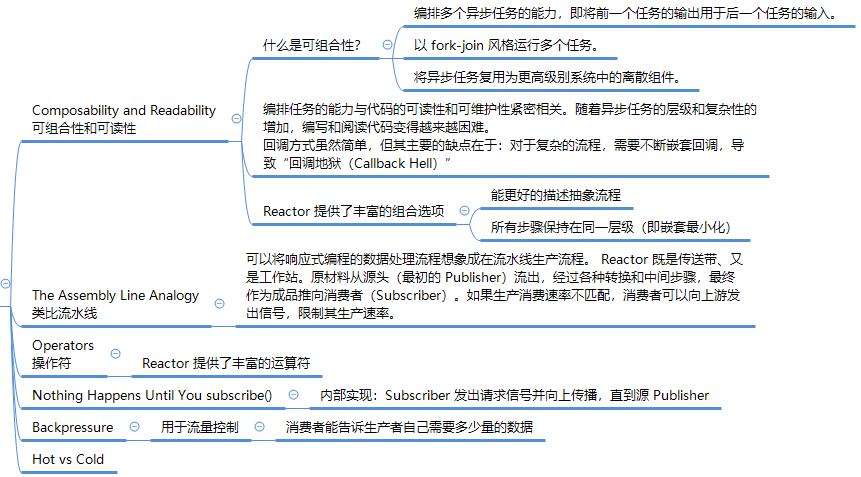
在 Reactor 中,操作符(Operators)好比流水线中的工作站。 每个操作符都会向 Publisher 添加行为,并将上一步的 Publisher 包装成新实例。因而,整个链就被串起来,数据从第一个 Publisher 开始,沿着链向下移动,通过每个链接进行转换。最终,Subscriber 结束该流程。 注意,直到 Subscriber 订阅 Publisher 为止,什么都不会发生。

理解操作符会创建新实例这一行为,有助于避免一些常见错误,详见:I Used an Operator on my Flux but it Doesn’t Seem to Apply. What Gives?

二、Nothing Happens Until You subscribe()

Reactor 中,当您编写 Publisher 链时,仅用于描述异步处理的抽象过程,默认情况下数据不会开始处理。只有通过订阅,将 PublisherSubscriber 绑定在一起时,才能触发整个链中的数据流处理。这是由其内部实现方式决定的:Subscriber 发出请求信号并向上传播,直到源 Publisher

org.reactivestream_api

详见:C.2. I Used an Operator on my Flux but it Doesn’t Seem to Apply. What Gives?

三、使用背压(Backpressure)进行流量控制

Propagating signals upstream is also used to implement backpressure, which we described in the assembly line analogy as a feedback signal sent up the line when a workstation processes more slowly than an upstream workstation.

The real mechanism defined by the Reactive Streams specification is pretty close to the analogy: A subscriber can work in unbounded mode and let the source push all the data at its fastest achievable rate or it can use the request mechanism to signal the source that it is ready to process at most n elements.

Intermediate operators can also change the request in-transit. Imagine a buffer operator that groups elements in batches of ten. If the subscriber requests one buffer, it is acceptable for the source to produce ten elements. Some operators also implement prefetching strategies, which avoid request(1) round-trips and is beneficial if producing the elements before they are requested is not too costly.

This transforms the push model into a push-pull hybrid, where the downstream can pull n elements from upstream if they are readily available. But if the elements are not ready, they get pushed by the upstream whenever they are produced.

我该使用哪个操作符?

Creating a New Sequence…

Mono

https://projectreactor.io/docs/core/release/api/reactor/core/publisher/Mono.html

for [0|1] elements

mono

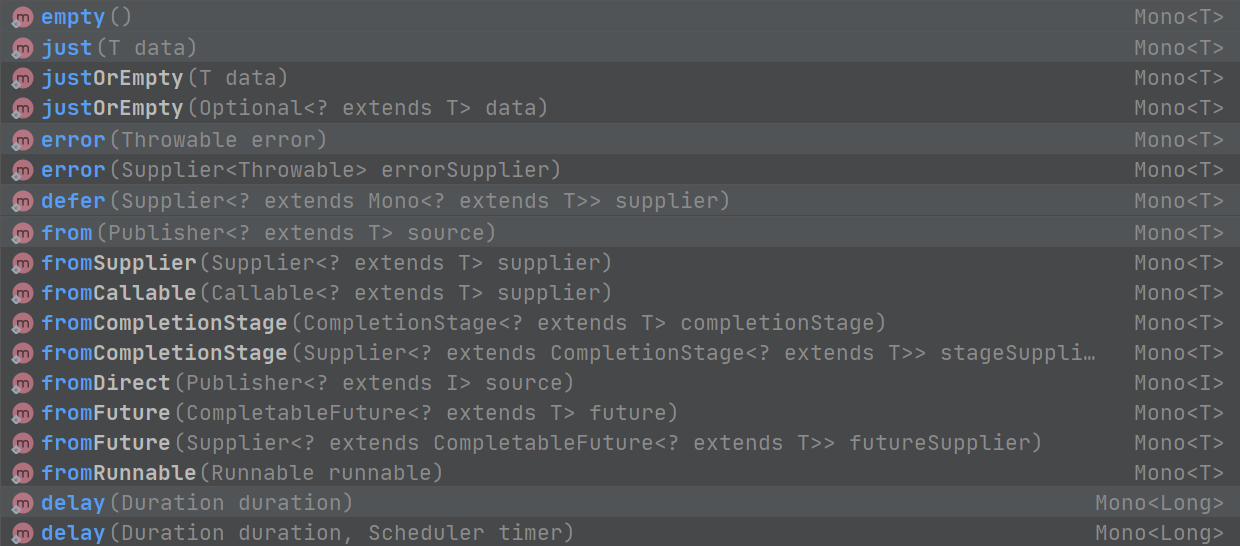
创建 Mono 流:

mono_create

Flux

https://projectreactor.io/docs/core/release/api/reactor/core/publisher/Flux.html

for [N] elements

flux

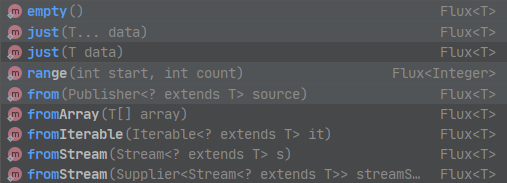
普通创建:

flux_create

遍历创建:

定时创建:

flux_create_interval

合并创建:

flux_create_combine

编程式创建:

flux_create_2

其它:

flux_create_switchOnNext

中间操作

Each operator adds behavior to a Publisher and wraps the previous step’s Publisher into a new instance. The whole chain is thus linked, such that data originates from the first Publisher and moves down the chain, transformed by each link. Eventually, a Subscriber finishes the process. Remember that nothing happens until a Subscriber subscribes to a Publisher.

While the Reactive Streams specification does not specify operators at all, one of the best added values of reactive libraries, such as Reactor, is the rich vocabulary of operators that they provide. These cover a lot of ground, from simple transformation and filtering to complex orchestration and error handling.

Transforming an Existing Sequence

常用的如下:

  • I want to transform existing data:

    • on a 1-to-1 basis (eg. strings to their length): map (Flux|Mono)

      • …by just casting it: cast (Flux|Mono)
      • …in order to materialize each source value’s index: Flux#index
    • on a 1-to-n basis (eg. strings to their characters): flatMap (Flux|Mono) + use a factory method

    • running an asynchronous task for each source item (eg. urls to http request): flatMap (Flux|Mono) + an async Publisher-returning method

      • …ignoring some data: conditionally return a Mono.empty() in the flatMap lambda

      • …retaining the original sequence order: Flux#flatMapSequential (this triggers the async processes immediately but reorders the results)

      • …where the async task can return multiple values, from a Mono source: Mono#flatMapMany

        1
        2
        3
        // Mono 转 Flux
        // Create a Flux that emits the items contained in the provided Iterable. A new iterator will be created for each subscriber.
        Mono#flatMapMany(Flux::fromIterable)
  • I want to add pre-set elements to an existing sequence:

  • I want to aggregate a Flux: (the Flux# prefix is assumed below)

    • into a List: collectList, collectSortedList

    • into a Map: collectMap, collectMultiMap

    • into an arbitrary container: collect

    • into the size of the sequence: count (Mono.empty() 不计入 count)

    • by applying a function between each element (eg. running sum): reduce

      1
      2
      3
      4
      Flux.range(0, 5)
      .reduce(Integer::sum) // 两两相加
      .map(Objects::toString)
      .subscribe(log::info);
      • …but emitting each intermediary value: scan
    • into a boolean value from a predicate:

      • applied to all values (AND): all
      • applied to at least one value (OR): any
      • testing the presence of any value: hasElements (there is a Mono equivalent in hasElement)
      • testing the presence of a specific value: hasElement(T)
  • I want to combine publishers…

    • in sequential order: Flux#concat or .concatWith(other) (Flux|Mono)
    • in emission order (combined items emitted as they come): Flux#merge / .mergeWith(other) (Flux|Mono)
    • by pairing values:
    • by coordinating their termination:
      • from 1 Mono and any source into a Mono: Mono#and
      • from n sources when they all completed: Mono#when
      • into an arbitrary container type:
        • each time all sides have emitted: Flux#zip (up to the smallest cardinality)
        • each time a new value arrives at either side: Flux#combineLatest
    • selecting the first publisher which…
      • produces a value (onNext): firstWithValue (Flux|Mono)
      • produces any signal: firstWithSignal (Flux|Mono)
    • triggered by the elements in a source sequence: switchMap (each source element is mapped to a Publisher)
    • triggered by the start of the next publisher in a sequence of publishers: switchOnNext
  • I want to repeat an existing sequence: repeat (Flux|Mono)

  • I have an empty sequence but…

    • I want a value instead: defaultIfEmpty (Flux|Mono)

    • I want another sequence instead: switchIfEmpty (Flux|Mono)

      1
      2
      3
      4
      5
      6
      7
      Flux.just(0, 1, 2, 3)
      .filter(i -> i < 0)
      .next()
      .doOnNext(i -> log.info("Exist a item: {}", i))
      .switchIfEmpty(Mono.just(-1))
      .map(Objects::toString)
      .subscribe(log::info);
  • I have a sequence but I am not interested in values: ignoreElements (Flux.ignoreElements()|Mono.ignoreElement())

    • …and I want the completion represented as a Mono: then (Flux|Mono)
    • …and I want to wait for another task to complete at the end: thenEmpty (Flux|Mono)
    • …and I want to switch to another Mono at the end: Mono#then(mono)
    • …and I want to emit a single value at the end: Mono#thenReturn(T)
    • …and I want to switch to a Flux at the end: thenMany (Flux|Mono)

Filtering a Sequence

方法 注释
take(long n) Take only the first N values from this Flux, if available.
takeLast(long n) Emit the last N values this Flux emitted before its completion.
last() Emit the last element observed before complete signal as a Mono, or emit NoSuchElementException error if the source was empty.
last(T defaultValue) Emit the last element observed before complete signal as a Mono, or emit the defaultValue if the source was empty.

Peeking into a Sequence

Reactive callback

方法 入参 注释
doOnSubscribe Consumer<? super Subscription> Add behavior triggered when the Mono is subscribed.
doOnCancel Runnable Add behavior triggered when the Mono is cancelled.
doOnRequest LongConsumer Add behavior triggering a LongConsumer when the Mono receives any request.
doOnNext Consumer<? super T> Add behavior triggered when the Mono emits a data successfully.
do on Complete …
doOnComplete Runnable Add behavior triggered when the Flux completes successfully.
doOnSuccess Consumer<? super T> Add behavior triggered when the Mono completes successfully.
* null : completed without data
* T: completed with data
doOnError Consumer<? super Throwable>
Class<E>, Consumer<? super E>
Predicate<? super Throwable>, Consumer<? super Throwable>
Add behavior triggered when the Mono completes with an error.
doOnTerminate Runnable completion or error
doAfterTerminate Runnable completion or error but after it has been propagated downstream
doFinally Consumer<SignalType> any terminating condition (complete, error, cancel).
doOnSuccessOrError Deprecated, will be removed in 3.5.0. Prefer using doOnNext(Consumer), doOnError(Consumer), doOnTerminate(Runnable) or doOnSuccess(Consumer).
Add behavior triggered when the Mono terminates, either by completing successfully or with an error.
* null, null : completing without data
* T, null : completing with data
* null, Throwable : failing with/without data
doAfterSuccessOrError Deprecated, will be removed in 3.5.0. Prefer using doAfterTerminate(Runnable) or doFinally(Consumer).

Add behavior triggered after the Mono terminates, either by completing downstream successfully or with an error. The arguments will be null depending on success, success with data and error:
* null, null : completed without data
* T, null : completed with data
* null, Throwable : failed with/without data
all events …
doOnEach Consumer<? super Signal<T>> I want to know of all events each represented as Signal object in a callback outside the sequence: doOnEach

调试类:

方法 注释
log Observe all Reactive Streams signals and trace them using Logger support. Default will use Level.INFO and java.util.logging. If SLF4J is available, it will be used instead.
timestamp If this Mono is valued, emit a Tuple2 pair of T1 the current clock time in millis (as a Long measured by the parallel Scheduler) and T2 the emitted data (as a T).
elapsed

Handling Errors

对于异常处理,Reactor 除了默认的立刻抛出异常的处理方式之外,还提供三类处理方式:

  • 简单记录日志(doOnError
  • recover from errors by falling back (onErrorReturnonErrorResume)
  • recover from errors by retrying (retryretryWhen)
方法 注释 描述
error Create a Mono that terminates with the specified error immediately after being subscribed to. 创建异常流。
onErrorMap Transform any error emitted by this Mono by synchronously applying a function to it.
Transform an error emitted by this Mono by synchronously applying a function to it if the error matches the given type. Otherwise let the error pass through.
Transform an error emitted by this Mono by synchronously applying a function to it if the error matches the given predicate. Otherwise let the error pass through.
catching an exception and wrapping and re-throwing
onErrorReturn Simply emit a captured fallback value when any error is observed on this Mono.
Simply emit a captured fallback value when an error of the specified type is observed on this Mono.
Simply emit a captured fallback value when an error matching the given predicate is observed on this Mono.
catching an exception and falling back to a default value
onErrorResume Subscribe to a fallback publisher when any error occurs, using a function to choose the fallback depending on the error.
Subscribe to a fallback publisher when an error matching the given type occurs.
Subscribe to a fallback publisher when an error matching a given predicate occurs.
catching an exception and falling back to another Mono
onErrorContinue Let compatible operators upstream recover from errors by dropping the incriminating element from the sequence and continuing with subsequent elements. https://devdojo.com/ketonemaniac/reactor-onerrorcontinue-vs-onerrorresume
retry()
retry(long)
Re-subscribes to this Mono sequence if it signals any error, indefinitely.
Re-subscribes to this Mono sequence if it signals any error, for a fixed number of times.
retrying with a simple policy (max number of attempts)
retryWhen

Mono

mono_error

Flux

flux_error

受检异常处理:

非受检异常会被 Reactor 传播,而受检异常必须被用户代码 try catch ,为了让受检异常被 Reactor 的异常传播机制和异常处理机制支持,可以使用如下步骤处理:

  1. try catch 之后,使用 Exceptions.propagate 将受检异常包装为非受检异常并重新抛出传播出去。
  2. onError 回调等异常处理操作获取到异常之后,可以调用 Exceptions.unwrap 取得原受检异常。

参考:https://projectreactor.io/docs/core/release/reference/index.html#error.handling

Sorting a Flux

flux_sort

Splitting a Flux

https://projectreactor.io/docs/core/release/reference/index.html#advanced-three-sorts-batching

延迟处理

flux_delay

转成并行流

flux_parallel

终结操作

Subscribe a Sequence

MonoFlux

mono_subscribe

订阅后可以使用 Disposable API 停止 FLux 流。

Going Back to the Synchronous World

Note: all of these methods except Mono#toFuture will throw an UnsupportedOperatorException if called from within a Scheduler marked as “non-blocking only” (by default parallel() and single()).

参考

Reactor 框架,实现 Reactive Streams 规范,并扩展大量特性

Appendix A: Which operator do I need?

https://zhuanlan.zhihu.com/p/35964846

响应式编程

响应式编程,如 Reactor 旨在解决 JVM 上传统异步编程带来的缺点、以及编程范式上从命令式过渡到响应式编程:

阻塞带来的性能浪费

现代的应用程序通常有大量并发请求。即使现代的硬件性能不断提高,软件性能仍然是关键瓶颈。

广义上讲,有两种方法可以提高程序的性能:

  • 利用并行(parallel)使用更多 CPU 线程和更多硬件资源。
  • 提升现有资源的利用率。

通常,Java 开发者使用阻塞方式来编写程序。除非达到性能瓶颈,否则这种做法可行。之后,通过增加线程数,运行类似的阻塞代码。 但这种方式很快就会导致资源争用和并发问题

更糟糕的是,阻塞会浪费资源。试想一下,程序一旦遇到一些延迟(特别是 I/O 操作,例如数据库请求或网络请求),就会挂起线程,从而导致资源浪费,因为大量线程处于空闲状态,等待数据,甚至导致资源耗尽。尽管使用池化技术可以提升资源利用率、避免资源耗尽,但只能缓解而不能解决根本问题,而且池内资源同样有耗尽的问题。

因此,并行技术并非银弹。

传统异步编程带来的缺点

Java 提供了两种异步编程模型:

  • Callbacks: 异步方法没有返回值,但是带有一个额外的 callback 回调参数(值为 Lambda 表达式或匿名类),回调参数在结果可用时被调用。
  • Futures: 异步方法调用后立即返回一个 Future<T> 对象。异步方法负责计算出结果值 T,由 Future 对象包装起来。该结果值并非立即可用,可以轮询该 Future 对象,直到结果值可用为止。这种方式顺序执行代码,将异步编程模型转为同步编程模型。ExecutorService 提供了方法 <T> Future<T> submit(Callable<T> task)

两种模型都有一个共同的缺点:难以组合代码,从而导致代码可读性差、难以维护。例如,当业务逻辑复杂,步骤存在依赖关系时,会导致回调嵌套过深,从而导致著名的 Callback Hell 问题。

详见代码例子。

从命令式过渡到响应式编程

from_imperative_to_reactive_programming

Reactor 框架

Reactor 是一款基于 JVM 的完全非阻塞的响应式编程框架。它实现了 Reactive Streams 规范,具有高效的流量控制(以管理背压的形式),并扩展了大量特性,例如提供了丰富的 Operators 运算符。

先决条件

Reactor Core 需要在 Java 8 及以上版本运行。因为 Reactor 直接集成了 Java 8 的函数式 API,特别是:

  • java.util.CompletableFuture
  • java.util.stream.Stream
  • java.time.Duration

依赖安装

自 Reactor 3 开始(since reactor-core 3.0.4, with the Aluminium release train),Reactor 使用 BOM (Bill of Materials) 模型来管理依赖。BOM 将一组相关的、可以良好协作的构建(Maven Artifact)组合在一起,提供版本管理。避免构件间潜在的版本不兼容风险。

为项目引入该 BOM:

1
2
3
4
5
6
7
8
9
10
11
<dependencyManagement>
<dependencies>
<dependency>
<groupId>io.projectreactor</groupId>
<artifactId>reactor-bom</artifactId>
<version>${reactor.version}</version>
<type>pom</type>
<scope>import</scope>
</dependency>
</dependencies>
</dependencyManagement>

然后就可以为项目添加相关依赖。注意忽略版本号,以便由 BOM 统一管理版本号(除非你想覆盖 BOM 管理的版本号):

1
2
3
4
5
6
7
8
9
10
11
12
<dependencies>
<!-- Reactor -->
<dependency>
<groupId>io.projectreactor</groupId>
<artifactId>reactor-core</artifactId>
</dependency>
<dependency>
<groupId>io.projectreactor</groupId>
<artifactId>reactor-test</artifactId>
<scope>test</scope>
</dependency>
</dependencies>

这里 Reactor Core 传递依赖于 Reactive Stream 规范,如下:

reactor_dependencies

1
2
3
4
5
6
<dependency>
<groupId>org.reactivestreams</groupId>
<artifactId>reactive-streams</artifactId>
<version>1.0.2</version>
<scope>compile</scope>
</dependency>

API

Reactor Core 提供了两个可组合式异步串行 API

  • reactor.core.publisher.Mono (for [0|1] elements)
  • reactor.core.publisher.Flux (for [N] elements)

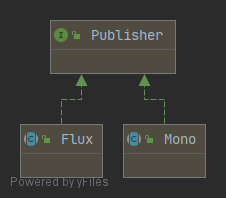
这两个类都是 org.reactivestreams.Publisher 接口的实现类:

Publisher

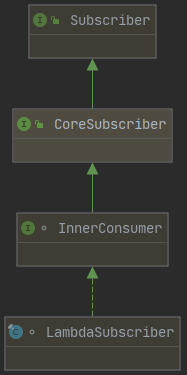
Reactor Core 还提供了 org.reactivestreams.Subscriber 接口的实现类,如下(还有其它子类,此处不一一例举):

Subscriber

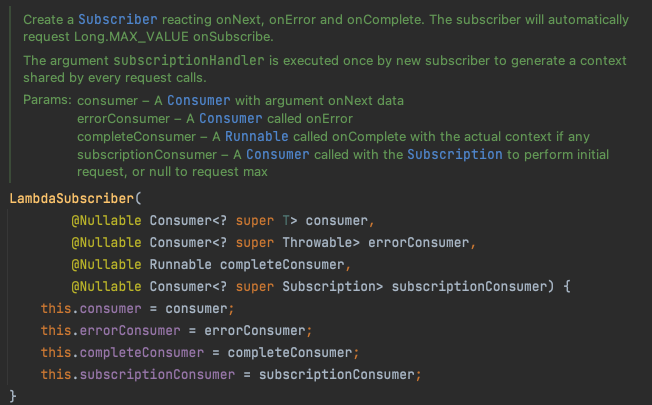
LambdaSubscriber 的构造方法如下:

LambdaSubscriber 的构造方法

不过一般不会直接使用该实现类,而是使用 MonoFlux 提供的 subscribe 方法(如下图),并传入 Lambda 表达式语句(代码即参数),由方法的实现负责将参数封装为 Subscriber 接口的实现类,供消费使用:

mono_subscribe

参考

Reactor 框架,实现 Reactive Streams 规范,并扩展大量特性

历史

响应式编程(Reactive Programming)概念最早于上世纪九十年代被提出,微软为 .NET 生态开发了 Reactive Extensions (Rx) 库用于支持响应式编程,后来 Netflix 开发了 RxJava,为 JVM 生态实现了响应式编程。随着时间的推移,2015 年 Reactive Stream(响应式流)规范诞生,为 JVM 上的响应式编程定义了一组接口和交互规则。RxJava 从 RxJava 2 开始实现 Reactive Stream 规范。同时 MongoDB、Reactor、Slick 等也相继实现了 Reactive Stream 规范。

Spring Framework 5 推出了响应式 Web 框架

Java 9 引入了响应式编程的 API,将 Reactive Stream 规范定义的四个接口集成到了 java.util.concurrent.Flow 类中。Java 9 提供了 SubmissionPublisherConsumerSubscriber 两个默认实现。

1
2
3
4
5
6
7
8
9
10
11
12
13
14
+--------------------------+     +-------------+     +------------------+     +-------------------------------+
| Reactive Extensions (Rx) | | RxJava 1.x | | Reactive Streams | | RxJava 2 |
| by Microsoft +-----> by Netflix +-----> Specification +-----> (Supporting Reactive Streams) |
| for .NET | | for Java 6+ | | for JVM | | for Java 6+ |
+--------------------------+ +-------------+ +------------------+ +-------------------------------+
|
|
|
+-----------------------+ +--------------------+ +---------------v---------------+
| Java 9 Standard | | Spring Framework 5 | | Project Reactor |
| (JEP-266 by Doug Lea) <-----+ Reactive Stack <-----+ (Supporting Reactive Streams) |
| | | | | for Java 8+ |
+-----------------------+ +--------------------+ +-------------------------------+

定义

响应式编程(Reactive Programing)是一种基于数据流(data stream)和变化传递(propagation of change)的声明式(declarative)的编程范式。

设计思想

响应式编程范式通常在面向对象语言中作为观察者模式的扩展出现。可以将其与大家熟知的迭代器模式作对比,主要区别在于:

迭代器(Iterator) 响应式流(Reactive Stream)
设计模式 迭代器模式 观察者模式
数据方向 拉模式(PULL) 推模式(PUSH)
获取数据 T next() onNext(T)
处理完成 hasNext() onCompleted()
异常处理 throws Exception onError(Exception)

Java 8 引入了 Stream 用于流的操作,Java 9 引入的 Flow 也是数据流的操作。相比之下:

  • Stream 更侧重于流的过滤、映射、整合、收集,使用的是 PULL 模式。
  • 而 Flow/RxJava/Reactor 更侧重于流的产生与消费,使用的是 PUSH 模式 。

迭代器模式

参考《Iterator API 总结

观察者模式

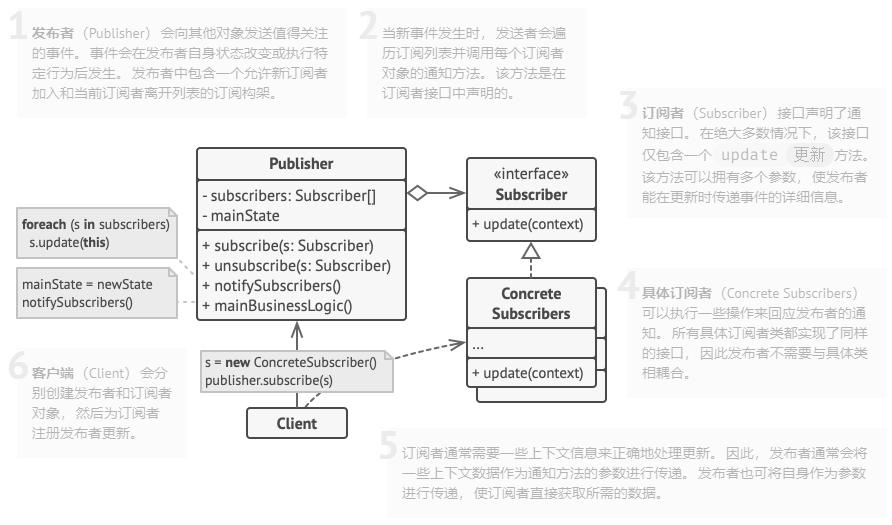
观察者模式是一种行为型设计模式,允许你定义一种订阅机制,可在对象事件发生时主动通知多个 “观察” 该对象的其它对象。

Observer

在响应式流中,上述操作由 Publisher-Subscriber 负责。由 Publisher 生产新值并推送给 Subscriber,这个“推送”就是响应式的关键,亦即“变化传递(propagation of change)”。另外,应用于被推送值的操作(Operator)是“声明式”而不是“命令式”的:开发者表达的是计算逻辑,而不是描述其具体的控制流程。

流程如下:

1
onNext x 0..N [onError | onComplete]

Reactive Streams 规范

依赖

Reactive Stream(响应式流)规范的 Maven 依赖如下:

1
2
3
4
5
6
<!-- https://mvnrepository.com/artifact/org.reactivestreams/reactive-streams -->
<dependency>
<groupId>org.reactivestreams</groupId>
<artifactId>reactive-streams</artifactId>
<version>1.0.2</version>
</dependency>

核心接口

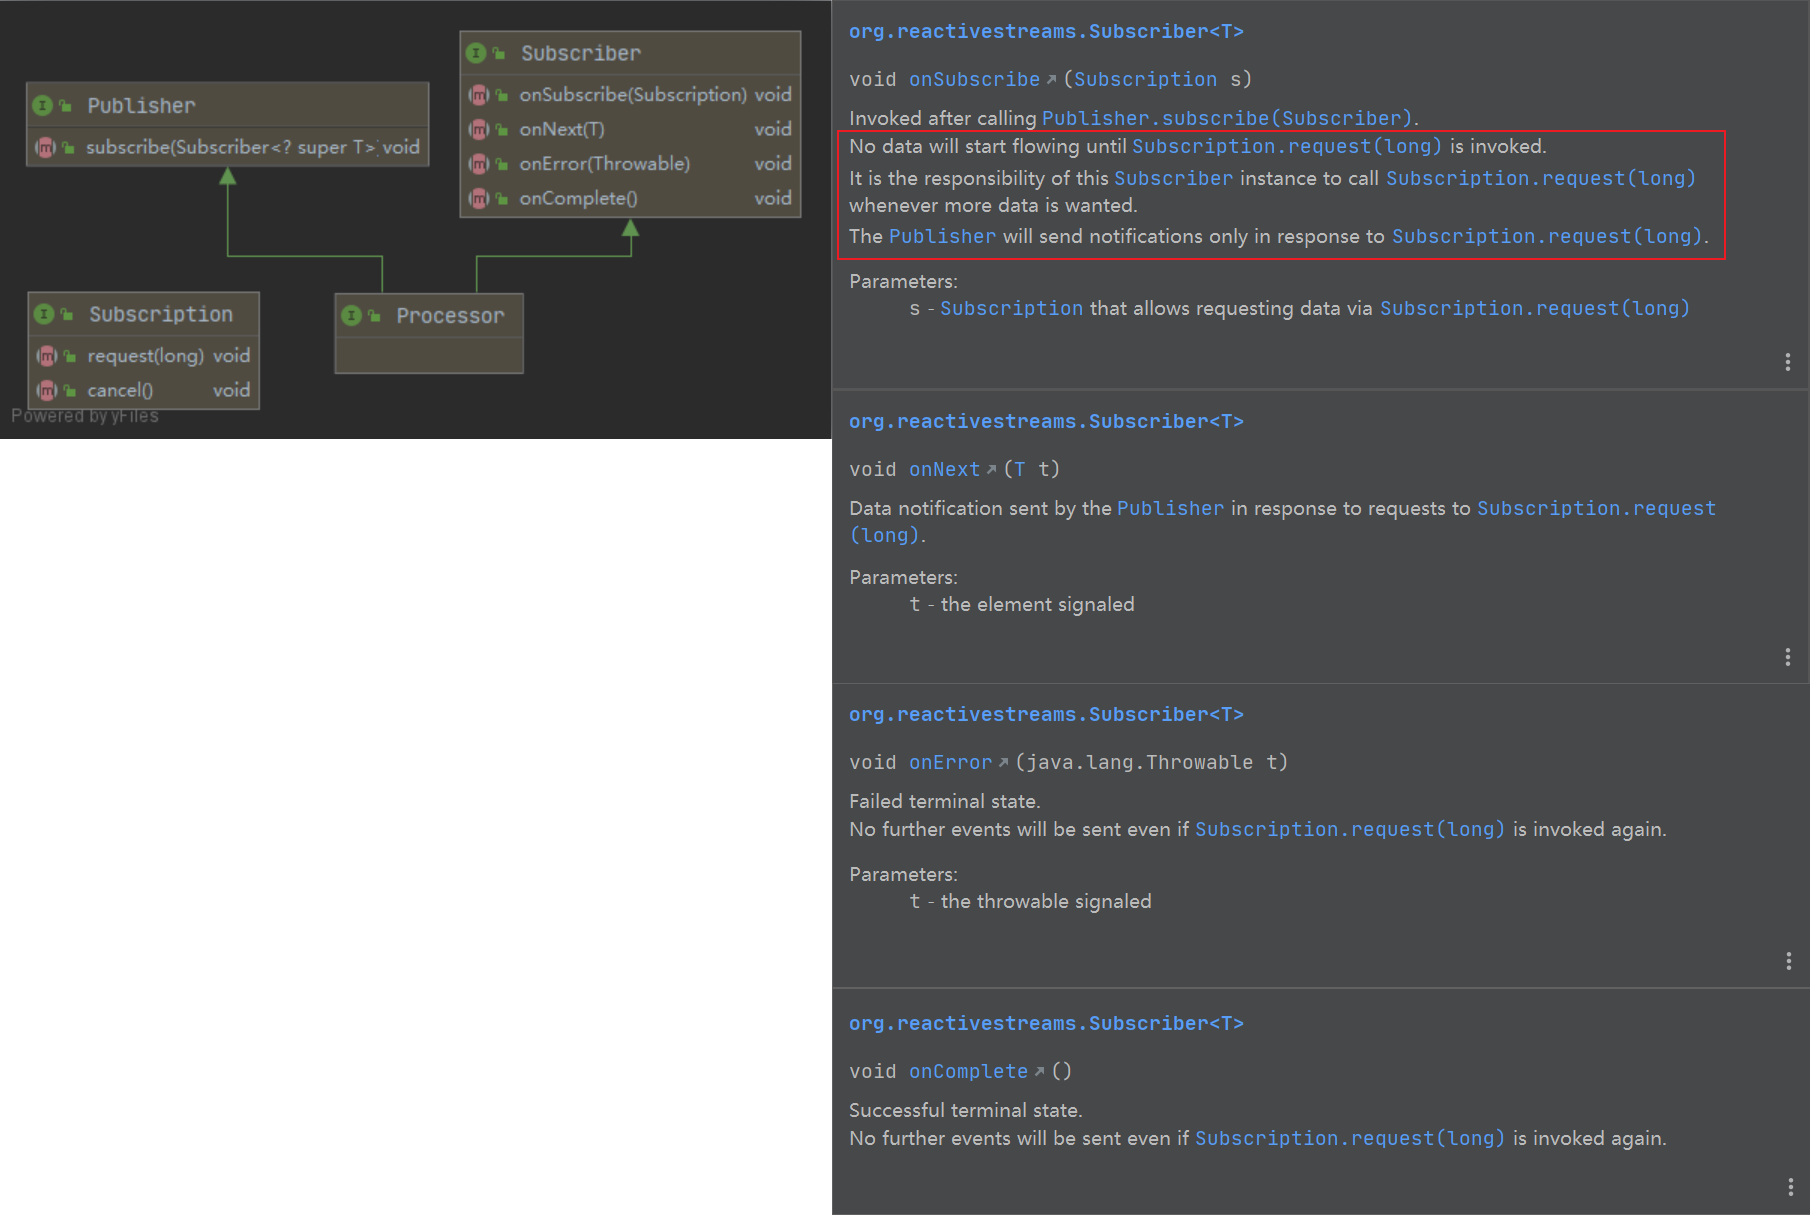
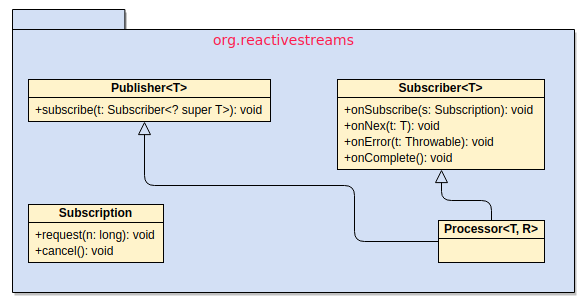
整个依赖包中,仅仅定义了四个核心接口:

  • org.reactivestreams.Subscription 接口定义了连接发布者和订阅者的方法;
  • org.reactivestreams.Publisher<T> 接口定义了发布者的方法;
  • org.reactivestreams.Subscriber<T> 接口定义了订阅者的方法;
  • org.reactivestreams.Processor<T,R> 接口定义了处理器;

org.reactivestreams

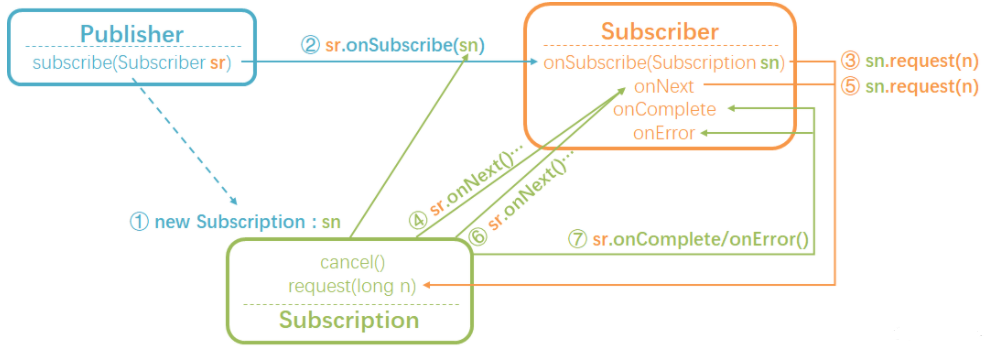
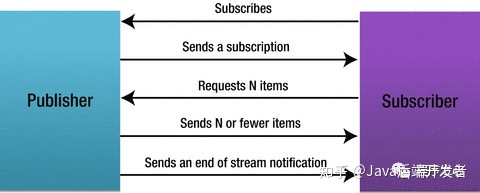
接口交互流程

简要交互如下:

process_ofreactive_stream

API 交互如下:

process_of_reactive_stream_2

参考

《Reactive Java Programming》

Reactive Streams 规范

ReactiveX 系列

Reactor 框架

Spring

  • https://spring.io/reactive
  • Web on Reactive Stack - Spring
    • 基于 Reactor 框架实现
    • 默认基于 Netty 作为应用服务器
    • 好处:能够以固定的线程来处理高并发(充分发挥机器的性能)
    • 提供 API:
      • Spring WebFlux
      • WebClient
      • WebSockets
      • Testing
      • RSocket
      • Reactive Libraries

http://openjdk.java.net/jeps/266

Timer & TimerTask

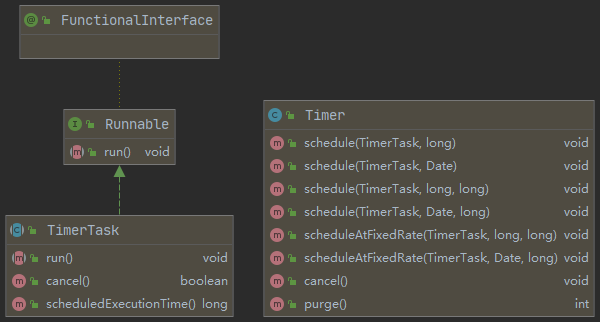
java.util.Timer 是 JDK 中提供的一个定时器工具类,使用的时候会在主线程之外起一个单独的线程执行指定的定时任务 java.util.TimerTask,可以指定执行一次或者反复执行多次。

java.util.TimerTask 是一个实现了 java.lang.Runnable 接口的抽象类,代表一个可以被 Timer 执行的任务。

TimerTask

用法如下(参考 ZooKeeper 源码):

TimerTask usage

ScheduledExecutorService

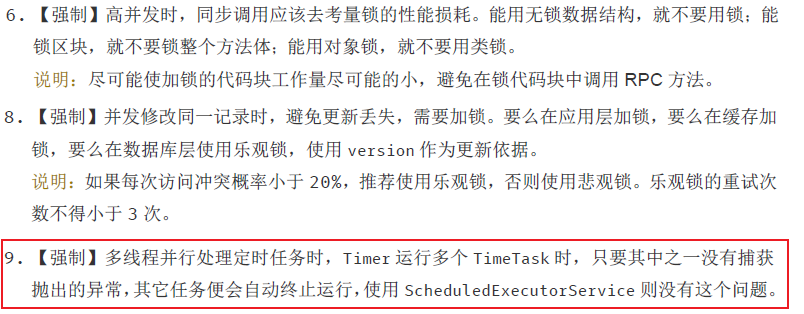
⚠️ 注意:尽量别用 java.util.TimerTask,如要用一定要捕获处理好异常,一般建议使用 java.util.concurrent.ScheduledExecutorService 代替:

Executor

参考《阿里巴巴 Java 开发手册》:

TimerTask problem

用法如下(参考 Ribbon 源码 com.netflix.loadbalancer.PollingServerListUpdater):

1
2
3
4
5
6
7
8
9
10
11
ScheduledThreadPoolExecutor _serverListRefreshExecutor = Executors.newScheduledThreadPool(POOL_SIZE, new ThreadFactoryBuilder()
.setNameFormat("PollingServerListUpdater-%d")
.setDaemon(true)
.build()
);
_serverListRefreshExecutor.scheduleWithFixedDelay(
wrapperRunnable,
initialDelayMs,
refreshIntervalMs,
TimeUnit.MILLISECONDS
);

参考

JDK 中的 Timer 和 TimerTask 详解

面试官:知道时间轮算法吗?在 Netty 和 Kafka 中如何应用的?

背景

为什么要用线程池?

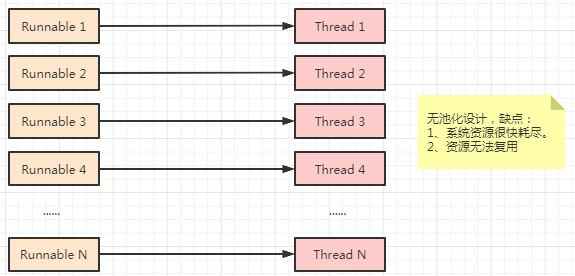
线程的创建和销毁是有代价的。

如果请求的到达率非常高且请求的处理过程是轻量级的,那么为每个请求创建一个新线程将消耗大量的计算资源。

活跃的线程会消耗系统资源,尤其是内存。大量空闲线程会占用许多内存,给垃圾回收器带来压力,而且大量线程竞争 CPU 资源还会产生其它的性能开销。

可创建线程的数量上存在限制,如果创建太多线程,会使系统饱和甚至抛出 OutOfMemoryException

问题如下:

no_thread_pool_design

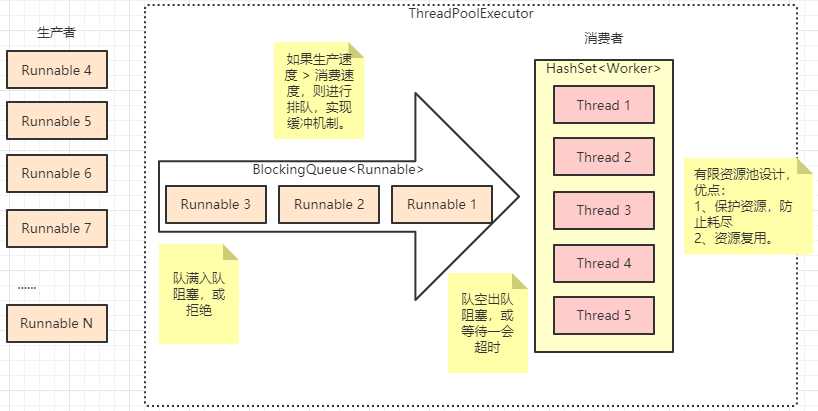
为了解决以上问题,从 Java 5 开始 JDK 并发 API 提供了 Executor Framework,用于将任务的创建与执行分离,避免使用者直接与 Thread 对象打交道,通过池化设计与阻塞队列保护系统资源:

thread_pool_design

使用 Executor Framework 的第一步就是创建一个 ThreadPoolExecutor 类的对象。你可以使用这个类提供的 四个构造方法Executors 工厂类来创建 ThreadPoolExecutor 。一旦有了执行器,你就可以提交 RunnableCallable 对象给执行器来执行。

自定义线程池

继承关系

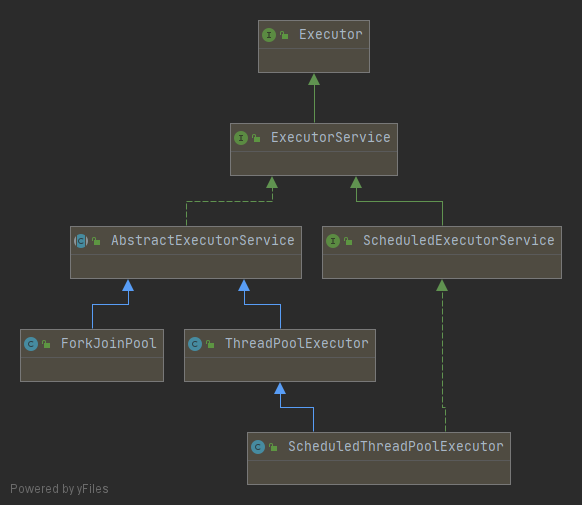
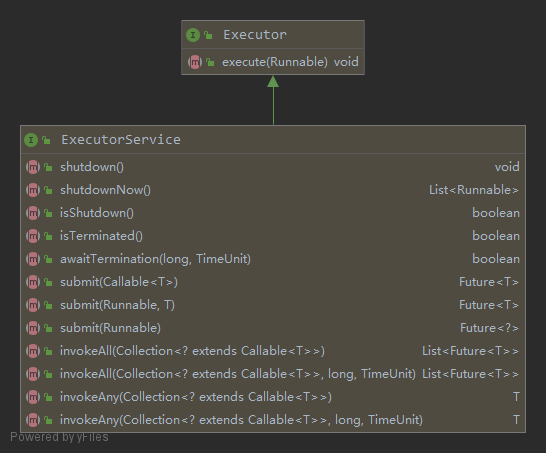
Executor 接口的实现类如下:

subtypes_of_Executor

其中,ThreadPoolExecutor 类实现了两个核心接口 ExecutorExecutorService,方法如下:

ThreadPoolExecutor

成员变量

ThreadPoolExecutor 类的成员变量如下:

1
2
3
4
5
6
7
8
9
10
11
12
13
14
15
16
17
18
19
20
21
22
23
24
25
26
27
28
29
30
31
32
33
34
35
36
37
38
39
40
41
42
43
44
45
46
47
48
49
50
51
52
53
54
55
56
57
58
59
60
61
62
63
64
65
66
67
68
69
70
71
72
73
74
75
76
77
78
79
80
81
82
83
84
/**
* 线程池使用一个int变量存储线程池状态和工作线程数
* int4个字节,32位,用高三位存储线程池状态,低29位存储工作线程数
* 为什么使用一个变量来同时表示线程状态和线程数?就是节省空间。咨询了一下写c的朋友,他们经常这么写
**/
private final AtomicInteger ctl = new AtomicInteger(ctlOf(RUNNING, 0));
//COUNT_BITS=29
private static final int COUNT_BITS = Integer.SIZE - 3;
//理论上线程池最大线程数量CAPACITY=(2^29)-1,即 536,870,911
private static final int CAPACITY = (1 << COUNT_BITS) - 1;

//获取线程池状态
private static int runStateOf(int c) { return c & ~CAPACITY; }
//获取工作线程数
private static int workerCountOf(int c) { return c & CAPACITY; }
//初始化ctl
private static int ctlOf(int rs, int wc) { return rs | wc; }

/**
* 线程池状态转换
* RUNNING -> SHUTDOWN
* RUNNING or SHUTDOWN -> STOP
* SHUTDOWN or STOP -> TIDYING
* TIDYING -> TERMINATED terminated()执行完后变为该TERMINATED
*/
//接受新任务,可以处理阻塞队列里的任务
private static final int RUNNING = -1 << COUNT_BITS;
//不接受新任务,可以处理阻塞队列里的任务。执行shutdown()会变为SHUTDOWN
private static final int SHUTDOWN = 0 << COUNT_BITS;
//不接受新的任务,不处理阻塞队列里的任务,中断正在处理的任务。执行shutdownNow()会变为STOP
private static final int STOP = 1 << COUNT_BITS;
//临时过渡状态,所有的任务都执行完了,当前线程池有效的线程数量为0,这个时候线程池的状态是TIDYING,执行terminated()变为TERMINATED
private static final int TIDYING = 2 << COUNT_BITS;
//终止状态,terminated()调用完成后的状态
private static final int TERMINATED = 3 << COUNT_BITS;

//重入锁,更新线程池核心大小、线程池最大大小等都有用到
private final ReentrantLock mainLock = new ReentrantLock();
//用于存储woker
private final HashSet<Worker> workers = new HashSet<Worker>();
//用于终止线程池
private final Condition termination = mainLock.newCondition();
//记录线程池中曾经出现过的最大线程数
private int largestPoolSize;
//完成任务数量
private long completedTaskCount;

/**
* 核心线程数
* 核心线程会一直存活,即使没有任务需要处理,当线程数小于核心线程数时。
* 即使现有的线程空闲,线程池也会优先创建新线程来处理任务,而不是直接交给现有的线程处理。
* 核心线程数在初始化时不会创建,只有提交任务的时候才会创建。核心线程在allowCoreThreadTimeout为true的时候超时会退出。
*/
private volatile int corePoolSize;
/** 最大线程数
* 当线程数大于或者等于核心线程,且任务队列已满时,线程池会创建新的线程,直到线程数量达到maxPoolSize。
* 如果线程数已等于maxPoolSize,且任务队列已满,则已超出线程池的处理能力,线程池会采取拒绝操作。
*/
private volatile int maximumPoolSize;
/**
* 线程空闲时间
* 当线程空闲时间达到keepAliveTime,该线程会退出,直到线程数量等于corePoolSize。
* 如果allowCoreThreadTimeout设置为true,则所有线程均会退出。
*/
private volatile long keepAliveTime;
//是否允许核心线程空闲超时退出,默认值为false。
private volatile boolean allowCoreThreadTimeOut;
//线程工厂
private volatile ThreadFactory threadFactory;
//用于保存等待执行的任务的阻塞队列。比如LinkedBlockQueue,SynchronousQueue等
private final BlockingQueue<Runnable> workQueue;
/**
* rejectedExecutionHandler:任务拒绝策略
* DiscardOldestPolicy:丢弃队列里最近的一个任务,并执行当前任务
* AbortPolicy:抛出异常。这也是默认的策略
* CallerRunsPolicy:用调用者所在线程来运行任务
* DiscardPolicy:不处理,丢弃掉
*/
private volatile RejectedExecutionHandler handler;
//默认的拒绝策略:抛出异常
private static final RejectedExecutionHandler defaultHandler =
new AbortPolicy();
private static final RuntimePermission shutdownPerm =
new RuntimePermission("modifyThread");

ctl

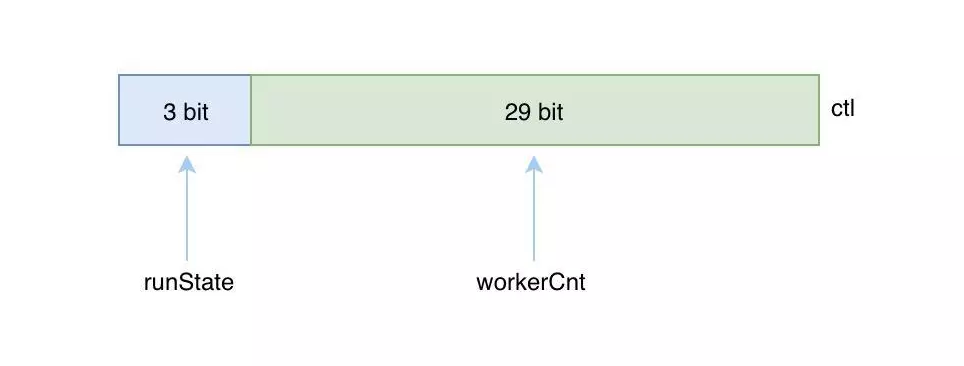
作为一个线程池,首先有两个关键属性:

  • 线程池状态 runState
  • 工作线程数 workerCnt

这两个关键属性保存在名为 ctlAtomicInteger 类型属性之中,高 3 位表示 runState,低 29 位表示 workerCnt,如下:

ctl

为什么要用 3 位来表示线程池的状态呢,原因是线程池一共有 5 种状态,而 2 位只能表示出 4 种情况,所以至少需要 3 位才能表示得了 5 种状态,如下:

1
2
3
4
5
6
7
runState workerCnt                       runState workerCnt
000 00000000000000000000000000000 SHUTDOWN empty
‭‭ 001 00000000000000000000000000000 STOP empty
010 00000000000000000000000000000 TIDYING empty
‭011 00000000000000000000000000000‬ TERMINATED empty
111 00000000000000000000000000000 RUNNING empty
‭ 111 11111111111111111111111111111 RUNNING full

通过 ctlOf 方法初始化 ctl 属性:

1
2
3
4
5
6
7
8
9
10
11
// 初始化ctl
private static int ctlOf(int rs, int wc) { return rs | wc; }

// 或运算符(|)规则:1|1=1
// 1|0=1
// 0|1=1
// 0|0=0
// 以初始化参数 ctlOf(RUNNING, 0) 为例:
11100000000000000000000000000000
| 00000000000000000000000000000000
= 11100000000000000000000000000000

通过 runStateOf 方法获取线程池状态 runState

1
2
3
4
5
6
7
8
9
10
// 获取线程池状态
private static int runStateOf(int c) { return c & ~CAPACITY; }

// 取反运算符(~)规则:~1=0
// ~0=1
// 以 c = 111 11111111111111111111111111111(RUNNING full)为例:
~11111111111111111111111111111
= 00000000000000000000000000000
& 111 11111111111111111111111111111
= 111

通过 workerCountOf 方法获取工作线程数 workerCnt

1
2
3
4
5
6
7
8
9
10
11
// 获取工作线程数
private static int workerCountOf(int c) { return c & CAPACITY; }

// 与运算符(&)规则:1&1=1
// 1&0=0
// 0&1=0
// 0&0=0
// 以 c = 111 11111111111111111111111111111(RUNNING full)为例:
111 11111111111111111111111111111
& 11111111111111111111111111111
= 11111111111111111111111111111

线程池状态

线程池状态用于标识线程池内部的一些运行情况,线程池的开启到关闭的过程就是线程池状态的一个流转的过程。

线程池共有五种状态:

run_state

状态 runState 含义
RUNNING 111 运行状态,该状态下线程池可以接受新的任务,也可以处理阻塞队列中的任务。
执行 shutdown 方法可进入 SHUTDOWN 状态。
执行 shutdownNow 方法可进入 STOP 状态。
SHUTDOWN 000 待关闭状态,不再接受新的任务,继续处理阻塞队列中的任务。
当阻塞队列中的任务为空,并且工作线程数为 0 时,进入 TIDYING 状态。
STOP 001 停止状态,不接收新任务,也不处理阻塞队列中的任务,并且会尝试结束执行中的任务。
当工作线程数为 0 时,进入 TIDYING 状态。
TIDYING 010 整理状态,此时任务都已经执行完毕,并且也没有工作线程 执行 terminated 方法后进入 TERMINATED 状态。
TERMINATED 011 终止状态,此时线程池完全终止了,并完成了所有资源的释放。

工作线程数

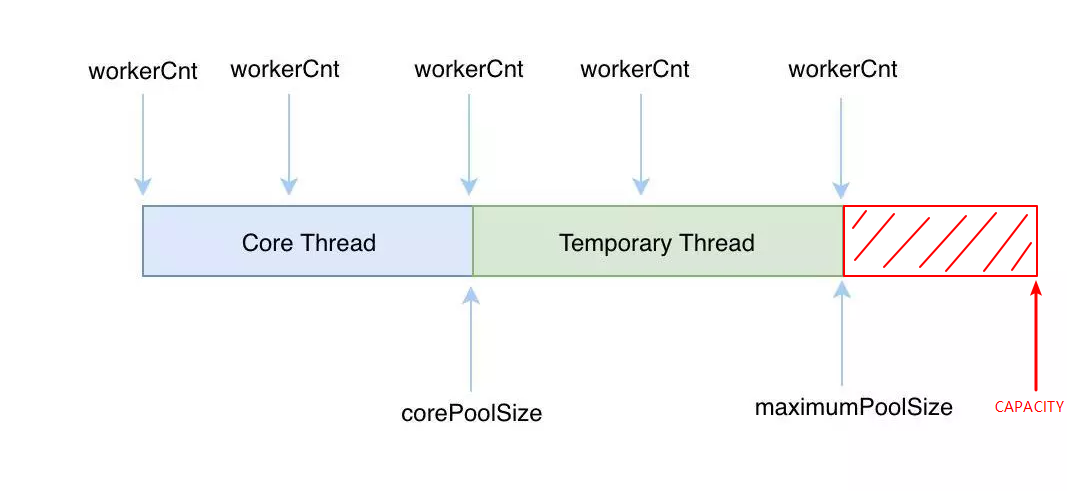
尽管理论上线程池最大线程数量可达 CAPACITY 数,但是实际上都会通过 maximumPoolSize 限制最大线程数。因此工作线程数 workerCnt 的个数可能在 0 至 maximumPoolSize 之间变化。

当工作线程的空闲时间达到 keepAliveTime,该工作线程会退出,直到工作线程数 workerCnt 等于 corePoolSize。如果 allowCoreThreadTimeout 设置为 true,则所有工作线程均会退出。

worker_count

注意:

  • 整个线程池的基本执行过程:创建核心线程(Core Thread) > 任务排队 > 创建临时线程(Temp Thread)。
  • 如果将 maximumPoolSize 设置为无界值(如 Integer.MAX_VALUE),可能会创建大量的线程,从而导致 OOM。因此务必要限定 maximumPoolSize 的大小。
  • 如果将 corePoolSizemaximumPoolSize 设置为相同值,则创建了 Fixed 固定大小的线程池,无法弹性扩容,只能排队。

线程工厂

通过提供不同的 ThreadFactory 接口实现,可以定制被创建线程 Thread属性ThreadFactory 有几种创建方式:

1、完全自定义方式。缺点是需要在 newThread 方法中实现的代码较多:

1
2
3
4
5
6
7
8
ThreadFactory threadFactory = runnable -> {
Thread t = new Thread(runnable);
t.setName("wechat-notify-1");
t.setDaemon(false);
t.setPriority(1);
t.setUncaughtExceptionHandler((thread, exception) -> {});
return t;
};

2、使用 Executors 工具类提供的方法:

1
ThreadFactory threadFactory = Executors.defaultThreadFactory();

这也是 Executors 工具类提供的几种默认线程池所使用的 ThreadFactory

  • 缺点:只能使用默认属性,不提供任何定制参数,无法修改。
  • 优点:实现了基本的线程名称自增。

3、使用 Guava 提供的 ThreadFactoryBuilder。优点是可以轻松定制四个线程属性,且支持线程名称自增:

1
2
3
4
5
6
ThreadFactory threadFactory = new ThreadFactoryBuilder()
.setNameFormat("wechat-notify-%d")
.setDaemon(false)
.setPriority(1)
.setUncaughtExceptionHandler((thread, exception) -> {})
.build();

该实现如下,如果未提供自定义的 ThreadFactory,将基于 Executors.defaultThreadFactory() 进行二次修改:

1
2
3
4
5
6
7
8
9
10
11
12
13
14
15
16
17
18
19
20
21
22
23
24
25
26
27
28
29
30
private static ThreadFactory build(ThreadFactoryBuilder builder) {
final String nameFormat = builder.nameFormat;
final Boolean daemon = builder.daemon;
final Integer priority = builder.priority;
final UncaughtExceptionHandler uncaughtExceptionHandler = builder.uncaughtExceptionHandler;
final ThreadFactory backingThreadFactory = (builder.backingThreadFactory != null)
? builder.backingThreadFactory
: Executors.defaultThreadFactory();
final AtomicLong count = (nameFormat != null) ? new AtomicLong(0) : null;

return new ThreadFactory() {
@Override
public Thread newThread(Runnable runnable) {
Thread thread = backingThreadFactory.newThread(runnable);
if (nameFormat != null) {
thread.setName(format(nameFormat, count.getAndIncrement()));
}
if (daemon != null) {
thread.setDaemon(daemon);
}
if (priority != null) {
thread.setPriority(priority);
}
if (uncaughtExceptionHandler != null) {
thread.setUncaughtExceptionHandler(uncaughtExceptionHandler);
}
return thread;
}
};
}

阻塞队列

阻塞队列的使用详见另一篇《Java 集合框架系列(八)并发实现总结》。

work_queue

拒绝策略

拒绝策略,默认有四种实现:

  • AbortPolicy:抛出异常,默认的策略。
  • DiscardPolicy:不处理,丢弃掉。
  • DiscardOldestPolicy:丢弃队列中最近的一个任务,并执行该任务。
  • CallerRunsPolicy:用调用者所在线程来执行该任务。

RejectedExecutionHandler

通过 RejectedExecutionHandler 接口可以实现更多策略,例如记录日志或持久化不能处理的任务,或者计数并发出告警。

1
2
3
public interface RejectedExecutionHandler {
void rejectedExecution(Runnable r, ThreadPoolExecutor executor);
}

⚠️ 注意:rejectedExecution 方法是在主线程中执行的。

构造方法

java.util.concurrent.ThreadPoolExecutor 提供了四个构造方法,以参数最多的为例:

1
2
3
4
5
6
7
8
9
10
11
12
13
14
15
16
17
18
19
20
21
public ThreadPoolExecutor(int corePoolSize,
int maximumPoolSize,
long keepAliveTime,
TimeUnit unit,
BlockingQueue<Runnable> workQueue,
ThreadFactory threadFactory,
RejectedExecutionHandler handler) {
// 参数校验
if (corePoolSize < 0 || maximumPoolSize <= 0 || maximumPoolSize < corePoolSize || keepAliveTime < 0)
throw new IllegalArgumentException();
if (workQueue == null || threadFactory == null || handler == null)
throw new NullPointerException();

this.acc = System.getSecurityManager() == null ? null : AccessController.getContext();
this.corePoolSize = corePoolSize;
this.maximumPoolSize = maximumPoolSize;
this.workQueue = workQueue;
this.keepAliveTime = unit.toNanos(keepAliveTime);
this.threadFactory = threadFactory;
this.handler = handler;
}

钩子方法

java.util.concurrent.ThreadPoolExecutor 提供了三个钩子方法,参考 Hook methods

This class provides protected overridable beforeExecute(Thread, Runnable) and afterExecute(Runnable, Throwable) methods that are called before and after execution of each task. These can be used to manipulate the execution environment; for example, reinitializing ThreadLocals, gathering statistics, or adding log entries. Additionally, method terminated() can be overridden to perform any special processing that needs to be done once the Executor has fully terminated.

钩子方法在源码中的调用如下:

1
2
3
4
5
6
7
8
9
10
11
12
13
14
15
16
17
18
19
20
21
final void runWorker(Worker w) {

...

beforeExecute(wt, task);
Throwable thrown = null;
try {
task.run();
} catch (RuntimeException x) {
thrown = x; throw x;
} catch (Error x) {
thrown = x; throw x;
} catch (Throwable x) {
thrown = x; throw new Error(x);
} finally {
afterExecute(task, thrown);
}

...

}

例子:利用钩子方法清理 MDC 上下文

1
2
3
4
5
6
7
8
9
10
11
12
13
14
15
16
17
18
19
20
21
22
23
public class MdcAwareThreadPoolExecutor extends ThreadPoolExecutor {

public MdcAwareThreadPoolExecutor(int corePoolSize,
int maximumPoolSize,
long keepAliveTime,
TimeUnit unit,
BlockingQueue<Runnable> workQueue,
ThreadFactory threadFactory,
RejectedExecutionHandler handler) {
super(corePoolSize, maximumPoolSize, keepAliveTime, unit, workQueue, threadFactory, handler);
}

/**
* Use ThreadPoolExecutor hooks and perform necessary cleanups after each execution.
*/
@Override
protected void afterExecute(Runnable r, Throwable t) {
System.out.println("Cleaning the MDC context");
MDC.clear();
org.apache.log4j.MDC.clear();
ThreadContext.clearAll();
}
}

执行流程

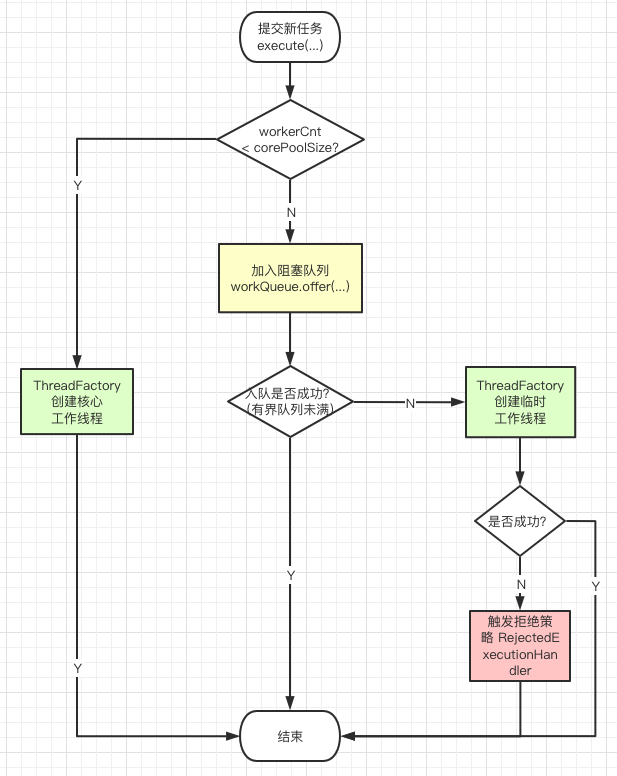
execute 方法的整体执行流程如下:

1
2
3
4
5
6
7
8
9
10
11
12
13
14
15
16
17
18
19
20
/*
* Proceed in 3 steps:
*
* 1. If fewer than corePoolSize threads are running, try to
* start a new thread with the given command as its first
* task. The call to addWorker atomically checks runState and
* workerCount, and so prevents false alarms that would add
* threads when it shouldn't, by returning false.
*
* 2. If a task can be successfully queued, then we still need
* to double-check whether we should have added a thread
* (because existing ones died since last checking) or that
* the pool shut down since entry into this method. So we
* recheck state and if necessary roll back the enqueuing if
* stopped, or start a new thread if there are none.
*
* 3. If we cannot queue task, then we try to add a new
* thread. If it fails, we know we are shut down or saturated
* and so reject the task.
*/

work_flow_of_execute_method

统计指标

虽然我们用上了线程池,但是该如何了解线程池的运行情况,例如有多少线程在执行、多少在队列中等待?下表提供了方法:

Modifier and Type Method and Description 备注
long getTaskCount()
Returns the approximate total number of tasks that have ever been scheduled for execution.
任务总数(已完成任务数 + 当前活跃线程数)
long getCompletedTaskCount()
Returns the approximate total number of tasks that have completed execution.
已完成任务数
int getActiveCount()
Returns the approximate number of threads that are actively executing tasks.
当前活跃中的工作线程数
int getPoolSize()
Returns the current number of threads in the pool.
当前工作线程数
int getLargestPoolSize()
Returns the largest number of threads that have ever simultaneously been in the pool.
最大工作线程数
BlockingQueue<Runnable> getQueue()
Returns the task queue used by this executor. Access to the task queue is intended primarily for debugging and monitoring.
当前排队数
1
2
3
4
5
6
7
logger.info("{}, taskCount [{}], completedTaskCount [{}], activeCount [{}], queueSize [{}]",
threadPoolExecutor.getThreadNamePrefix(),
threadPoolExecutor.getTaskCount(),
threadPoolExecutor.getCompletedTaskCount(),
threadPoolExecutor.getActiveCount(),
threadPoolExecutor.getQueue().size()
);

使用工厂类创建线程池

java.util.concurrent.ThreadPoolExecutor 提供了四个不同的构造方法,但由于它们的复杂性(参数较多),Java 并发 API 提供了 java.util.concurrent.Executors 工厂类来简化线程池的构造,常用方法如下:

1
2
3
4
5
6
7
8
// 创建一个定长线程池,可控制线程最大并发数,超出的线程会在队列中等待。
public static ExecutorService newFixedThreadPool(...) {...}
// 创建一个单线程化的线程池,它只会用唯一的工作线程来执行任务,保证所有任务按照指定顺序(FIFO, LIFO, 优先级)执行。
public static ExecutorService newSingleThreadExecutor(...) {...}
// 创建一个可缓存线程池,如果线程池长度超过处理需要,可灵活回收空闲线程,若无可回收,则新建线程。
public static ExecutorService newCachedThreadPool(...) {...}
// 创建一个定长线程池,支持定时及周期性任务执行。
public static ScheduledExecutorService newScheduledThreadPool(...) {...}

但是这种方式并不推荐使用,参考《阿里巴巴 Java 开发手册》:

principal of executors

java.util.concurrent.Executors 源码分析如下,首先是 newFixedThreadPool(...)newSingleThreadExecutor(...)

1
2
3
4
5
6
7
8
9
10
11
12
13
14
// Fixed 限定 corePoolSize 和 maximumPoolSize 为相同大小,即线程池大小固定(意味着无法扩展)
public static ExecutorService newFixedThreadPool(int nThreads) {
return new ThreadPoolExecutor(nThreads, nThreads,
0L, TimeUnit.MILLISECONDS,
new LinkedBlockingQueue<Runnable>());
}

// Single 其实就是 Fixed 为 1 的变种
public static ExecutorService newSingleThreadExecutor() {
return new FinalizableDelegatedExecutorService
(new ThreadPoolExecutor(1, 1,
0L, TimeUnit.MILLISECONDS,
new LinkedBlockingQueue<Runnable>()));
}

上述方法中,关键在于对 java.util.concurrent.LinkedBlockingQueue 的构造,使用了默认的无参构造方法:

1
2
3
4
// ⚠️ 允许的请求队列长度(capacity)为 Integer.MAX_VALUE,可能会堆积大量的请求,从而导致 OOM。
public LinkedBlockingQueue() {
this(Integer.MAX_VALUE);
}

然后是 newCachedThreadPool(...)newScheduledThreadPool(...)

1
2
3
4
5
6
7
8
9
10
11
// ⚠️ 允许的创建线程数量(maximumPoolSize)为 Integer.MAX_VALUE,可能会创建大量的线程,从而导致 OOM。
public static ExecutorService newCachedThreadPool() {
return new ThreadPoolExecutor(0, Integer.MAX_VALUE,
60L, TimeUnit.SECONDS,
new SynchronousQueue<Runnable>());
}

// 问题在于 ScheduledThreadPoolExecutor 构造方法的默认参数
public static ScheduledExecutorService newScheduledThreadPool(int corePoolSize) {
return new ScheduledThreadPoolExecutor(corePoolSize);
}

看下 java.util.concurrent.ScheduledThreadPoolExecutor 的构造方法:

1
2
3
4
5
// ⚠️ 允许的创建线程数量(maximumPoolSize)为 Integer.MAX_VALUE,可能会创建大量的线程,从而导致 OOM。
public ScheduledThreadPoolExecutor(int corePoolSize) {
super(corePoolSize, Integer.MAX_VALUE, 0, NANOSECONDS,
new DelayedWorkQueue());
}

⚠️ 注意:ScheduledThreadPoolExecutor 使用的是 DelayedWorkQueue 队列,这个队列是无界的(无法设置 capacity),也就是说 maximumPoolSize 的设置其实是没有什么意义的。

  • corePoolSize 设置的太小,会导致并发任务量大时,延迟任务得不到及时处理,造成阻塞。
  • corePoolSize 设置的太大,会导致并发任务量少时,造成大量的线程资源浪费。

参考

https://docs.oracle.com/javase/8/docs/api/java/util/concurrent/ThreadPoolExecutor.html

如何合理估算 Java 线程池大小:综合指南

如何合理地估算线程池大小?

线程池执行的任务抛出异常会怎样?

Java 线程池实现原理,及其在美团业务中的实践

美团动态线程池实践思路及代码

案例分析|线程池相关故障梳理&总结 | 阿里技术

线程操纵术之更优雅的并行策略——Fork/Join | 阿里技术