Maven 实战系列(七)骨架快速搭建项目

工作中经常需要为新开展的业务创建新工程,如果每次都重新搭建、或者拷贝老项目,这些重复工作会影响开发效率,也不利于维护(例如为新工程统一引入新组件、或升级配置文件等)。Maven 提供了 archetype 骨架插件,用于抽取这些重复的配置和代码,以模板的方式创建新项目。

Maven Archetype Plugin(骨架插件)能够让用户从现有的模板(即骨架)中创建 Maven 项目,也能够从现有的项目中创建骨架。其流程如下:

Maven Archetype Plugin

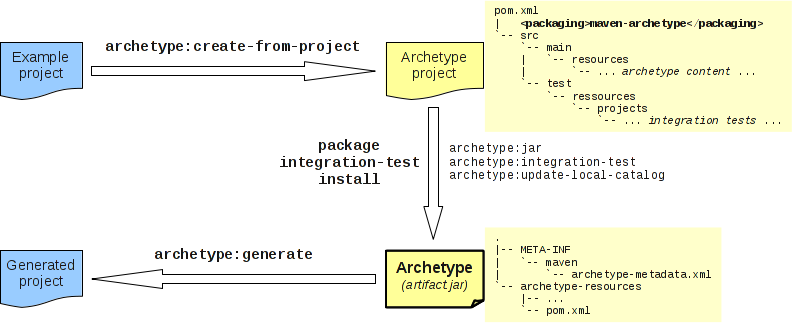
从上图可见,该插件提供了如下目标(即命令):

  • archetype:generate creates a Maven project from an archetype: asks the user to choose an archetype from the archetype catalog, and retrieves it from the remote repository. Once retrieved, it is processed to create a working Maven project.
  • archetype:create-from-project creates an archetype from an existing project.(注意如果需要包含 yml 配置文件,需要加上参数 -Darchetype.filteredExtentions=yml
  • archetype:crawl search a repository for archetypes and updates a catalog.

下面具体演示如何使用。

创建 archetype 工程样例

方式一

利用 Maven 内置的 maven-archetype-archetype 构件创建一个骨架工程样例:

1
2
3
4
mvn archetype:generate
-DgroupId=[your project's group id]
-DartifactId=[your project's artifact id]
-DarchetypeArtifactId=maven-archetype-archetype

创建成功后,其目录结构如下:

1
2
3
4
5
6
7
8
9
10
11
12
13
14
15
16
17
archetype
|-- pom.xml // archetype pom
`-- src
`-- main
`-- resources
|-- META-INF
| `-- maven
| `--archetype.xml // archetype descriptor
`-- archetype-resources // prototype files
|-- pom.xml // prototype pom
`-- src
|-- main
| `-- java
| `-- App.java
`-- test
`-- java
`-- AppTest.java

骨架由以下四个部分组成,各文件作用如下:

组成部分 组成部分 路径 描述
archetype pom 骨架的 POM 根目录下的 pom.xml
archetype descriptor 骨架描述符文件 src/main/resources/META-INF/maven/archetype.xml 这个文件列出了包含在 archetype 中的所有文件并将这些文件分类,因此 archetype 生成机制才能正确的处理。
prototype pom 新工程的原型 POM src/main/resources/archetype-resources/pom.xml archetype 插件会直接复制这个 pom.xml,然后替换其中的占位符 ${artifactId}${groupId}${version}
prototype files 新工程的原型文件 src/main/resources/archetype-resources/ archetype 插件会直接复制这些文件

方式二

利用公司现有模板项目创建骨架:

1
mvn archetype:create-from-project -Darchetype.filteredExtentions=yml,xml,java,jsp

创建成功后,其目录结构如下:

1
2
3
4
5
6
7
8
9
youproject
|-- pom.xml // 项目源文件
`-- src // 项目源文件
`-- main
`-- test
`-- target // 创建结果
`-- generated-sources
`-- archetype
// 目录结构同方式一。后续安装 archetype 到本地仓库时,需要 cd 到本目录,执行 mvn install;如果是发布到远程仓库,则 mvn deploy

-Darchetype.filteredExtentions 用于指定要过滤的文件后缀名,被过滤的文件将会替换文件里面用到的占位符。在生成的 archetype.xml 文件时,命令将会扫描模板项目中所有的文件类型,为上述指定的文件类型添加 filtered="true" 属性:

1
2
3
4
5
6
7
8
9
10
11
12
13
14
15
16
17
18
19
20
21
22
23
24
25
26
<fileSet filtered="true" packaged="true" encoding="UTF-8">
<directory>src/main/java</directory>
<includes>
<include>**/*.java</include>
</includes>
</fileSet>
<fileSet filtered="true" encoding="UTF-8">
<directory>src/main/resources</directory>
<includes>
<include>**/*.xml</include>
<include>**/*.yml</include>
</includes>
</fileSet>
<fileSet filtered="true" encoding="UTF-8">
<directory>src/main/webapp</directory>
<includes>
<include>**/*.jsp</include>
<include>**/*.xml</include>
</includes>
</fileSet>
<fileSet filtered="true" packaged="true" encoding="UTF-8">
<directory>src/test/java</directory>
<includes>
<include>**/*.java</include>
</includes>
</fileSet>

配置骨架

配置描述符 archetype.xml

然后,配置 archetype.xml,详见:archetype descriptor

配置新工程的 pom.xml

使用占位符 ${artifactId}${groupId}${version},这些变量都将在 archetype:generate 命令运行时被初始化:

1
2
3
4
5
6
7
8
9
10
11
12
13
14
15
16
17
18
19
20
21
<project xmlns="http://maven.apache.org/POM/4.0.0" xmlns:xsi="http://www.w3.org/2001/XMLSchema-instance"
xsi:schemaLocation="http://maven.apache.org/POM/4.0.0 http://maven.apache.org/xsd/maven-4.0.0.xsd">
<modelVersion>4.0.0</modelVersion>

<groupId>${groupId}</groupId>
<artifactId>${artifactId}</artifactId>
<version>${version}</version>
<packaging>jar</packaging>

<name>A custom project</name>
<url>http://www.myorganization.org</url>

<dependencies>
<dependency>
<groupId>junit</groupId>
<artifactId>junit</artifactId>
<version>3.8.1</version>
<scope>test</scope>
</dependency>
</dependencies>
</project>

配置新工程的相关文件

将新工程所需文件,全部拷贝到 src/main/resources/archetype-resources/ 目录下。

安装本地仓库

创建骨架并配置完毕,首先安装到本地仓库:

  • 如果是使用 Maven 内置的 maven-archetype-archetype 构件创建的骨架工程样例,直接在该目录下执行安装命令即可。
  • 如果是使用命令 mvn archetype:create-from-project 从现有的项目中创建骨架,需要先 cd 进入到 target/generated-sources/archetype/ 目录,再运行 mvn install
1
mvn install

执行如下插件 goal:

1
2
3
4
5
6
maven-resources-plugin:resources  // 拷贝资源文件
maven-resources-plugin:testResources // 拷贝测试资源文件
maven-archetype-plugin:jar // 在 target 目录下构建出 archetype jar
maven-archetype-plugin:integration-test
maven-install-plugin:install // 将构建出来的 jar 和 pom 安装到本地仓库
maven-archetype-plugin:update-local-catalog // 更新本地仓库根目录下的 archetype-catalog.xml

安装完毕,构建出来的 archetype jar artifactId-archetype-version.jar 将会安装到本地仓库。此时需要更新本地仓库根目录下的 archetype-catalog.xml ,插入一段骨架配置如下:

1
2
3
4
5
6
7
8
9
10
11
12
13
14
<?xml version="1.0" encoding="UTF-8"?>
<archetype-catalog xsi:schemaLocation="http://maven.apache.org/plugins/maven-archetype-plugin/archetype-catalog/1.0.0 http://maven.apache.org/xsd/archetype-catalog-1.0.0.xsd"
xmlns="http://maven.apache.org/plugins/maven-archetype-plugin/archetype-catalog/1.0.0"
xmlns:xsi="http://www.w3.org/2001/XMLSchema-instance">
<archetypes>
<!-- 新插入的骨架 -->
<archetype>
<groupId>[your project's group id]</groupId>
<artifactId>[your project's artifact id]</artifactId>
<version>xxx</version>
<description>xxx</description>
</archetype>
</archetypes>
</archetype-catalog>

可以使用命令:mvn archetype:crawl,将自动搜索仓库中的骨架并更新骨架配置。

发布到远程仓库

骨架生成成功,并且一切符合预期之后,可以发布到远程仓库供他人使用:

1
mvn deploy

创建新项目

命令行方式

尝试创建项目,选择想要使用的骨架,并为新工程指定 groupIdartifactId,以及包名 package

1
2
3
4
5
6
7
8
mvn archetype:generate                                  \
-DarchetypeGroupId=<archetype-groupId> \
-DarchetypeArtifactId=<archetype-artifactId> \
-DarchetypeVersion=<archetype-version> \
-DgroupId=<my.groupid> \
-DartifactId=<my-artifactId> \
-Dversion=<my.version> \
-Dpackage=my.package

输出日志:

1
2
3
4
5
6
7
8
9
10
[INFO] Using property: groupId = <my.groupid>
[INFO] Using property: artifactId = <my-artifactId>
[INFO] Using property: version = <my.version>
[INFO] Using property: package = my.package
Confirm properties configuration:
groupId: <my.groupid>
artifactId: <my-artifactId>
version: <my.version>
package: my.package
Y:

回复 Y 确认即可。

IDEA

File > New Module > Maven,勾选 Create from archetype,点击 Add Archetype,配置如下:

IDEA 中添加 archetype

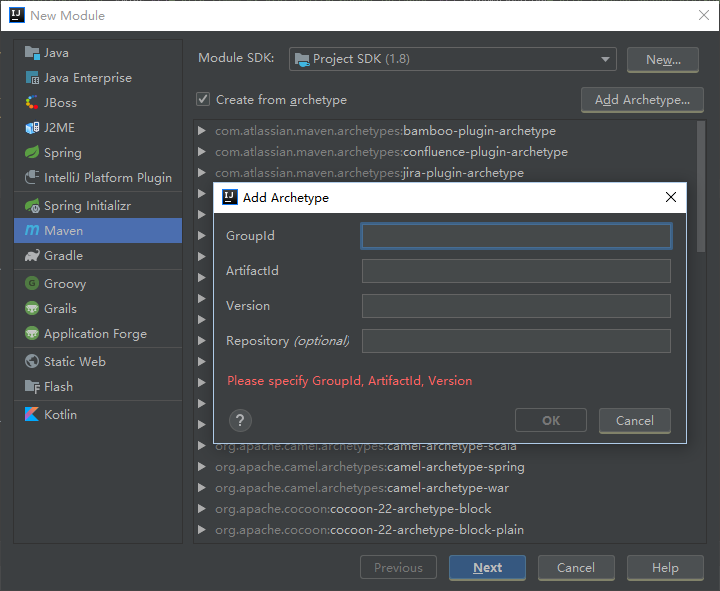
输入创建 archetype 工程时,定义的 GroupId、ArtifactId、Version,并选择你远程仓库的地址即可,例如:http://xxx/nexus/content/repositories/snapshots。

配置完毕,创建新工程时,将会执行命令:

1
2
3
4
5
6
7
8
9
-DinteractiveMode=false
-DarchetypeGroupId=
-DarchetypeArtifactId=
-DarchetypeVersion=
-DarchetypeRepository=http://xxx/nexus/content/repositories/snapshots
-DgroupId=
-DartifactId=
-Dversion=
org.apache.maven.plugins:maven-archetype-plugin:RELEASE:generate

goal generate 执行过程中会下载指定的 archetype jar,并根据指定参数创建新工程。

注意,由于这种方式只会下载指定的 archetype jar 到本地仓库,但不会将骨架添加到本地仓库根目录下的骨架目录文件 archetype-catalog.xml 之中。这将会导致在 IDEA 之外以命令行方式执行 mvn archetype:generate 生成新工程时,由于在骨架目录文件中找不到指定 archetype 而报错,因此需要将该 archetype 添加到骨架目录文件下。解决方法是执行命令:mvn archetype:crawl 遍历本地仓库搜索骨架并更新目录文件。

参考

https://maven.apache.org/guides/introduction/introduction-to-archetypes.html

https://maven.apache.org/guides/mini/guide-creating-archetypes.html

http://maven.apache.org/archetype/maven-archetype-plugin/