For proper operation of its domain name resolver, a network host is configured with an initial cache (hints) of the known addresses of the root name servers. The hints are updated periodically by an administrator by retrieving a dataset from a reliable source.
Name servers in delegations are identified by name, rather than by IP address. This means that a resolving name server must issue another DNS request to find out the IP address of the server to which it has been referred. If the name given in the delegation is a subdomain of the domain for which the delegation is being provided, there is a circular dependency.
In this case, the name server providing the delegation must also provide one or more IP addresses for the authoritative name server mentioned in the delegation. This information is called glue. The delegating name server provides this glue in the form of records in the additional section of the DNS response, and provides the delegation in the authority section of the response. A glue record is a combination of the name server and IP address.
For example, if the authoritative name server for example.org is ns1.example.org, a computer trying to resolve www.example.org first resolves ns1.example.org. As ns1 is contained in example.org, this requires resolving example.org first, which presents a circular dependency. To break the dependency, the name server for the top level domain org includes glue along with the delegation for example.org. The glue records are address records that provide IP addresses for ns1.example.org. The resolver uses one or more of these IP addresses to query one of the domain’s authoritative servers, which allows it to complete the DNS query.
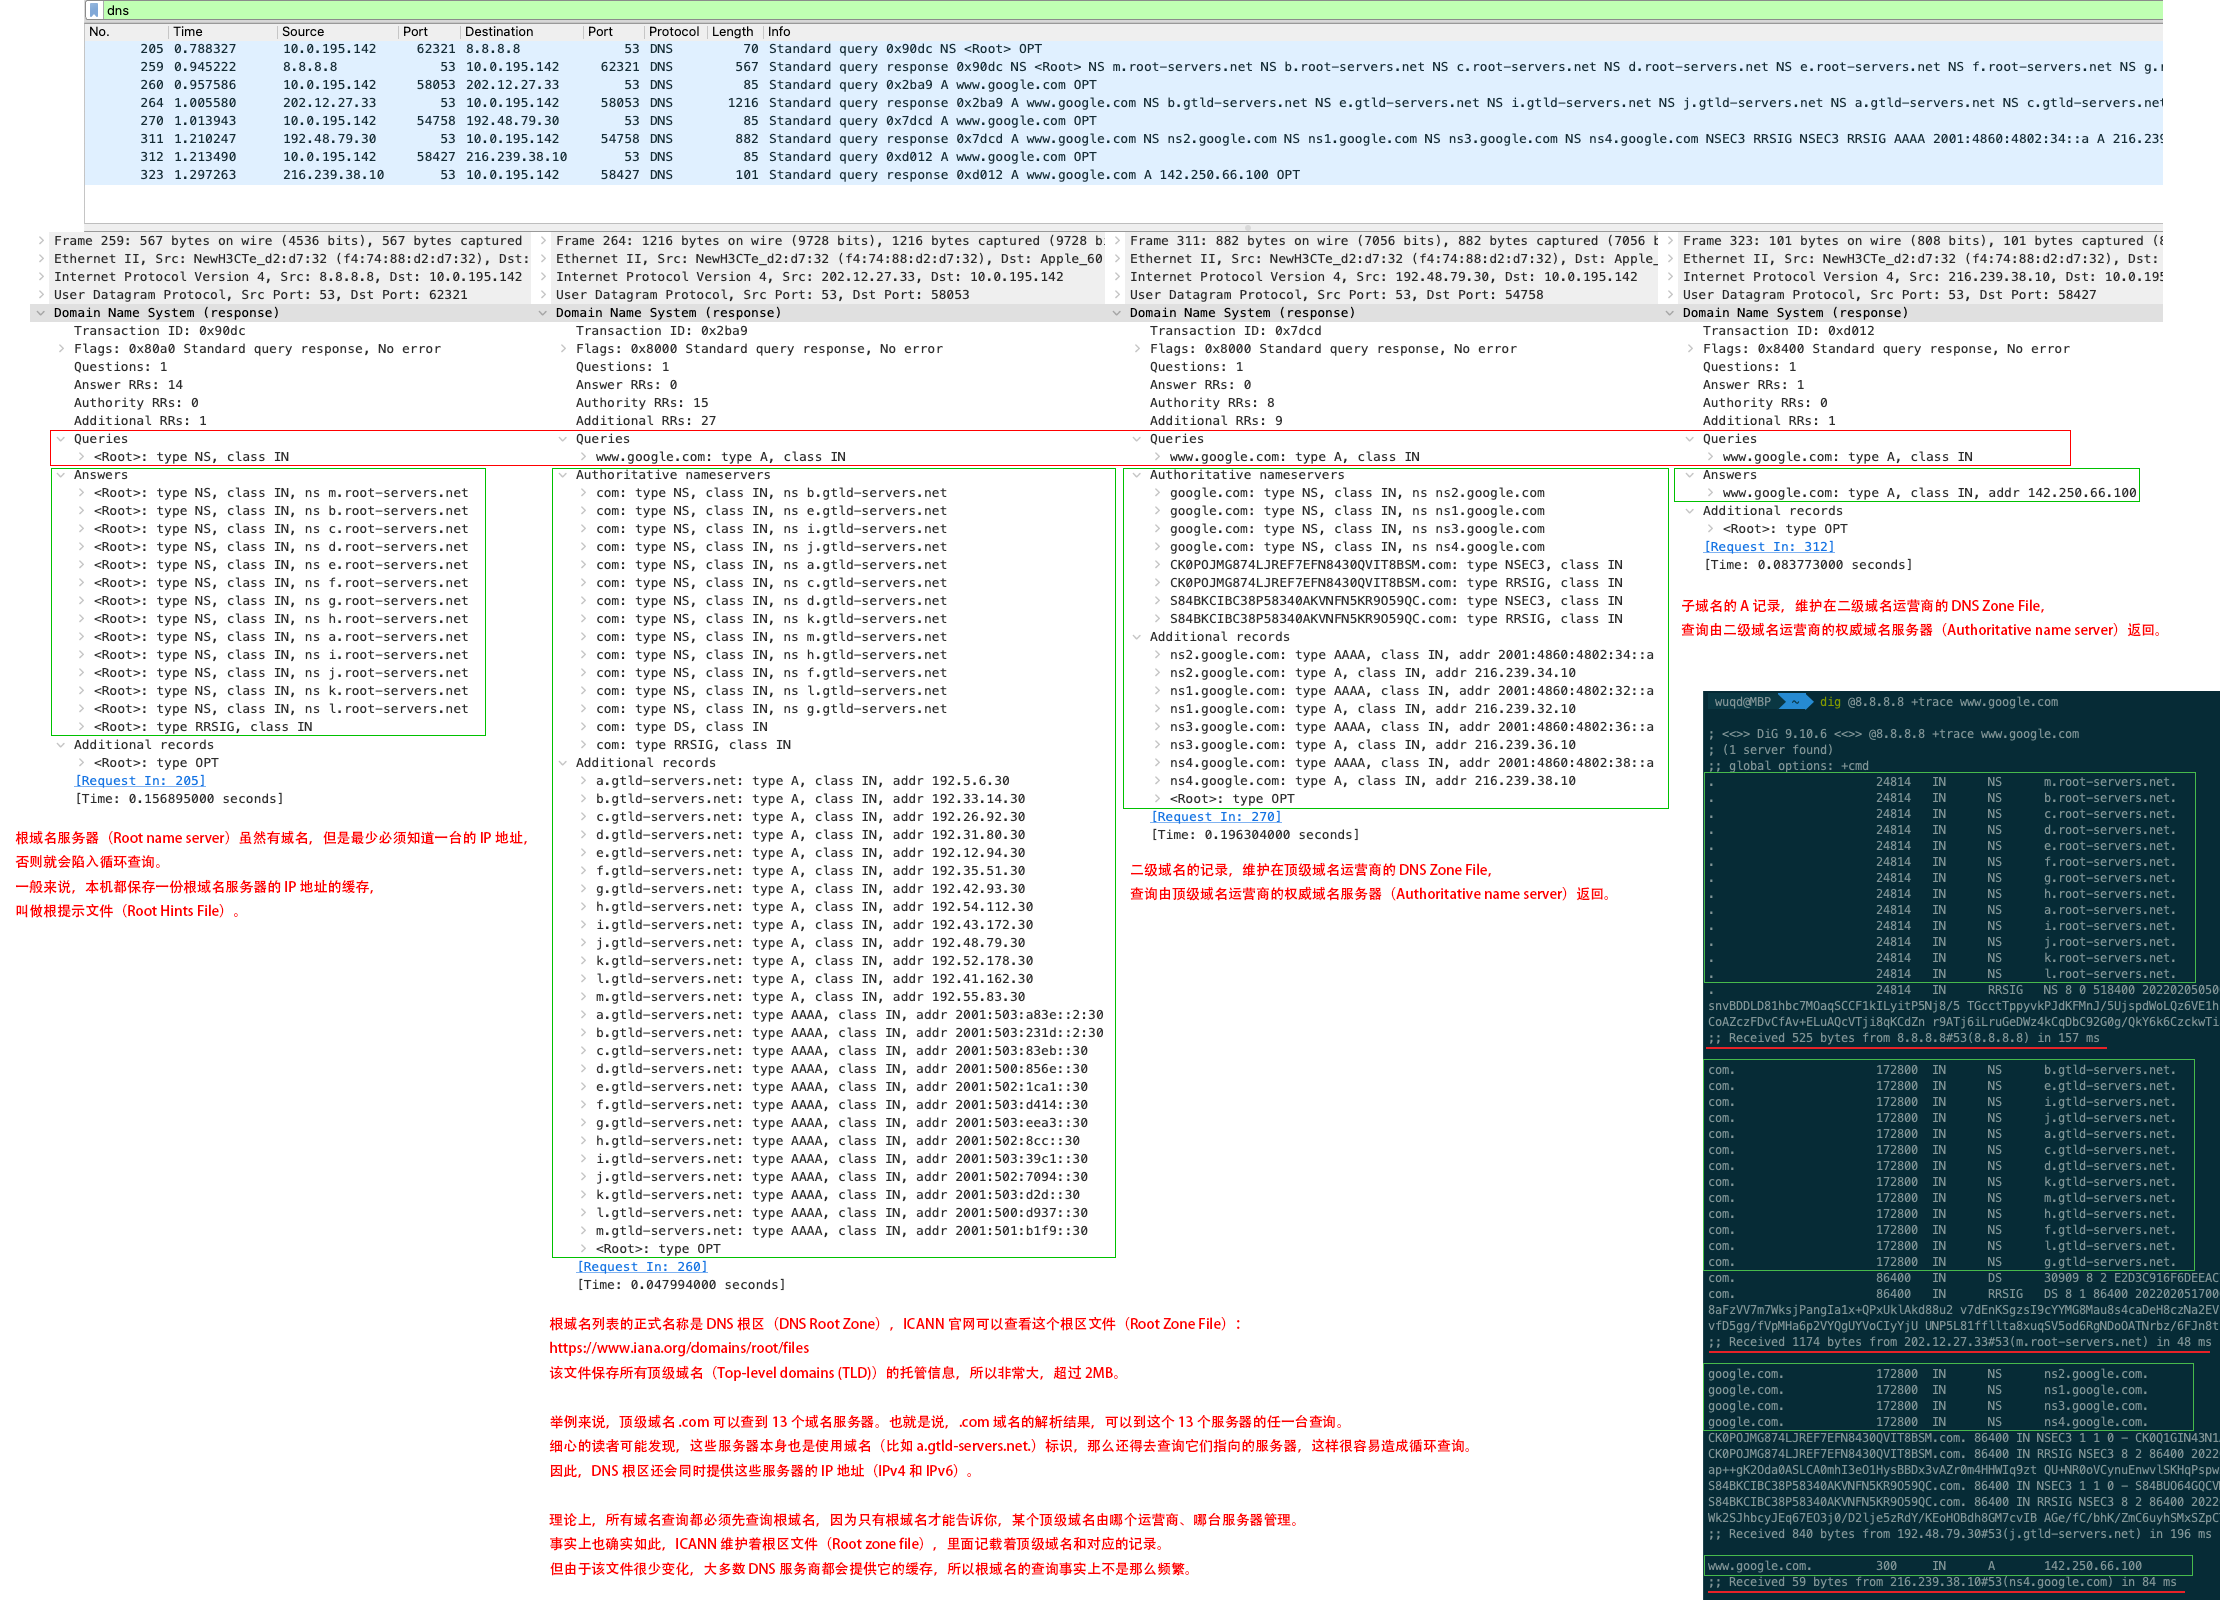
DNS 根域名服务器(Root name server)负责维护 DNS 根区文件(Root zone file)。该文件保存了所有顶级域名(TLD)的托管信息,所以非常大,超过 2MB。
举例来说,顶级域名 .com 可以查到 13 个域名服务器:
1 2 3 4 5 6 7 8 9 10 11 12 13
com. 172800 IN NS a.gtld-servers.net. com. 172800 IN NS b.gtld-servers.net. com. 172800 IN NS c.gtld-servers.net. com. 172800 IN NS d.gtld-servers.net. com. 172800 IN NS e.gtld-servers.net. com. 172800 IN NS f.gtld-servers.net. com. 172800 IN NS g.gtld-servers.net. com. 172800 IN NS h.gtld-servers.net. com. 172800 IN NS i.gtld-servers.net. com. 172800 IN NS j.gtld-servers.net. com. 172800 IN NS k.gtld-servers.net. com. 172800 IN NS l.gtld-servers.net. com. 172800 IN NS m.gtld-servers.net.
a.gtld-servers.net. 172800 IN A 192.5.6.30 a.gtld-servers.net. 172800 IN AAAA 2001:503:a83e:0:0:0:2:30 b.gtld-servers.net. 172800 IN A 192.33.14.30 b.gtld-servers.net. 172800 IN AAAA 2001:503:231d:0:0:0:2:30 c.gtld-servers.net. 172800 IN A 192.26.92.30 c.gtld-servers.net. 172800 IN AAAA 2001:503:83eb:0:0:0:0:30 ...
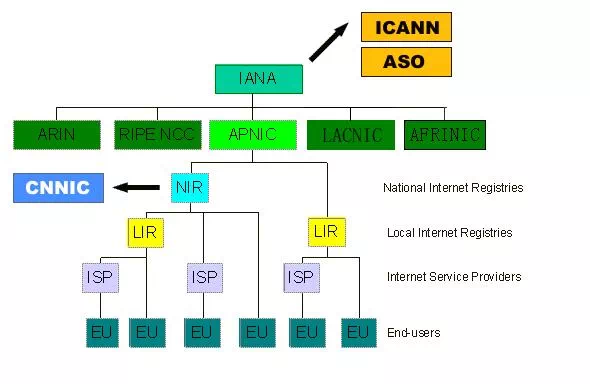
理论上,所有域名查询都必须先查询根域名,因为只有根域名才能告诉你,某个顶级域名由哪个运营商、哪台服务器管理。事实上也确实如此,ICANN 维护着根区文件(Root zone file),里面记载着顶级域名和对应的记录。
restricted generic top-level domains (grTLD): These domains are managed under official ICANN accredited registrars.
Sponsored top-level domains (sTLD): These domains are proposed and sponsored by private agencies or organizations that establish and enforce rules restricting the eligibility to use the TLD. Use is based on community theme concepts; these domains are managed under official ICANN accredited registrars.
Test top-level domains (tTLD): These domains were installed under .test for testing purposes in the IDN development process; these domains are not present in the root zone.
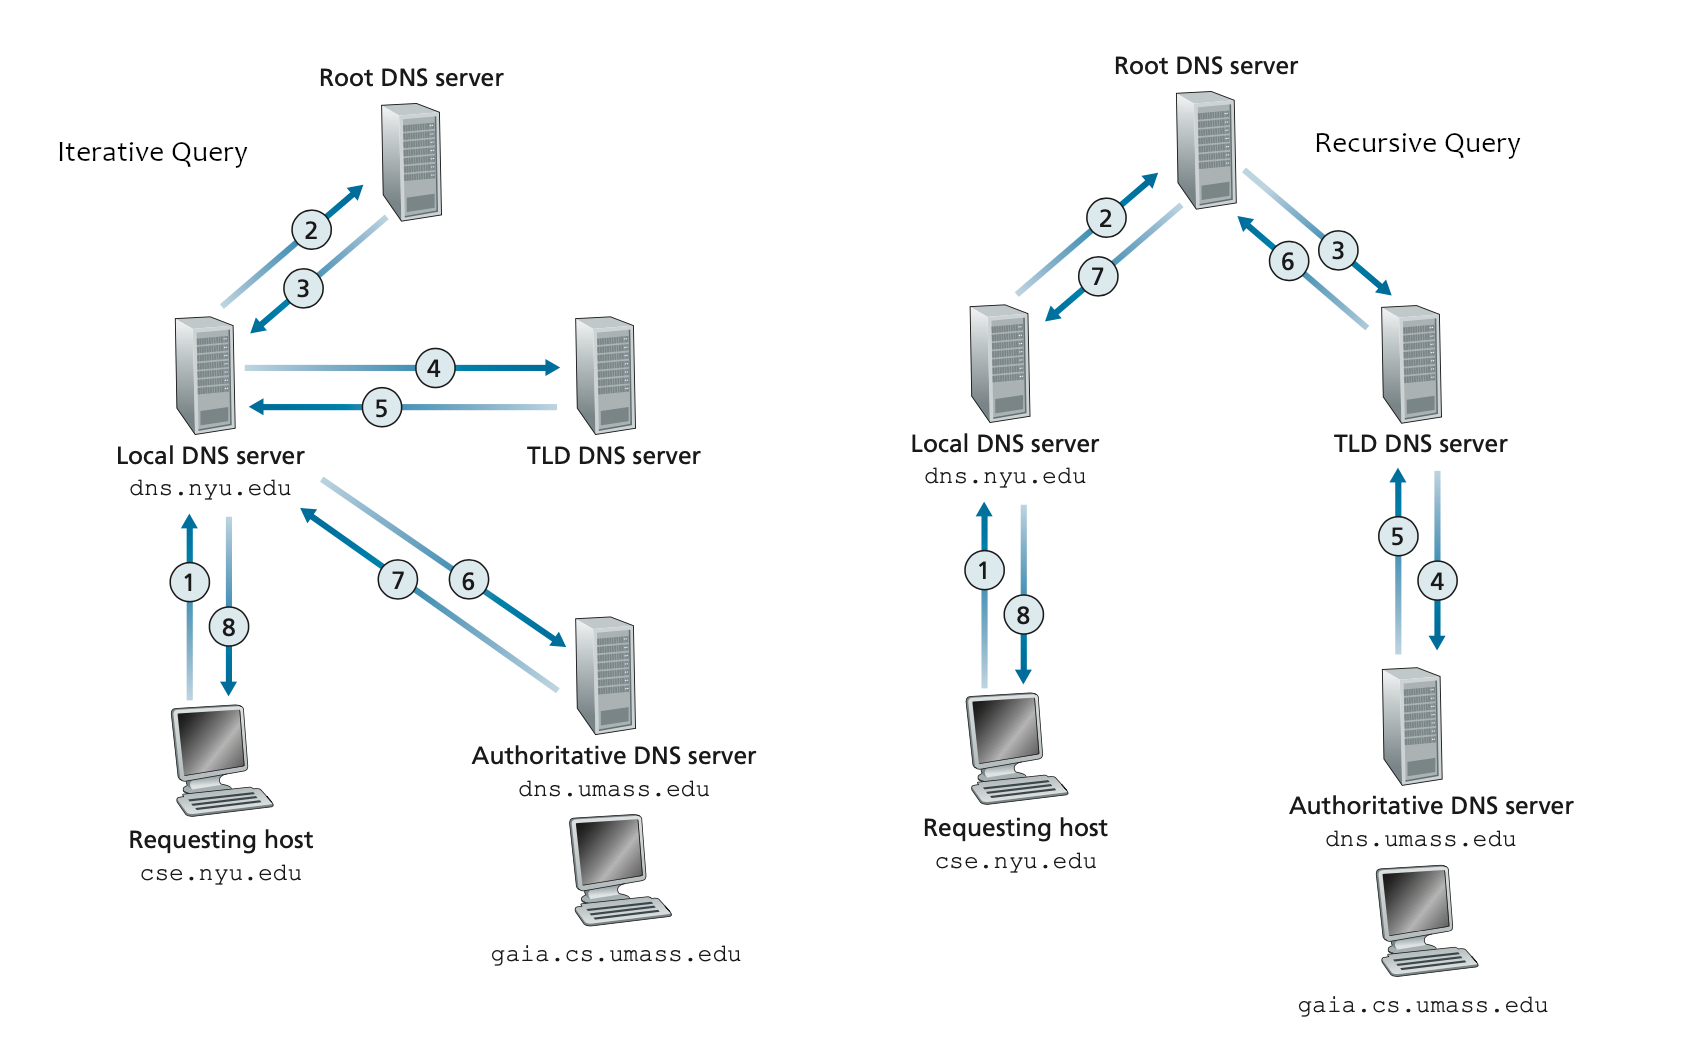
In any system that has a distributed database, a particular name server may be presented with a query that can only be answered by some other server. The two general approaches to dealing with this problem are
“recursive”, in which the first server pursues the query for the client at another server,
“iterative”, in which the server refers the client to another server and lets the client pursue the query.
Both approaches have advantages and disadvantages, but the iterative approach is preferred for the datagram style of access. The domain system requires implementation of the iterative approach, but allows the recursive approach as an option.
迭代方式(Iterative Approach)
A DNS resolver that implements the iterative approach mandated by RFC 1034; in this case, the resolver consults three name servers to resolve the fully qualified domain name “www.wikipedia.org".
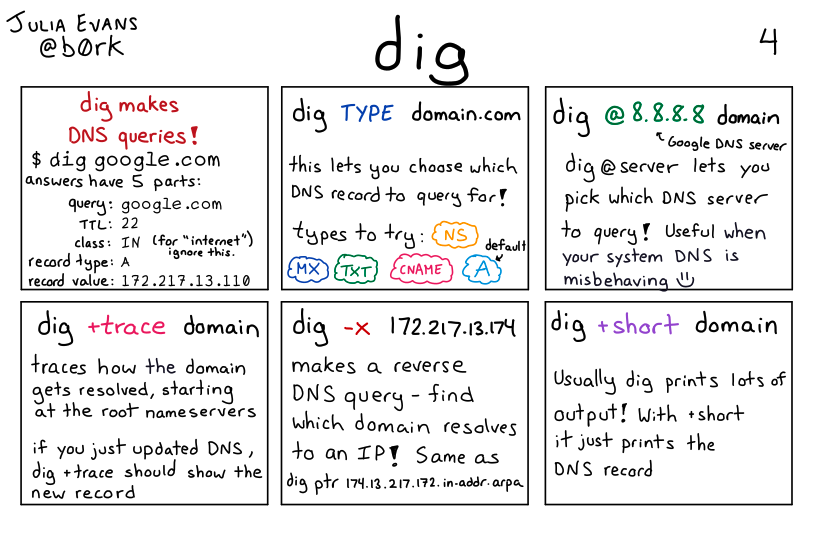
# To use a specific DNS server for the query, use the @ option. $ dig @8.8.8.8 example.com
1 2 3
# By default, dig displays the A record for a domain. To look up a different DNS record, add it to the end of the command. # For example, to look up the MX (mail exchanger) record for the example.com domain, type the following command: $ dig example.com MX
1 2 3 4 5
# query for any type of record information $ dig +noall +answer www.google.com any
www.google.com. 107 IN A 142.250.66.132 www.google.com. 94 IN AAAA 2404:6800:4005:802::2004
+[no]trace
This option toggles tracing of the delegation path from the root name servers for the name being looked up. Tracing is disabled by default. When tracing is enabled, dig makes iterative queries to resolve the name being looked up. It follows referrals from the root servers, showing the answer from each server that was used to resolve the lookup.
下例中,使用公共域名服务器,而不是依次使用 /etc/resolv.conf 里配置的本地域名服务器进行 DNS 迭代查询,结果如下:
; <<>> DiG 9.10.6 <<>> @8.8.8.8 +trace www.google.com ; (1 server found) ;; global options: +cmd . 24814 IN NS m.root-servers.net. . 24814 IN NS b.root-servers.net. . 24814 IN NS c.root-servers.net. . 24814 IN NS d.root-servers.net. . 24814 IN NS e.root-servers.net. . 24814 IN NS f.root-servers.net. . 24814 IN NS g.root-servers.net. . 24814 IN NS h.root-servers.net. . 24814 IN NS a.root-servers.net. . 24814 IN NS i.root-servers.net. . 24814 IN NS j.root-servers.net. . 24814 IN NS k.root-servers.net. . 24814 IN NS l.root-servers.net. ;; Received 525 bytes from 8.8.8.8#53(8.8.8.8) in 157 ms
com. 172800 IN NS b.gtld-servers.net. com. 172800 IN NS e.gtld-servers.net. com. 172800 IN NS i.gtld-servers.net. com. 172800 IN NS j.gtld-servers.net. com. 172800 IN NS a.gtld-servers.net. com. 172800 IN NS c.gtld-servers.net. com. 172800 IN NS d.gtld-servers.net. com. 172800 IN NS k.gtld-servers.net. com. 172800 IN NS m.gtld-servers.net. com. 172800 IN NS h.gtld-servers.net. com. 172800 IN NS f.gtld-servers.net. com. 172800 IN NS l.gtld-servers.net. com. 172800 IN NS g.gtld-servers.net. ;; Received 1174 bytes from 202.12.27.33#53(m.root-servers.net) in 48 ms
google.com. 172800 IN NS ns2.google.com. google.com. 172800 IN NS ns1.google.com. google.com. 172800 IN NS ns3.google.com. google.com. 172800 IN NS ns4.google.com. ;; Received 840 bytes from 192.48.79.30#53(j.gtld-servers.net) in 196 ms
www.google.com. 300 IN A 142.250.66.100 ;; Received 59 bytes from 216.239.38.10#53(ns4.google.com) in 84 ms
# Indicates whether this client should fetch eureka registry information from eureka server. # 指示此 eureka client 是否应从 eureka server 获取注册表信息。(缓存到本地,后面会增量获取) eureka.client.fetch-registry=true
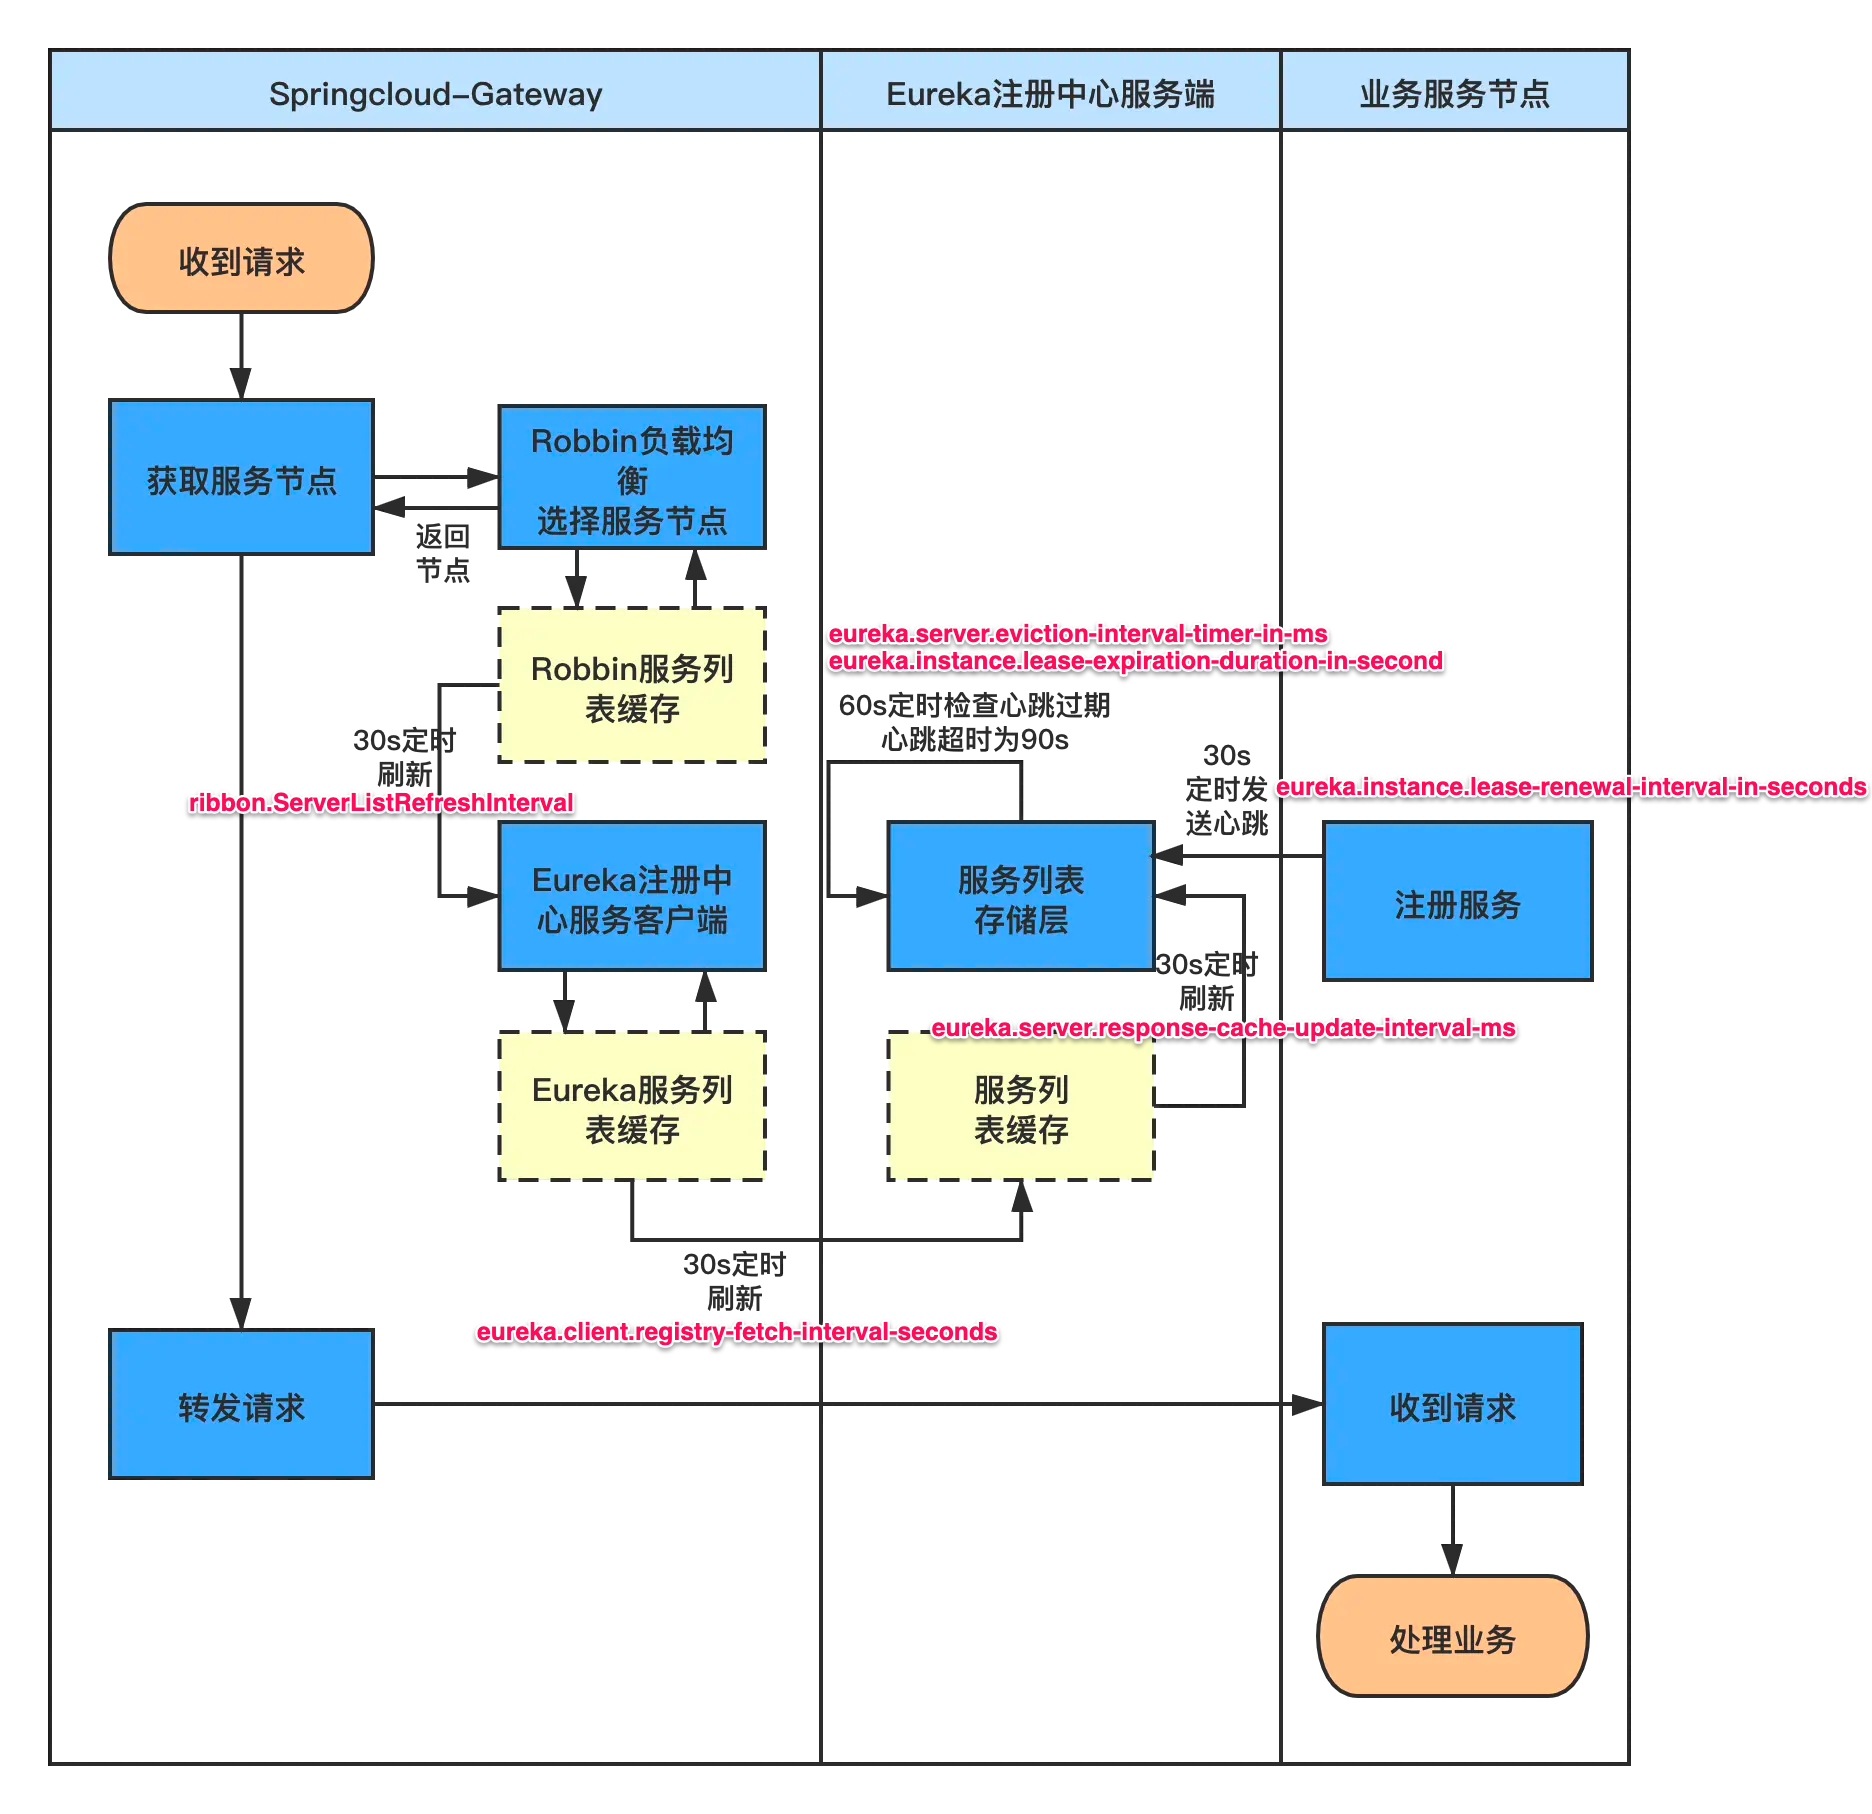
# Indicates how often(in seconds) to fetch the registry information from the eureka server. # 指示此 eureka client 从 eureka server 获取注册表信息的频率(以秒为单位)。可用于 eureka client 下线后,快速感知 eureka.client.registry-fetch-interval-seconds=30
Eureka client (provider)
1 2 3 4 5 6 7 8 9 10
# Map of availability zone to list of fully qualified URLs to communicate with eureka server. Each value can be a single URL or a comma separated list of alternative locations. Typically the eureka server URLs carry protocol,host,port,context and version information if any. Example: http://ec2-256-156-243-129.compute-1.amazonaws.com:7001/eureka/ The changes are effective at runtime at the next service url refresh cycle as specified by eurekaServiceUrlPollIntervalSeconds. eureka.client.service-url.default-zone: http://localhost:8000/eureka/
# Indicates whether or not this instance should register its information with eureka server for discovery by others. In some cases, you do not want your instances to be discovered whereas you just want do discover other instances. # 指示此实例是否应向 eureka server 注册其信息以供其它服务发现。两种情况下会设置为 false:1、您不希望您的实例被发现,而您只想发现其他实例。2、eureka server 以单机模式运行(https://cloud.spring.io/spring-cloud-netflix/reference/html/#spring-cloud-eureka-server-standalone-mode) eureka.client.register-with-eureka=true
# Indicates how often (in seconds) the eureka client needs to send heartbeats to eureka server to indicate that it is still alive. If the heartbeats are not received for the period specified in leaseExpirationDurationInSeconds, eureka server will remove the instance from its view, there by disallowing traffic to this instance. Note that the instance could still not take traffic if it implements HealthCheckCallback and then decides to make itself unavailable. # 服务续约时间(心跳时间) —— 指示 eureka client 需要多长时间(以秒为单位)向 eureka server 发送心跳以表明它仍然活着。如果 eureka server 在 lease-expiration-duration-in-second 中指定的时间段内未收到心跳,eureka server 将从其视图中删除该实例,从而限流该实例。请注意,如果实例实现 HealthCheckCallback 然后决定使其自身不可用,则该实例仍然无法获取流量。 eureka.instance.lease-renewal-interval-in-seconds=30
Eureka server
1 2 3 4 5 6 7 8 9 10 11
# Indicates the time in seconds that the eureka server waits since it received the last heartbeat before it can remove this instance from its view and there by disallowing traffic to this instance. Setting this value too long could mean that the traffic could be routed to the instance even though the instance is not alive. Setting this value too small could mean, the instance may be taken out of traffic because of temporary network glitches.This value to be set to atleast higher than the value specified in leaseRenewalIntervalInSeconds. # 服务过期时间 —— 指示 eureka server 自收到最后一次心跳后等待的时间(以秒为单位),然后才能从其视图中删除此实例,并限流该实例。将此值设置得太长可能意味着即使实例挂了,流量也可以路由到实例。将此值设置得太小可能意味着,由于临时网络故障,eureka server 未及时收到心跳,实例可能会被限流。此值至少要设置为高于 lease-renewal-interval-in-seconds 中指定的值。 eureka.instance.lease-expiration-duration-in-second=90
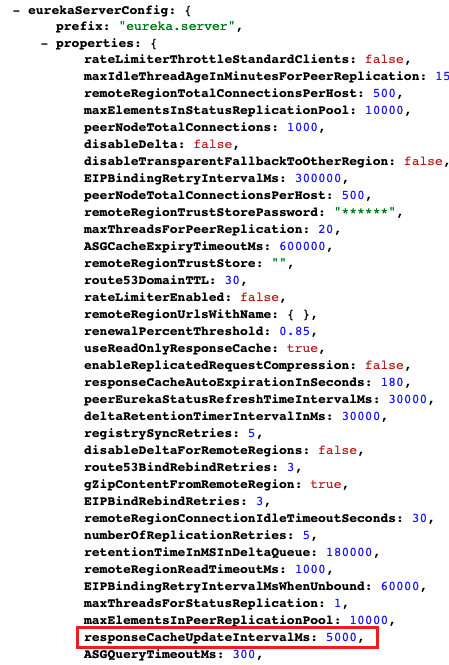
# Gets the time interval with which the task that expires instances should wake up and run. # 服务剔除 TimerTask 执行时间 eureka.server.eviction-interval-timer-in-ms=60 * 1000
# Gets the time interval with which the payload cache of the client should be updated. # 一级缓存更新 TimerTask 执行时间,定时将 L2(readWriteCacheMap)覆盖掉 L1(readOnlyCacheMap) eureka.server.response-cache-update-interval-ms=30 * 1000
C++ integrates the operators new and delete for allocating dynamic memory. But these were not available in the C language; instead, it used a library solution, with the functions malloc, calloc, realloc and free, defined in the header <cstdlib> (known as <stdlib.h> in C). The functions are also available in C++ and can also be used to allocate and deallocate dynamic memory.
Note, though, that the memory blocks allocated by these functions are not necessarily compatible with those returned by new, so they should not be mixed; each one should be handled with its own set of functions or operators.
在 C++ 中,您可以使用特殊的运算符为给定类型的变量在运行时分配堆内存(memory heap),这会返回所分配的空间地址。
动态内存分配使用 new 运算符,后面跟上一个数据类型,语法如下:
1 2 3 4 5 6
// allocate memory to contain one single element of specified type pointer = new type // allocate a block (an array) of elements of specified type, where `number_of_elements` is an integer value representing the amount of these. // it returns a pointer to the beginning of the new block of memory allocated. pointer = new type [number_of_elements]
例如:
1 2
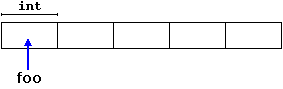
int * bar = new int(5); // int bar = 5 int * foo = new int[5]; // int foo[5]
In this case, the system dynamically allocates space for five elements of type int and returns a pointer to the first element of the sequence, which is assigned to foo (a pointer). Therefore, foo now points to a valid block of memory with space for five elements of type int.
Here, foo is a pointer, and thus, the first element pointed to by foo can be accessed either with the expression foo[0] or the expression *foo (both are equivalent). The second element can be accessed either with foo[1] or *(foo+1), and so on…
由于使用动态内存分配机制,因此 number_of_elements 可以是一个变量,变量值在运行时才决定,例如:p = new int[i];。
声明普通数组与使用 new 分配动态内存的区别:
There is a substantial difference between declaring a normal array and allocating dynamic memory for a block of memory using new. The most important difference is that the size of a regular array needs to be a constant expression, and thus its size has to be determined at the moment of designing the program, before it is run, whereas the dynamic memory allocation performed by new allows to assign memory during runtime using any variable value as size.
C++ 提供了两种标准机制来检查堆内存分配是否成功:
The dynamic memory requested by our program is allocated by the system from the memory heap. However, computer memory is a limited resource, and it can be exhausted. Therefore, there are no guarantees that all requests to allocate memory using operator new are going to be granted by the system.
C++ provides two standard mechanisms to check if the allocation was successful:
机制一:异常机制
One is by handling exceptions. Using this method, an exception of type bad_alloc is thrown when the allocation fails. If this exception is thrown and it is not handled by a specific handler, the program execution is terminated.
1
foo = newint [5]; // if allocation fails, an exception is thrown
机制二:返回空指针
The other method is known as nothrow, and what happens when it is used is that when a memory allocation fails, instead of throwing a bad_alloc exception or terminating the program, the pointer returned by new is a null pointer, and the program continues its execution normally.
This method can be specified by using a special object called nothrow, declared in header <new>, as argument for new:
1
foo = new (nothrow) int [5];
In this case, if the allocation of this block of memory fails, the failure can be detected by checking if foo is a null pointer:
1 2 3 4 5
int * foo; foo = new (nothrow) int [5]; if (foo == nullptr) { // error assigning memory. Take measures. }
This nothrow method is likely to produce less efficient code than exceptions, since it implies explicitly checking the pointer value returned after each and every allocation. Therefore, the exception mechanism is generally preferred, at least for critical allocations. But nothrow mechanism is more simplicity.
It is considered good practice for programs to always be able to handle failures to allocate memory, either by checking the pointer value (if nothrow) or by catching the proper exception.
动态内存回收 delete
如果您不再需要动态分配的内存空间,可以使用 delete 运算符,删除之前由 new 运算符分配的堆内存(memory heap),以便该内存可再次用于其它动态内存分配。语法如下:
1 2 3 4 5
// releases the memory of a single element allocated using new delete bar;
// releases the memory allocated for arrays of elements using new and a size in brackets ([]) delete [] foo; // 不管所删除数组的维数多少,指针名前只用一对方括号 []
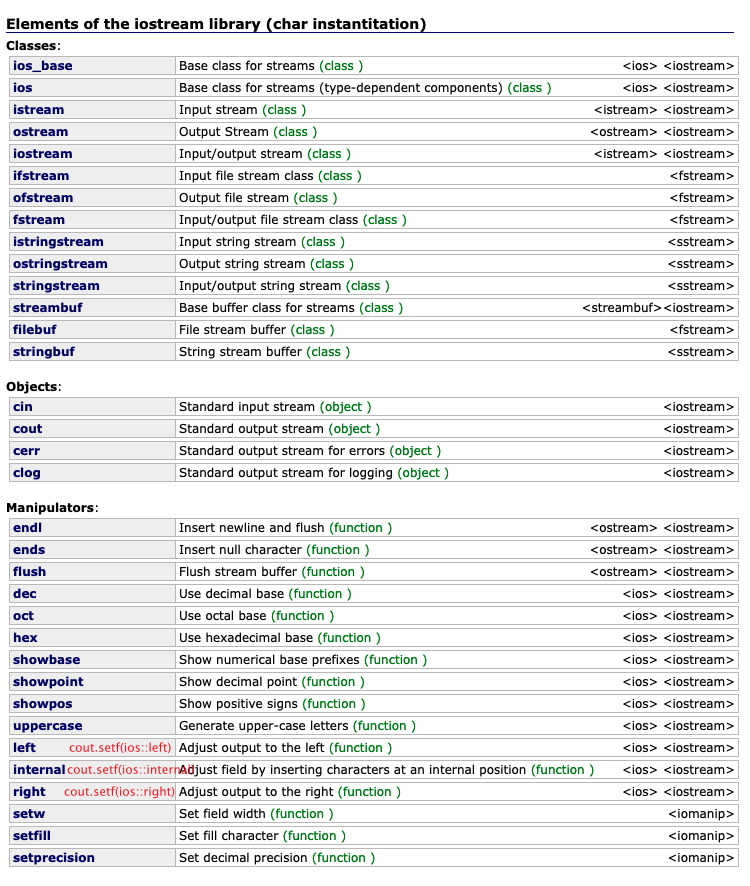
The iostream library is an object-oriented library that provides input and output functionality using streams.
A stream is an abstraction that represents a device on which input and ouput operations are performed. A stream can basically be represented as a source or destination of characters of indefinite length.
Streams are generally associated to a physical source or destination of characters, like a disk file, the keyboard, or the console, so the characters gotten or written to/from our abstraction called stream are physically input/output to the physical device. For example, file streams are C++ objects to manipulate and interact with files; Once a file stream is used to open a file, any input or output operation performed on that stream is physically reflected in the file.
To operate with streams, C++ provides the standard iostream library, which contains the following elements:
Basic class templates
The base of the iostream library is the hierarchy of class templates. The class templates provide most of the functionality of the library in a type-independent fashion.
Class template instantiations
The library incorporates two standard sets of instantiations of the entire iostream class template hierarchy:
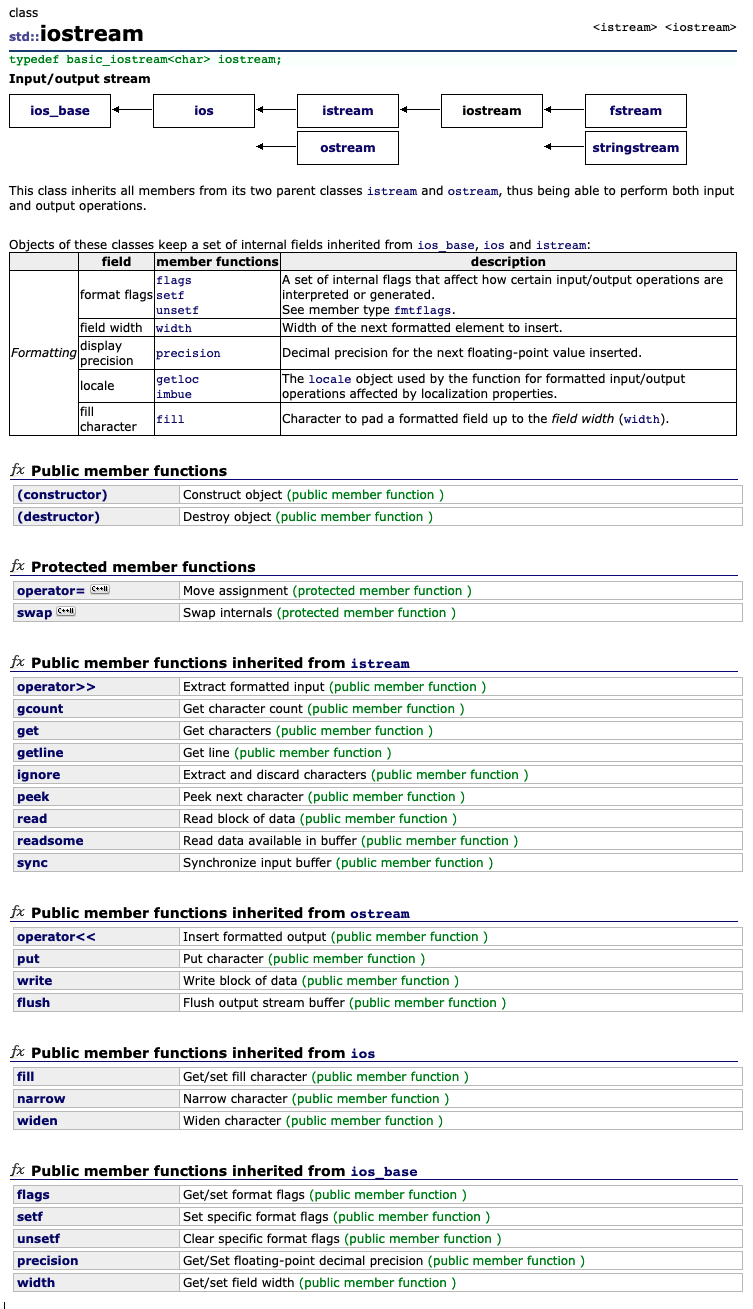
The narrow-oriented (char type) instantiation is probably the better known part of the iostream library. Classes like ios, istream and ofstream are narrow-oriented. The diagram on top of this page shows the names and relationships of narrow-oriented classes.
The classes of the wide-oriented (wchar_t) instatiation follow the same naming conventions as the narrow-oriented instantiation but with the name of each class and object prefixed with a w character, forming wios, wistream and wofstream, as an example.
Objects
As part of the iostream library, the header file <iostream> declares certain objects that are used to perform input and output operations on the standard input and output.
They are divided in two sets:
narrow-oriented objects: cin, cout, cerr and clog
wide-oriented objects: wcin, wcout, wcerr and wclog
Manipulators
Manipulators are global functions designed to be used together with insertion (<<) and extraction (>>) operators performed on iostream stream objects. They generally modify properties and formatting settings of the streams.
In principle, a publicly derived class inherits access to every member of a base class except:
its constructors and its destructor
its assignment operator members (operator=)
its friends
its private members
继承的访问控制属性
Access
public
protected
private
members of the same class
yes
yes
yes
members of derived class
yes
yes
no
not members
yes
no
no
构造、析构函数执行顺序
Even though access to the constructors and destructor of the base class is not inherited, they are automatically called by the constructors and destructor of the derived class.
Unless otherwise specified, the constructors of a derived class calls the default constructor of its base classes (i.e., the constructor taking no arguments).
继承后,执行顺序如下:
构造函数:先父后子
析构函数:先子后父
子类调用父类方法
BaseClass::Function()
多态
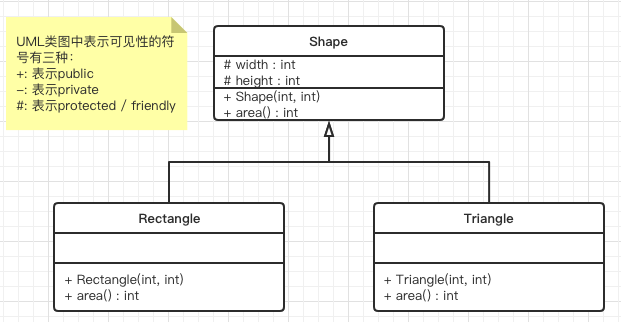
One of the key features of class inheritance is that a pointer to a derived class is type-compatible with a pointer to its base class. Polymorphism is the art of taking advantage of this simple but powerful and versatile feature.
cout << "rectangle area is " << p1->area() << endl; // rectangle area is 6 cout << "triangle area is " << p2->area() << endl; // triangle area is 3 return0; }
cout << "rectangle area is " << p1->area() << endl; // rectangle area is 6 cout << "triangle area is " << p2->area() << endl; // triangle area is 3
delete p3; delete p4; return0; }
描述如下:
Function main declares two pointers to Shape (named p1 and p2). These are assigned the addresses of rect and trgl, respectively, which are objects of type Rectangle and Triangle. Such assignments are valid, since both Rectangle and Triangle are classes derived from Shape.
Dereferencing p1 and p2 (with p1-> and p2->) is valid and allows us to access the members of their pointed objects. For example, the following two statements would be equivalent in the previous example:
+--------------------+ | Base Class | | virtual function | +---------^----------+ | |class inheritance | +---------+----------+ | Derived class | | redefined function| +--------------------+
运行时多态的实现手段:虚函数 + 继承 + 函数重定义
派生类也可以重定义基类的非虚函数,但无法通过基类的引用来访问派生类的该函数。即:如果移除上述基类中 area 函数声明的 virtual 关键字,下面的函数调用将返回 0,因为实际调用的是基类的版本:
1 2
cout << "rectangle area is " << p1->area() << endl; // rectangle area is 0 cout << "triangle area is " << p2->area() << endl; // triangle area is 0
Therefore, essentially, what the virtual keyword does is to allow a member of a derived class with the same name as one in the base class to be appropriately called from a pointer, and more precisely when the type of the pointer is a pointer to the base class that is pointing to an object of the derived class, as in the above example.
A class that declares or inherits a virtual function is called a polymorphic class.
注意,尽管成员之一是 virtual 的,但 Sharp 仍然是一个常规类,可以实例化对象。
纯虚函数(抽象类)
Classes that contain at least one pure virtual function are known as abstract base classes. The syntax of pure virtual function is to replace their definition by =0 (an equal sign and a zero):
1 2 3 4 5 6 7
// abstract class CPolygon classShape { protected: int width, height; public: virtualintarea()= 0; };
Abstract base classes cannot be used to instantiate objects:
1 2 3
// 不允许使用抽象类类型 "Shape" 的对象: -- 函数 "Shape::area" 是纯虚函数 // variable type 'Shape' is an abstract class Shape shape;
But an abstract base class is not totally useless. It can be used to create pointers to it, and take advantage of all its polymorphic abilities.
1 2 3
// the following pointer declarations would be valid Shape * p1 = ▭ Shape * p2 = &trgl;
Virtual members and abstract classes grant C++ polymorphic characteristics, most useful for object-oriented projects.
private members of a class are accessible only from within other members of the same class (or from their friend). By default, all members of a class have private access for all its members.
protected members are accessible from other members of the same class (or from their friend), but also from members of their derived classes.
Finally, public members are accessible from anywhere where the object is visible.
this 指针
在 C++ 中,每一个对象都能通过 this 指针来访问自己的地址。this 指针是所有成员函数的隐含参数。因此,在成员函数内部,它可以用来指向调用对象。
// classes example #include<iostream> usingnamespace std;
classRectangle { int width, height; public: // declaration of a member function within the class voidset_values(int, int); // defining a member function completely within the class definition intarea(){return width*height;} };
// definition of a member function of a class outside the class itself. // The scope operator (::) specifies the class to which the member being defined belongs, granting exactly the same scope properties as if this function definition was directly included within the class definition. voidRectangle::set_values(int x, int y){ width = x; height = y; };
intmain(){ Rectangle rect;
// public members of object can be accessed by dot operator (.) rect.set_values (3,4); cout << "area: " << rect.area() << endl; return0; }
常成员函数
To specify that a member is a const member, the const keyword shall follow the function prototype, after the closing parenthesis for its parameters:
// 调用有参构造函数 Rectangle rect(1, 2); // Object is being created, width=1, height=2 // 调用默认构造函数 Rectangle rectb; // Object is being created
构造函数重载
Overloading constructors
Like any other function, a constructor can also be overloaded with different versions taking different parameters: with a different number of parameters and/or parameters of different types. The compiler will automatically call the one whose parameters match the arguments:
// 定义一个无参构造函数 Rectangle::Rectangle() { cout << "Object is being created" << endl; }
// 定义一个有参构造函数 Rectangle::Rectangle(int width, int height) { this->width = width; this->height = height; cout << "Object is being created, width=" << this->width << ", height=" << this->height << endl; };
This example introduces a special kind constructor: the default constructor. The default constructor is the constructor that takes no parameters, and it is special because it is called when an object is declared but is not initialized with any arguments. In the example above, the default constructor is called for rectb. Note how rectb is not even constructed with an empty set of parentheses - in fact, empty parentheses cannot be used to call the default constructor:
1 2
Rectangle rectb; // ok, default constructor called Rectangle rectc(); // oops, default constructor NOT called, empty parentheses interpreted as a function declaration
This is because the empty set of parentheses would make of rectc a function declaration instead of an object declaration: It would be a function that takes no arguments and returns a value of type Rectangle.
在构造函数中初始化成员变量
使用构造函数初始化其他成员变量时,有下面两种方式:
Member initialization in constructors
When a constructor is used to initialize other members, these other members can be initialized directly, without resorting to statements in its body. This is done by inserting, before the constructor’s body, a colon (:) and a list of initializations for class members. For example, consider a class with the following declaration:
C++ allows most operators to be overloaded so that their behavior can be defined for just about any type, including classes. Here is a list of all the operators that can be overloaded:
Operators are overloaded by means of operator functions, which are regular functions with special names: their name begins by the operator keyword followed by the operator sign that is overloaded. The syntax is:
1
type operatorsign(parameters){ /*... body ...*/ }
二、重载运算符的不同形式:
There is a table with a summary of the parameters needed for each of the different operators than can be overloaded (please, replace @ by the operator in each case):
Expression
Operator
Member function
Non-member function
@a
+ - * & ! ~ ++ --
A::operator@()
operator@(A)
a@
++ --
A::operator@(int)
operator@(A,int)
a@b
+ - * / % ^ & | < > == != <= >= << >> && || ,
A::operator@(B)
operator@(A,B)
a@b
= += -= *= /= %= ^= &= |= <<= >>= []
A::operator@(B)
-
a(b,c...)
()
A::operator()(B,C...)
-
a->b
->
A::operator->()
-
(TYPE) a
TYPE
A::operator TYPE()
-
Where a is an object of class A, b is an object of class B and c is an object of class C. TYPE is just any type (that operators overloads the conversion to type TYPE).
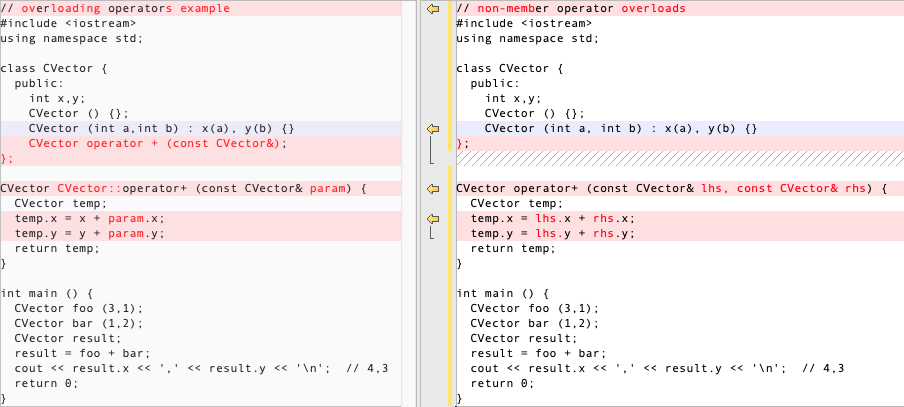
Notice that some operators may be overloaded in two forms: either as a member function or as a non-member function.
三、例子:
For example, cartesian vectors are sets of two coordinates: x and y. The addition operation of two cartesian vectors is defined as the addition both x coordinates together, and both y coordinates together. For example, adding the cartesian vectors(3,1) and (1,2) together would result in (3+1,1+2) = (4,3). This could be implemented in C++ with the following code:
The function operator+ of class CVector overloads the addition operator (+) for that type. Once declared, this function can be called either implicitly using the operator, or explicitly using its functional name:
1 2 3 4 5
// called either implicitly using the operator c = a + b;
// or explicitly using its functional name c = a.operator+ (b);
Both expressions are equivalent.
四、注意点:
Attention
The operator overloads are just regular functions which can have any behavior; there is actually no requirement that the operation performed by that overload bears a relation to the mathematical or usual meaning of the operator, although it is strongly recommended. For example, a class that overloads operator+ to actually subtract or that overloads operator== to fill the object with zeros, is perfectly valid, although using such a class could be challenging.
函数重定义(redefine)
即 Java 语言中的方法重写(rewrite)。
类指针
Objects can also be pointed to by pointers: Once declared, a class becomes a valid type, so it can be used as the type pointed to by a pointer. For example:
1 2
// a pointer to an object of class Rectangle. Rectangle * prect;
Similarly as with plain data structures, the members of an object can be accessed directly from a pointer by using the arrow operator (->). Here is an example with some possible combinations:
// no matching function for call to 'getmax' // char maxChar = getmax('a', 1.99); // cout << maxChar << endl;
return0; }
类模板
Just like we can create function templates, we can also create class templates, allowing classes to have members that use template parameters as types. For example:
// class templates #include<iostream> usingnamespace std;
template <classT> classMyPair { T a, b; public: MyPair (T first, T second) {a=first; b=second;} T getmax(); };
// In case that a member function is defined outside the defintion of the class template, it shall be preceded with the template <...> prefix template <classT> T MyPair<T>::getmax () { T retval; retval = a > b ? a : b; return retval; }
// implicit conversion from 'double' to 'char' changes value from 1.99 to 1 // MyPair<char> mychars('a', 1.99); // cout << mychars.getmax() << endl;
return0; }
Notice the syntax of the definition of member function getmax:
1 2
template <classT> T mypair<T>::getmax ()
There are three T‘s in this declaration: The first one is the template parameter. The second T refers to the type returned by the function. And the third T (the one between angle brackets) is also a requirement: It specifies that this function’s template parameter is also the class template parameter.
模板类
模板类是类模板实例化后的一个产物。
It is possible to define a different implementation for a template when a specific type is passed as template argument. This is called a template specialization.
This is the syntax used for the class template specialization:
1 2
template <> classmycontainer <char> { ... };
First of all, notice that we precede the class name with template<> , including an empty parameter list. This is because all types are known and no template arguments are required for this specialization, but still, it is the specialization of a class template, and thus it requires to be noted as such.
But more important than this prefix, is the <char> specialization parameter after the class template name. This specialization parameter itself identifies the type for which the template class is being specialized (char). Notice the differences between the generic class template and the specialization:
The first line is the generic template, and the second one is the specialization.
When we declare specializations for a template class, we must also define all its members, even those identical to the generic template class, because there is no “inheritance” of members from the generic template to the specialization.
A type alias is a different name by which a type can be identified. In C++, any valid type can be aliased so that it can be referred to with a different identifier.
在 C++ 中,有两种创建类型别名的语法:
从 C 语言继承而来,使用 typedef 关键字:
1
typedef existing_type new_type_name ;
由 C++ 语言引入,使用 using 关键字:
1
using new_type_name = existing_type ;
existing_type 可以是任何类型,无论是基本类型还是复合类型:
例子一:
typedef
using
typedef char C;
using C = char;
typedef unsigned int WORD;
using WORD = unsigned int;
typedef char * pChar;
using pChar = char *;
typedef char field [50];
using field = char [50];
例子二,下面两种定义结构体类型的方式是等价的:
1
2
3
4
5
6
7
8
9
structproduct { int weight; double price; };
typedefstruct { int weight; double price; } product;
new_type_name 作为该类型的别名,用法如下:
1 2 3 4
C mychar, anotherchar, *ptc1;
WORD myword;
pChar ptc2;
field name;