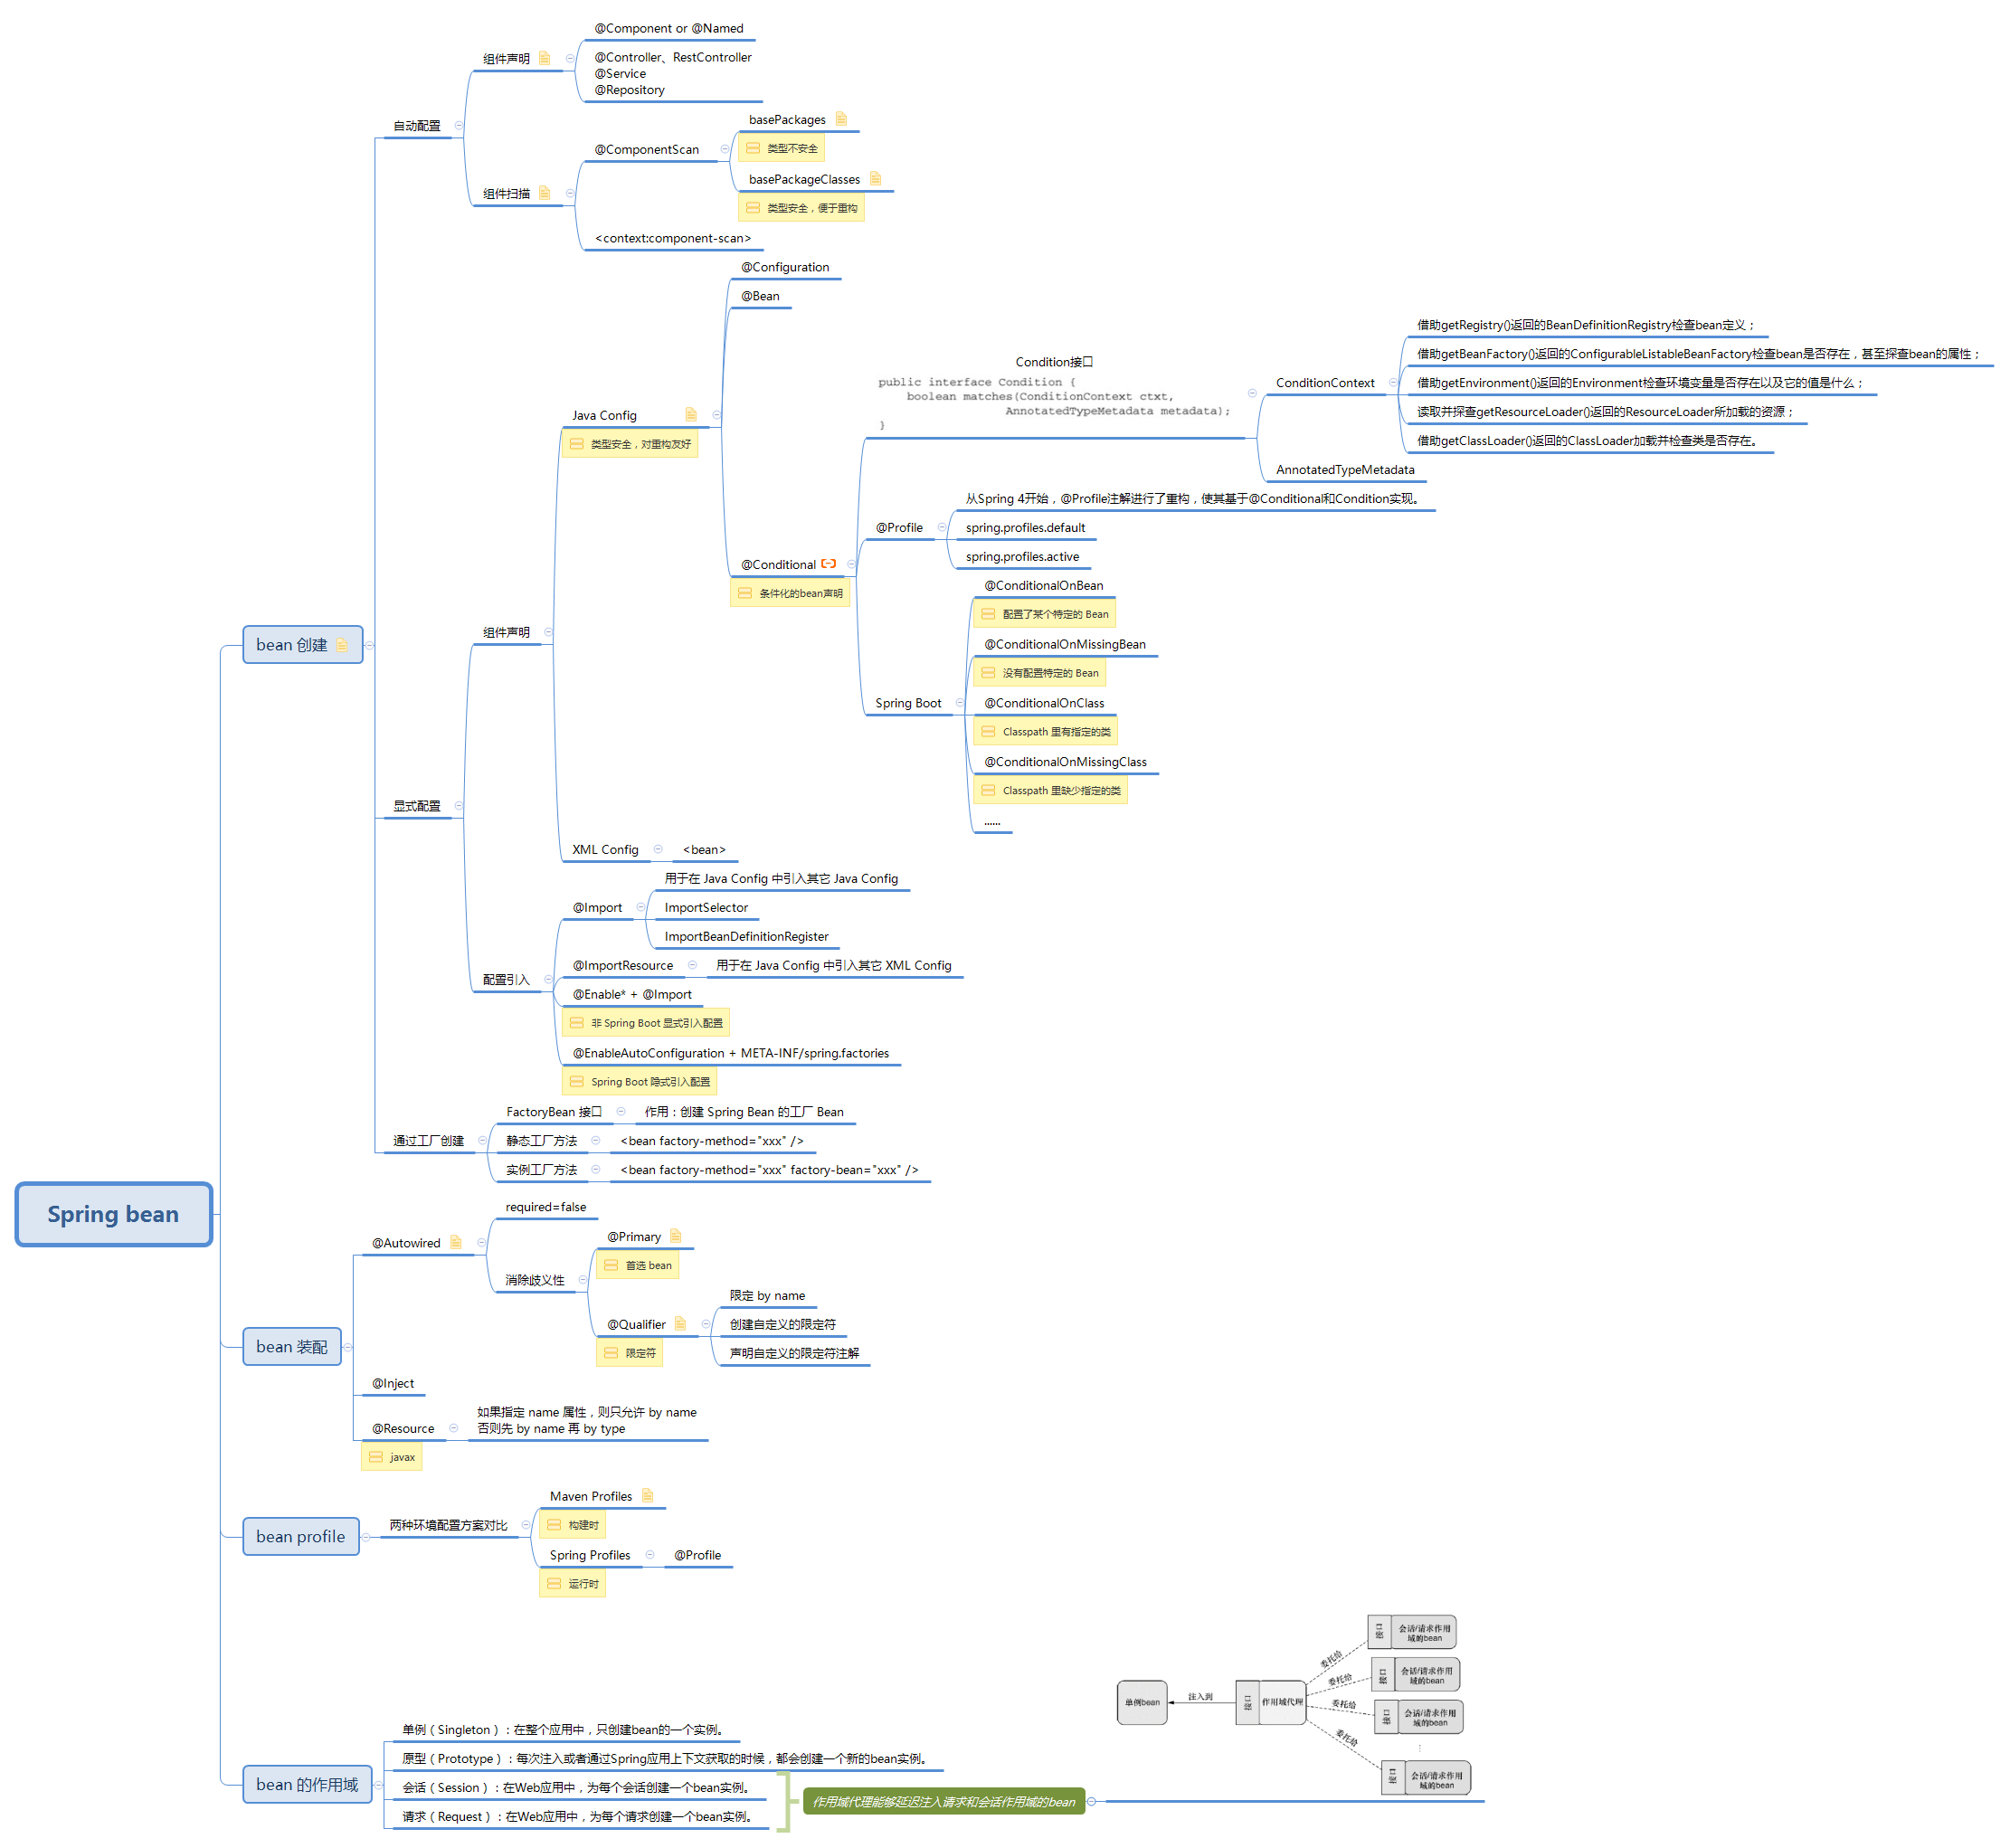
Spring Bean 几种配置方式总结

Spring 组件引入的两种推荐方式:
- 非 Spring Boot 项目,显示引入 Java Config:
@Enable*+@Import - Spring Boot 项目,隐式引入 Java Config:
@EnableAutoConfiguration+META-INF/spring.factories
Spring bean 的声明及装配的几种配置方式:
基于 XML Config 的显式配置,不推荐- 基于 Java Config 的显式配置,推荐用于声明第三方编写的组件
- 自动化配置,即组件扫描(隐式的 bean 发现机制) + 自动装配,推荐用于自己编写的组件
用户可以选择其中一种方式使用,也可以混搭使用。使用时的最佳实践如下:
- 建议尽可能地使用自动化配置的机制。显式配置越少越好,以避免显式配置所带来的维护成本。
- 当你必须要显式配置 bean 的时候(比如,有些源码不是由你来维护的,而当你需要为这些代码配置 bean 的时候),推荐使用类型安全并且比 XML Config 更加强大的 Java Config。
- 最后,只有当你想要使用便利的 XML 命名空间,并且在 JavaConfig 中没有同样的实现时,才应该使用 XML Config。
自动化配置
Spring 从两个角度来实现 bean 的自动化配置:
- 组件扫描(component scanning):Spring 会自动发现应用上下文中要创建的 bean。
- 自动装配(autowiring):Spring 自动满足 bean 之间的依赖。
组件扫描(隐式的 bean 发现机制)和自动装配组合在一起能够发挥出强大的威力,它们能够将你的显式配置降低到最少。
组件声明
注解:
@Named@ComponentIndicates that an annotated class is a “component”. Such classes are considered as candidates for auto-detection when using annotation-based configuration and classpath scanning.
Other class-level annotations may be considered as identifying a component as well, typically a special kind of component: e.g. the@Repositoryannotation or AspectJ’s@Aspectannotation.@Controller、@RestController、@Service、@Repository
例子:
1 | // 接口 |
组件扫描
注解:
@Configuration@ComponentScanConfigures component scanning directives for use with
@Configurationclasses. Provides support parallel with Spring XML’s<context:component-scan>element.
EitherbasePackageClasses()orbasePackages()(or its aliasvalue()) may be specified to define specific packages to scan. If specific packages are not defined, scanning will occur from the package of the class that declares this annotation.
Note that the<context:component-scan>element has an annotation-config attribute; however, this annotation does not. This is because in almost all cases when using@ComponentScan, default annotation config processing (e.g. processing@Autowiredand friends) is assumed. Furthermore, when usingAnnotationConfigApplicationContext, annotation config processors are always registered, meaning that any attempt to disable them at the@ComponentScanlevel would be ignored.
See@Configuration‘s Javadoc for usage examples.
例子:
1 | // 显式声明 Java Config 配置类 |
自动装配
注解:
@Autowired@Resource@Inject
例子:为了测试组件扫描的功能,我们创建一个简单的 JUnit 单元测试。它会创建 Spring 上下文,并判断 bean 是否真的创建:
1 | // 用于自动创建 Spring 的应用上下文 |
如何处理自动装配的歧义性问题?有两种方案:
- 使用
@Primary注解将可选 bean 中的某一个设为首选的 bean。@Primary能够与@Component组合用在组件扫描的 bean 上,也可以与@Bean组合用在 Java 配置的 bean 声明中。 - 使用限定符注解
@Qualifier来帮助 Spring 将可选的 bean 的范围缩小到只有一个 bean。
更多详见:《Spring Bean 自动装配总结》
基于 Java Config 的显式配置
尽管在很多场景下通过组件扫描和自动装配实现 Spring 的自动化配置是更为推荐的方式,但有时候自动化配置的方案行不通,因此需要显式配置 Spring。比如说,你想要将第三方库中的组件装配到你的应用中,在这种情况下,是没有办法在它的类上添加 @Component 和 @Autowired 注解的,因此就不能使用自动化装配的方案了。
在这种情况下,就必须要采用显式装配的方式。在进行显式配置的时候,有两种可选方案:Java 和 XML。Java Config 的优缺点如下:
- 优点:类型安全,对重构友好且不易出错。因为它就是 Java 代码,就像应用程序中的其它 Java 代码一样。
- 缺点:如果修改了 Java Config 类中的配置,就必须重新编译应用程序。
同时,Java Config 与其它的 Java 代码又有所区别,在概念上,它与应用程序中的业务逻辑和领域代码是不同的。尽管它与其它的组件一样都使用相同的语言进行表述,但 Java Config 是配置代码。这意味着它不应该包含任何业务逻辑,Java Config 也不应该侵入到业务逻辑代码之中。尽管不是必须的,但通常会将 Java Config 放到单独的包中,使它与其他的应用程序逻辑分离开来,这样对于它的意图就不会产生困惑了。
@Bean
下面是一个 Java Config 的例子:
1 | // 显式声明 Java Config 配置类 |
注意,这个 Java Config 需要放在 @ComponentScan 能够扫描到的路径之下,否则配置中所声明的 bean 将无法被 Spring 容器所注册。
@Import
有时候我们需要引入一些外部的 Java Config 配置,这些配置往往是在其它 package 下。此时可以通过 @Import 注解导入这些外部 Java Config。
@Enable*
@Import 注解导入 Java Config 的方式有时不够直观,主流的做法是为其包装一层 @Enable* 注解,其字面意思是“开启某个功能”,非常直观。Spring 框架中提供了大量这类注解:
Spring Framework:
- spring-context
@EnableAsync开启对@Async注解的支持@EnableScheduling开启对@Scheduled注解的支持@EnableCaching开启对@Cacheable注解的支持@EnableAspectJAutoProxy开启对@Aspect注解的支持@EnableLoadTimeWeaving@EnableMBeanExport
- spring-tx
@EnableTransactionManagement开启对@Transactional注解的支持
- spring-webmvc
@EnableWebMvc开启对@Controller注解的支持
- spring-webflux
@EnableWebFlux
- spring-websocket
@EnableWebSocket@EnableWebSocketMessageBroker
- spring-jms
@EnableJms
其它组件:
- spring-security
@EnableWebSecurity
- spring-data-jpa
@EnableJpaRepositories
- spring-boot-autoconfigure
@EnableAutoConfiguration
通过简单的 @Enable* 即可开启一项功能的支持,从而避免大量配置,大大降低使用难度。通过观察这些 @Enable* 注解的源码,可以发现所有的注解都有一个 @Import 注解,@Import 是用来导入配置类的,这也就意味着这些自动开启的实现其实就是导入了一些自动配置的 Bean。这些导入的配置主要分为以下三类:
- 直接导入配置类
- 依据条件选择配置类
- 动态注册 Bean
@Conditional
假设你希望实现条件化的 bean,例如:
某个 bean 只有在应用的类路径下包含特定的库时才创建;
某个 bean 只有当另外某个特定的 bean 也声明了之后才会创建;
某个特定的环境变量设置之后,才会创建某个 bean。
在 Spring 4 之前,很难实现这种级别的条件化配置,但是 Spring 4 引入了一个新的 @Conditional 注解,它可以用到带有 @Bean注解的方法上。如果给定的条件计算结果为 true,就会创建这个 bean,否则的话,这个 bean 会被忽略。
详情参考另一篇博文:《Spring Bean 条件化配置总结》
基于 XML 的显式配置
XML 配置的缺点是比较复杂,且无法从编译期的类型检查中受益。除非是老项目维护,否则在新项目中已不再建议使用,此处不作过多介绍。
混合配置
在典型的 Spring 应用中,我们可能会同时使用自动化和显式配置。这些配置方案不是互斥的,可以将 Java Config 的组件扫描和自动装配和/或 XML 配置混合在一起:
1 | // 创建一个全局的根配置,并组合各种配置 |
参考
Package org.springframework.context.annotation
Annotation support for the Application Context, including JSR-250 “common” annotations, component-scanning, and Java-based metadata for creating Spring-managed objects.
《Spring4.x高级话题(六):@Enable*注解的工作原理》