Qida's Blog

纸上得来终觉浅,绝知此事要躬行。

工作中常用到一些并发编程类,这里做一些总结。

JDK 中涉及到线程的包如下:

java.lang

内含基础并发类。

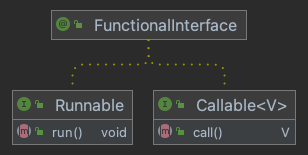
Runnable

无返回结果的异步任务。

Thread

程序中的执行线程。

属性

Thread 对象中保存了一些属性能够帮助我们来辨别每一个线程,知道它的状态,调整控制其优先级等:

ID

每个线程的独特标识。

Name

线程的名称。

Priority

线程对象的优先级。优先级别在 1-10 之间,1 是最低级,10 是最高级。不建议改变它们的优先级。

Daemon

是否为守护线程。

Java 有一种特别的线程叫做守护线程。这种线程的优先级非常低,通常在程序里没有其他线程运行时才会执行它。当守护线程是程序里唯一在运行的线程时,JVM 会结束守护线程并终止程序。

根据这些特点,守护线程通常用于在同一程序里给普通线程(也叫使用者线程)提供服务。它们通常无限循环的等待服务请求或执行线程任务。它们不能做重要的任务,因为我们不知道什么时候会被分配到 CPU 时间片,并且只要没有其他线程在运行,它们可能随时被终止。JAVA中最典型的这种类型代表就是垃圾回收器 GC

只能在 start() 方法之前可以调用 setDaemon() 方法。一旦线程运行了,就不能修改守护状态。

可以使用 isDaemon() 方法来检查线程是否是守护线程。

Thread.UncaughtExceptionHandler

用于捕获和处理线程对象抛出的 Unchecked Exception 来避免程序终结。

Thread.State

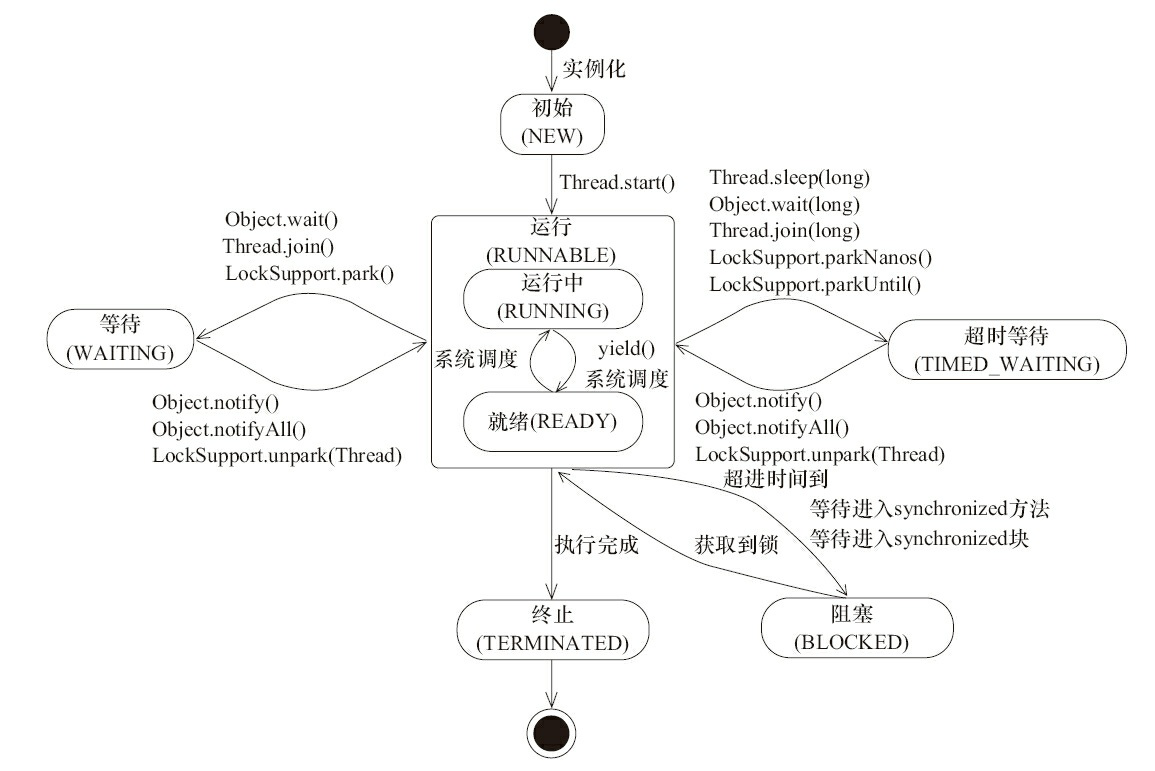
线程的状态,共六种:
NEW
RUNNABLE
BLOCKED
WAITING
TIME_WAITING
TERMINATED

方法

Thread 类提供了以下几类方法

  • 线程睡眠 Thread.sleep(...)
  • 线程中断 Thread.interrupt()
  • 线程让步 Thread.yield()
  • 线程合并 Thread.join(...)
  • ……

Object 提供了一组线程协作方法:

  • 线程协作 Object.wait/notify

Thread state

ThreadLocal<T>

ThreadLocal 存放的值是线程内共享的,线程间互斥的,主要用于在线程内共享一些数据。

try-with-resources

可以通过实现 AutoCloseable 以使用 try-with-resources 语法简化 ThreadLocal 资源清理:

1
2
3
try (ChannelContext ctx = new ChannelContext(channel)) {
...
}

实现如下:

1
2
3
4
5
6
7
8
9
10
11
12
13
14
15
16
17
18
19
20
21
22
23
24
25
26
27
28
29
30
31
32
33
34
35
36
@Slf4j
public class ChannelContext implements AutoCloseable {

private static final ThreadLocal<Channel> CTX = new ThreadLocal<>();

public ChannelContext(FundChannelDTO dto) {
Channel channel = Channel.builder()
.appId(dto.getAppId().toString())
.build();
CTX.set(channel);
}

public ChannelContext(Channel channel) {
CTX.set(channel);
}

public static Channel get() {
return CTX.get();
}

@Override
public void close() {
try {
CTX.remove();
} catch (Exception e) {
log.error(e.getMessage(), e);
}
}

@Getter
@Builder
static class Channel {
private final String appId;
}

}

父子线程的值传递

https://docs.oracle.com/javase/8/docs/api/java/lang/InheritableThreadLocal.html

异步执行的上下文传递

https://github.com/alibaba/transmittable-thread-local

java.util.concurrent

JDK 5 引入的 Executor Framework ,用于取代传统的并发编程。
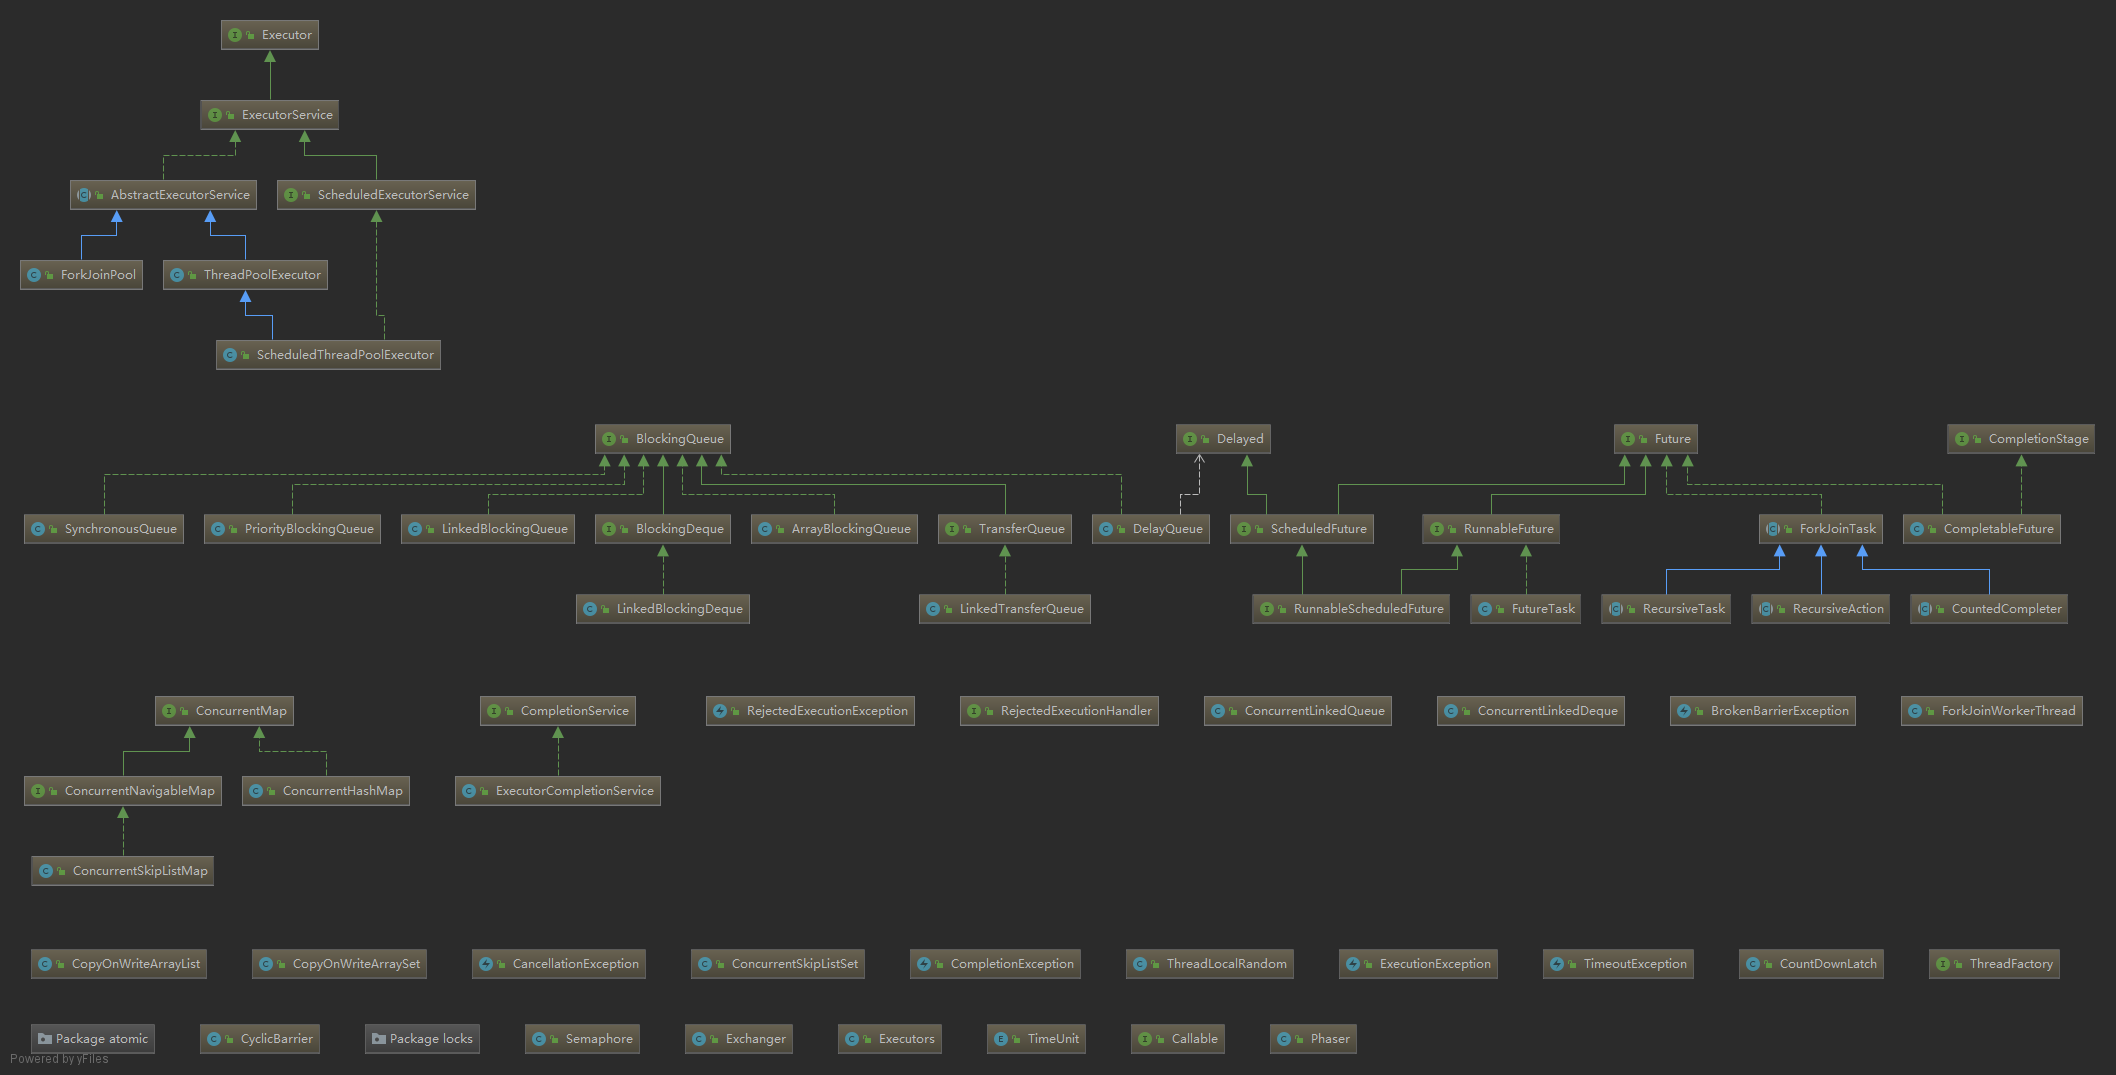
Package concurrent

Callable

有返回结果的异步任务。

Executor Framework 的一个重要优点是提供了 java.util.concurrent.Callable<V> 接口用于返回异步任务的结果。它的用法跟 Runnable 接口很相似,但它提供了两种改进:

  • Callable 接口中主要的方法叫 call() ,可以返回结果。

    Callable

  • 当你将 Callable 对象 submitExecutor 执行者,你可以获取一个实现 Future 对象,你可以用这个对象来控制和获取 Callable 对象的状态和结果。

    ThreadPoolExecutor

工具类

CountDownLatch

CyclicBarrier

Phaser

CompletableFuture

Semaphore

Exchanger

Executors

线程池

参考另一篇《并发编程系列(三)Java 线程池总结》。

并发集合

详见另一个篇《Java 集合框架系列(九)并发实现总结》。

显式锁

java.util.concurrent.locks

用于实现线程安全与通信。
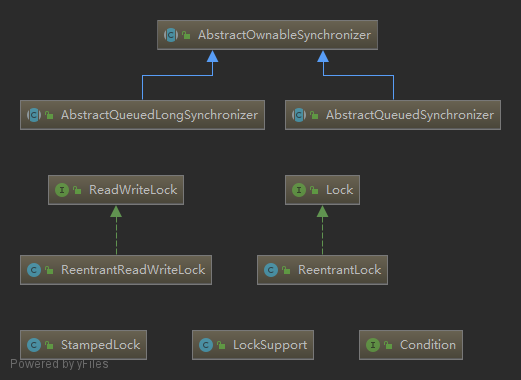
Package locks

原子类

java.util.concurrent.atomic

使用这些数据结构可以避免在并发程序中使用同步代码块(synchronized 或 Lock)。
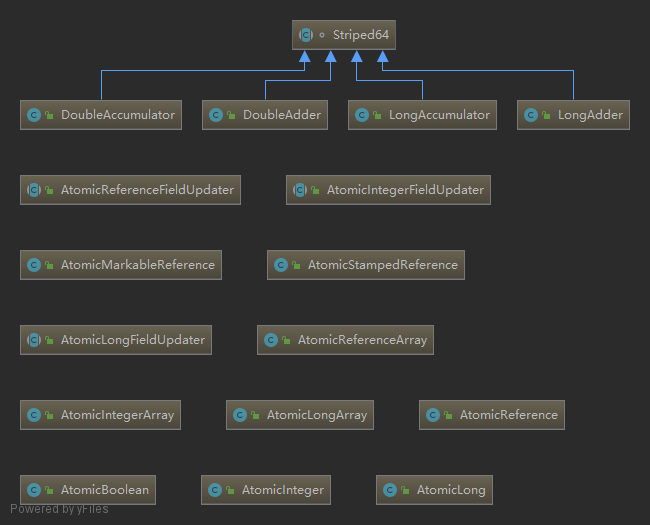
Package atomic

JDK 5 新增的原子类,底层基于魔术类 Unsafe 进行 CAS 无锁操作。实现类按功能分组如下:

Integer Long Boolean 引用类型
基本类 AtomicInteger AtomicLong AtomicBoolean
引用类型 AtomicReference
AtomicStampedReference
AtomicMarkableReference
数组类型 AtomicIntegerArray AtomicLongArray AtomicReferenceArray
属性原子修改器 AtomicIntegerFieldUpdater AtomicLongFieldUpdater AtomicReferenceFieldUpdater

JDK 8 新增 Striped64 累加计数器这个并发组件,64 指的是计数 64 bit 的数,即 LongDouble 类型。其实现类如下:

Long Double
LongAdder DoubleAdder
LongAccumulator DoubleAccumulator

性能对比参考:http://www.manongjc.com/article/105666.html

Spring 包简介

Task Execution and Scheduling - Spring Framework

org.springframework.scheduling

Spring Framework 中并发编程相关的类主要位于 spring-context 下的 org.springframework.scheduling,例如其子包 concurrent

org.springframework.scheduling.concurrent

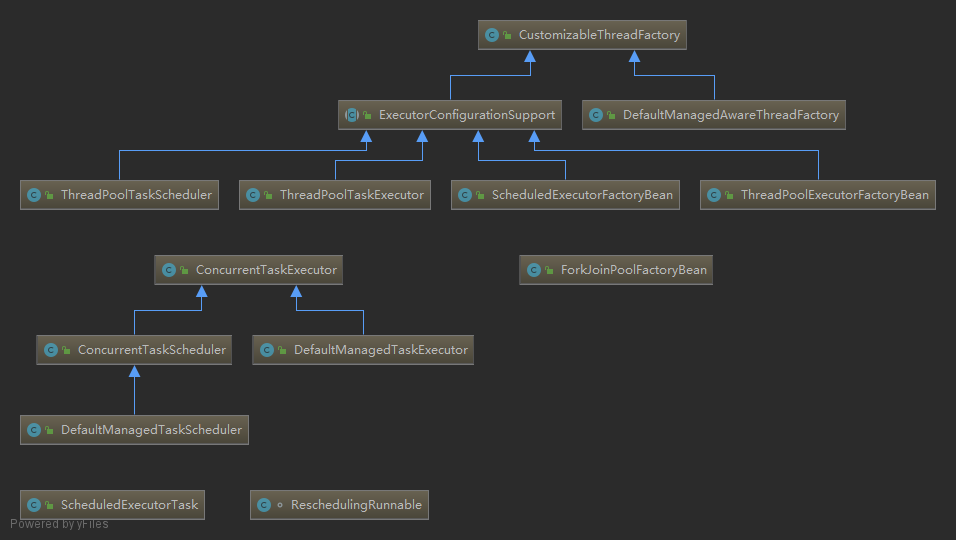
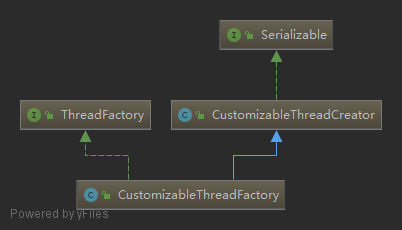
其中,顶层的 org.springframework.scheduling.concurrent.CustomizableThreadFactory 结构如下:
org.springframework.util.CustomizableThreadFactory

  • CustomizableThreadFactory 实现了 java.util.concurrent.ThreadFactory 线程工厂接口,源码如下:

    1
    2
    3
    4
    // Executors.defaultThreadFactory 方法提供了一个实用的简单实现,为新线程设置了上下文,详见源码
    public interface ThreadFactory {
    Thread newThread(Runnable r);
    }
  • CustomizableThreadFactory 继承了 org.springframework.util.CustomizableThreadCreator 类,用于创建新线程,并提供各种线程属性自定义配置(如线程名前缀、线程优先级等)。

然后重点看下最常用的 org.springframework.scheduling.concurrent.ThreadPoolTaskExecutor 类,提供的方法列表如下:
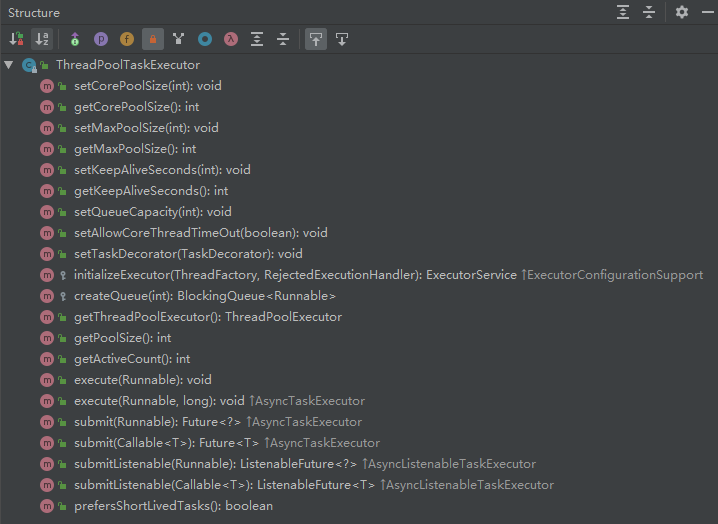
ThreadPoolTaskExecutor 方法列表

当我们在实例化 ThreadPoolTaskExecutor 对象之后,其变量如下:
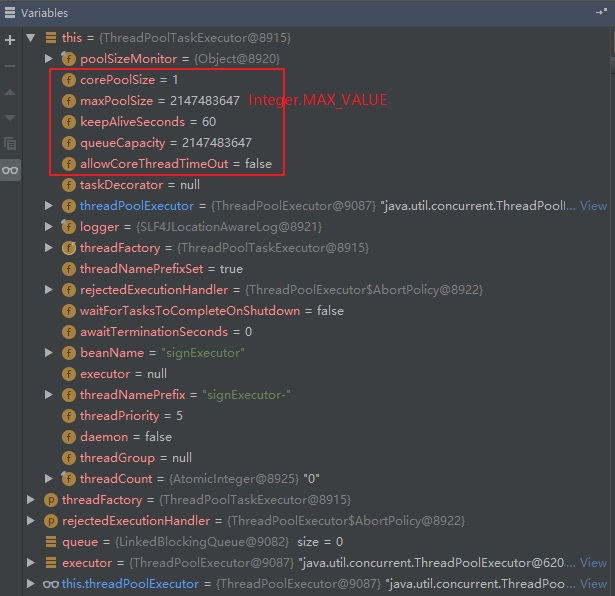
ThreadPoolTaskExecutor variables

其调用堆栈如下:

可见,实际上是先调用了抽象父类 ExecutorConfigurationSupportafterPropertiesSet()initialize() 方法,最后再调用 ThreadPoolTaskExecutor#initializeExecutor(...),该方法源码如下:

1
2
3
4
5
6
7
8
9
10
11
12
13
14
15
16
17
18
19
20
21
22
23
24
25
26
27
28
29
30
31
@Override
protected ExecutorService initializeExecutor(
ThreadFactory threadFactory, RejectedExecutionHandler rejectedExecutionHandler) {

BlockingQueue<Runnable> queue = createQueue(this.queueCapacity);

ThreadPoolExecutor executor;
if (this.taskDecorator != null) {
executor = new ThreadPoolExecutor(
this.corePoolSize, this.maxPoolSize, this.keepAliveSeconds, TimeUnit.SECONDS,
queue, threadFactory, rejectedExecutionHandler) {
@Override
public void execute(Runnable command) {
super.execute(taskDecorator.decorate(command));
}
};
}
else {
executor = new ThreadPoolExecutor(
this.corePoolSize, this.maxPoolSize, this.keepAliveSeconds, TimeUnit.SECONDS,
queue, threadFactory, rejectedExecutionHandler);

}

if (this.allowCoreThreadTimeOut) {
executor.allowCoreThreadTimeOut(true);
}

this.threadPoolExecutor = executor;
return executor;
}

实际上就是通过构造方法实例化 java.util.concurrent.ThreadPoolExecutor 对象,并设置相应参数。
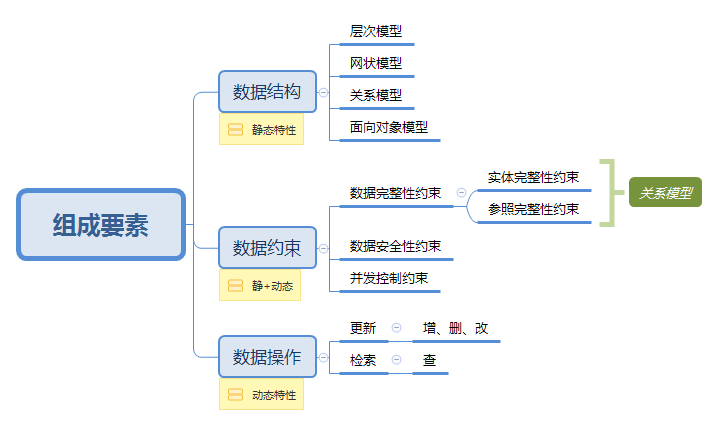
数据特征

数据具有两种特征:

静态特征,指的是数据结构、数据间的联系、对数据取值范围的约束。

动态特征,指的是对数据可以进行符合一定规则的操作

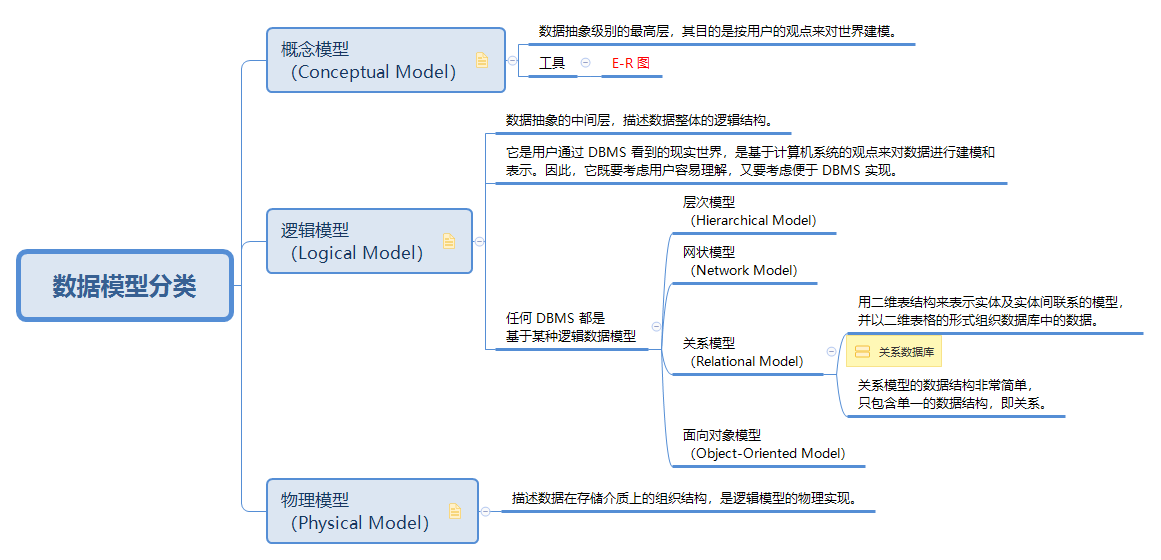
数据模型

组成要素

composition_of_data_model

模型分类

classification_of_data_model

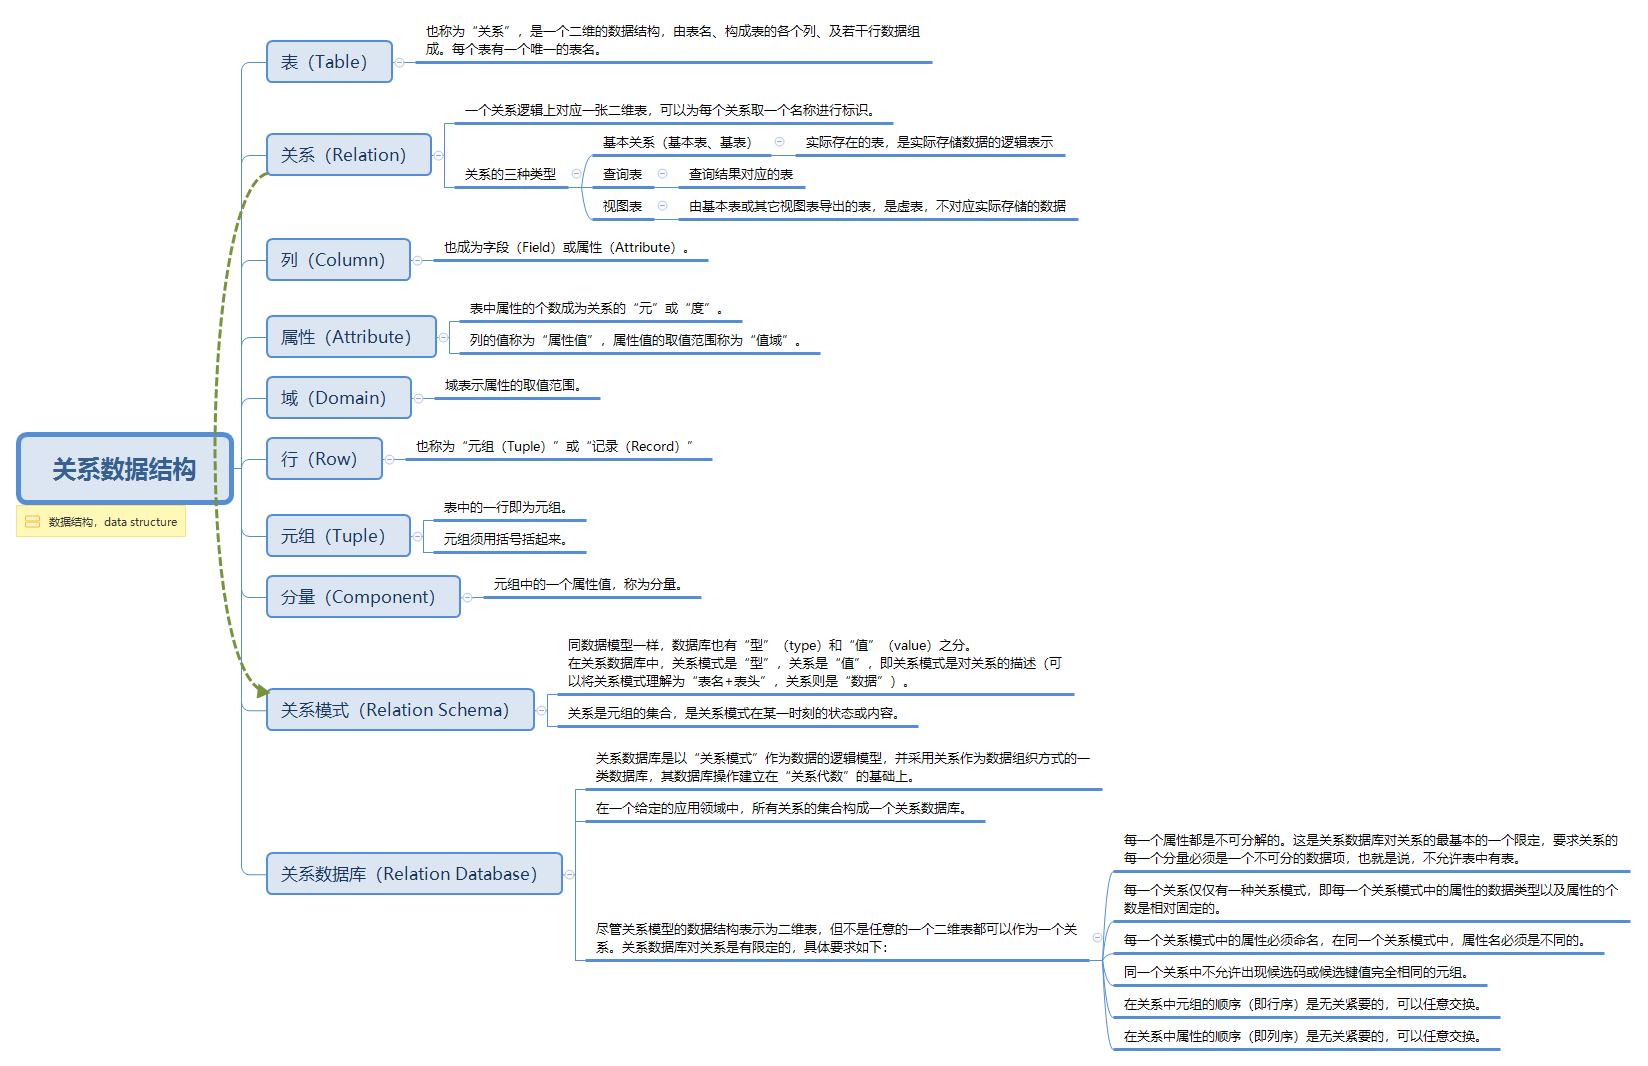
关系数据模型

关系数据结构

data_structure_of_relational_data_model

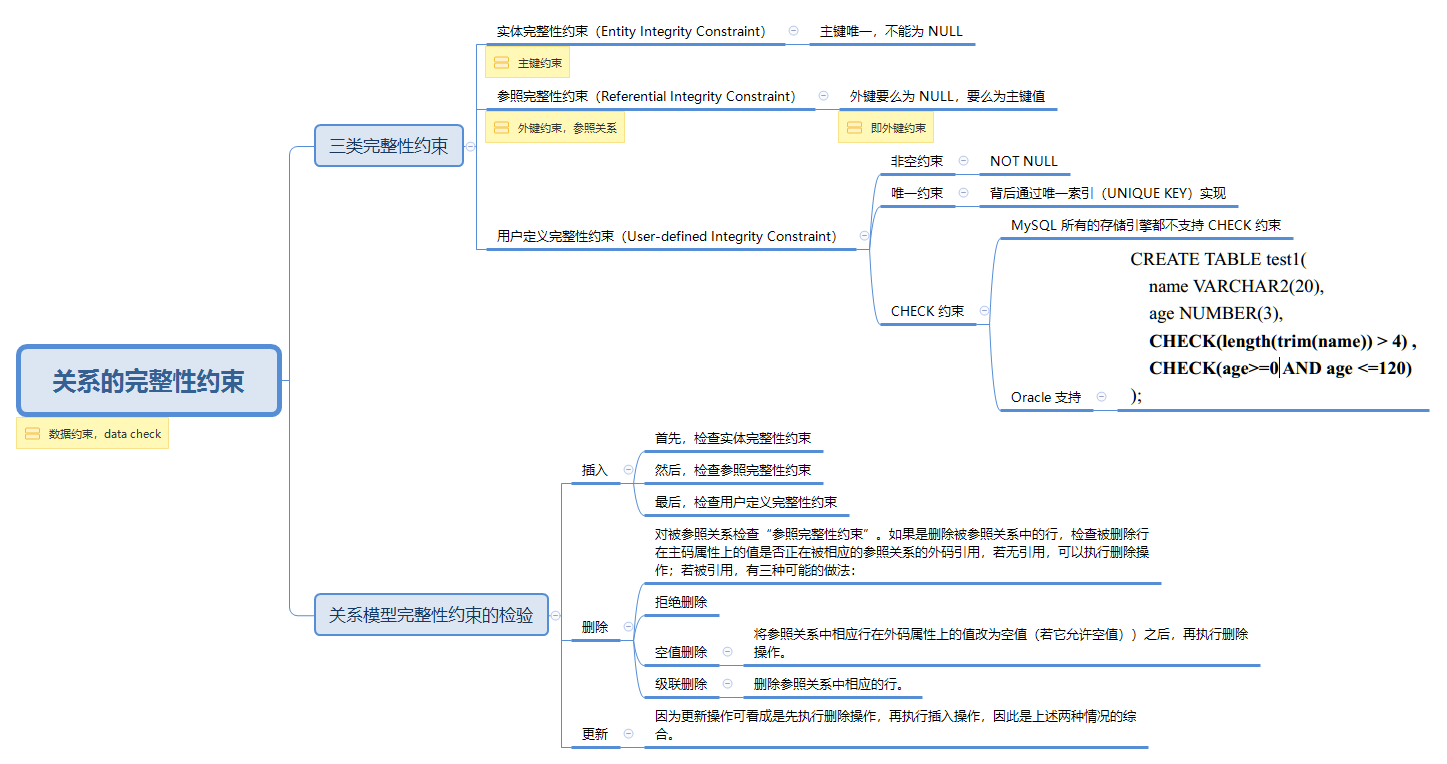
关系的完整性约束

data_check_of_relational_data_model

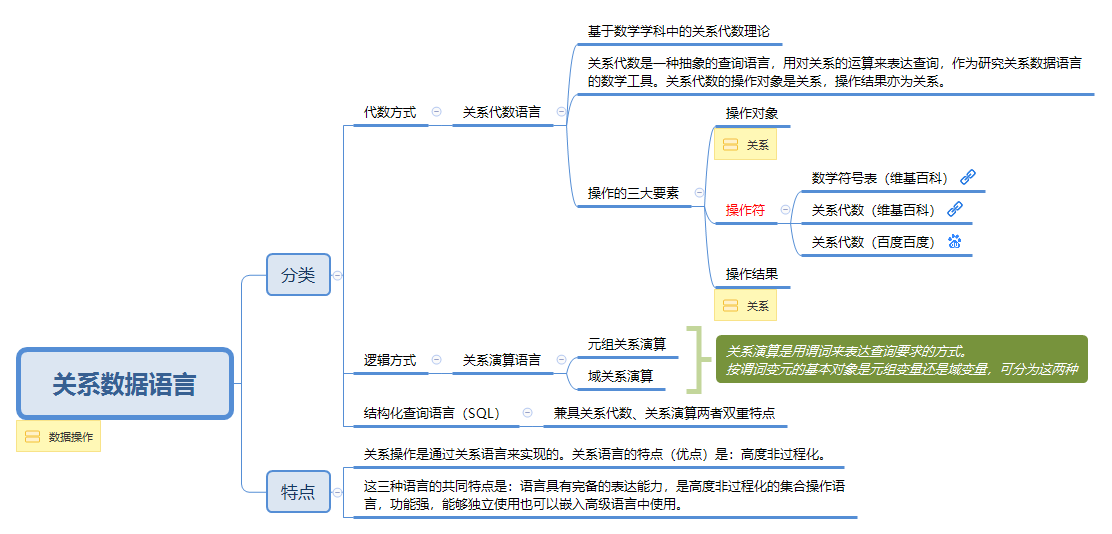
关系数据语言

关系语言是一种声明式的查询语言,基于声明式编程范式(Declarative),有别于命令式编程范式(Imperative),特点(优点)是:高度非过程化

relational_language_of_relational_data_model

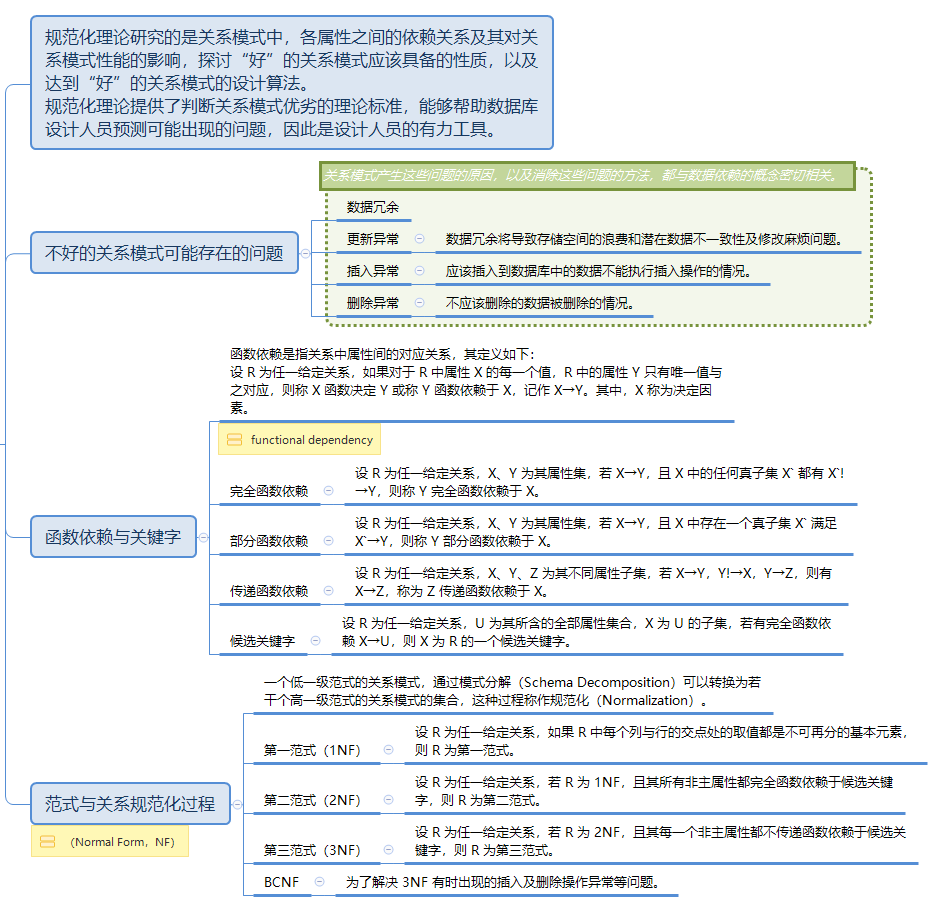
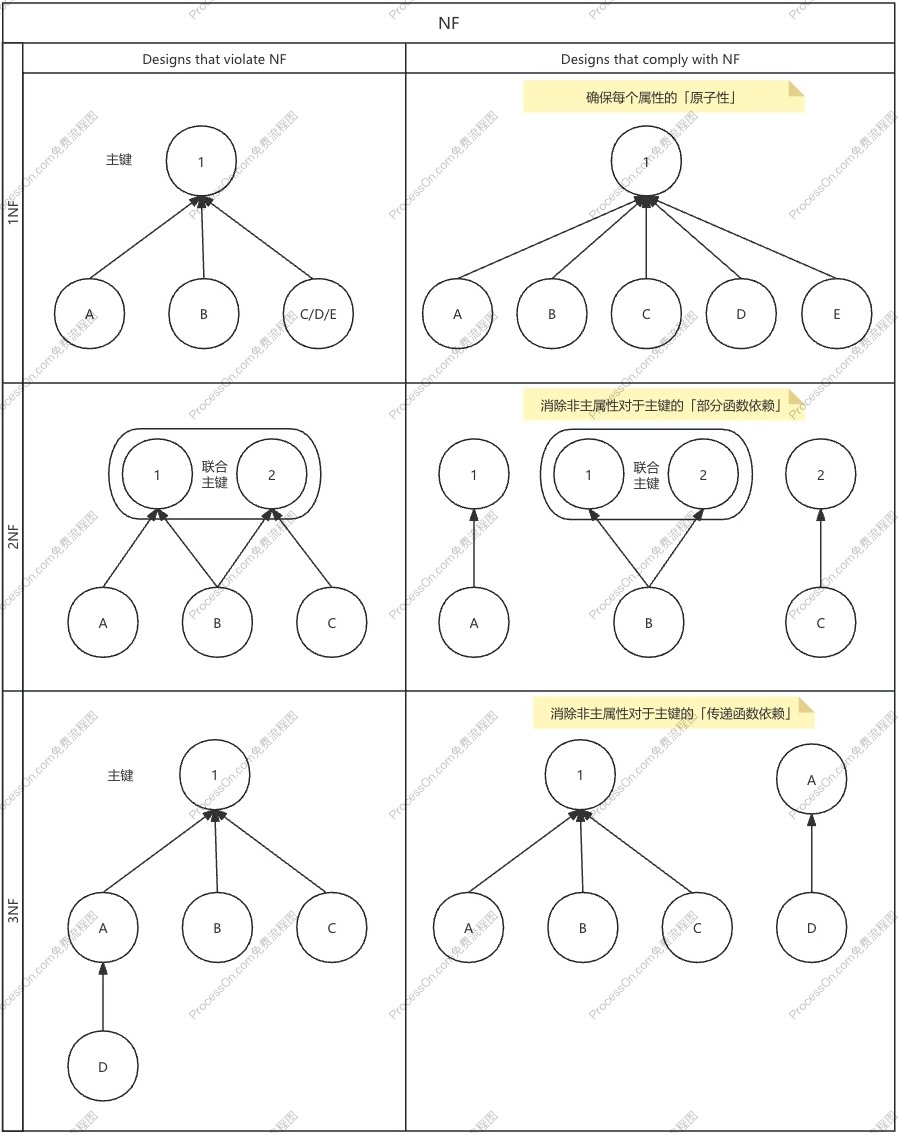
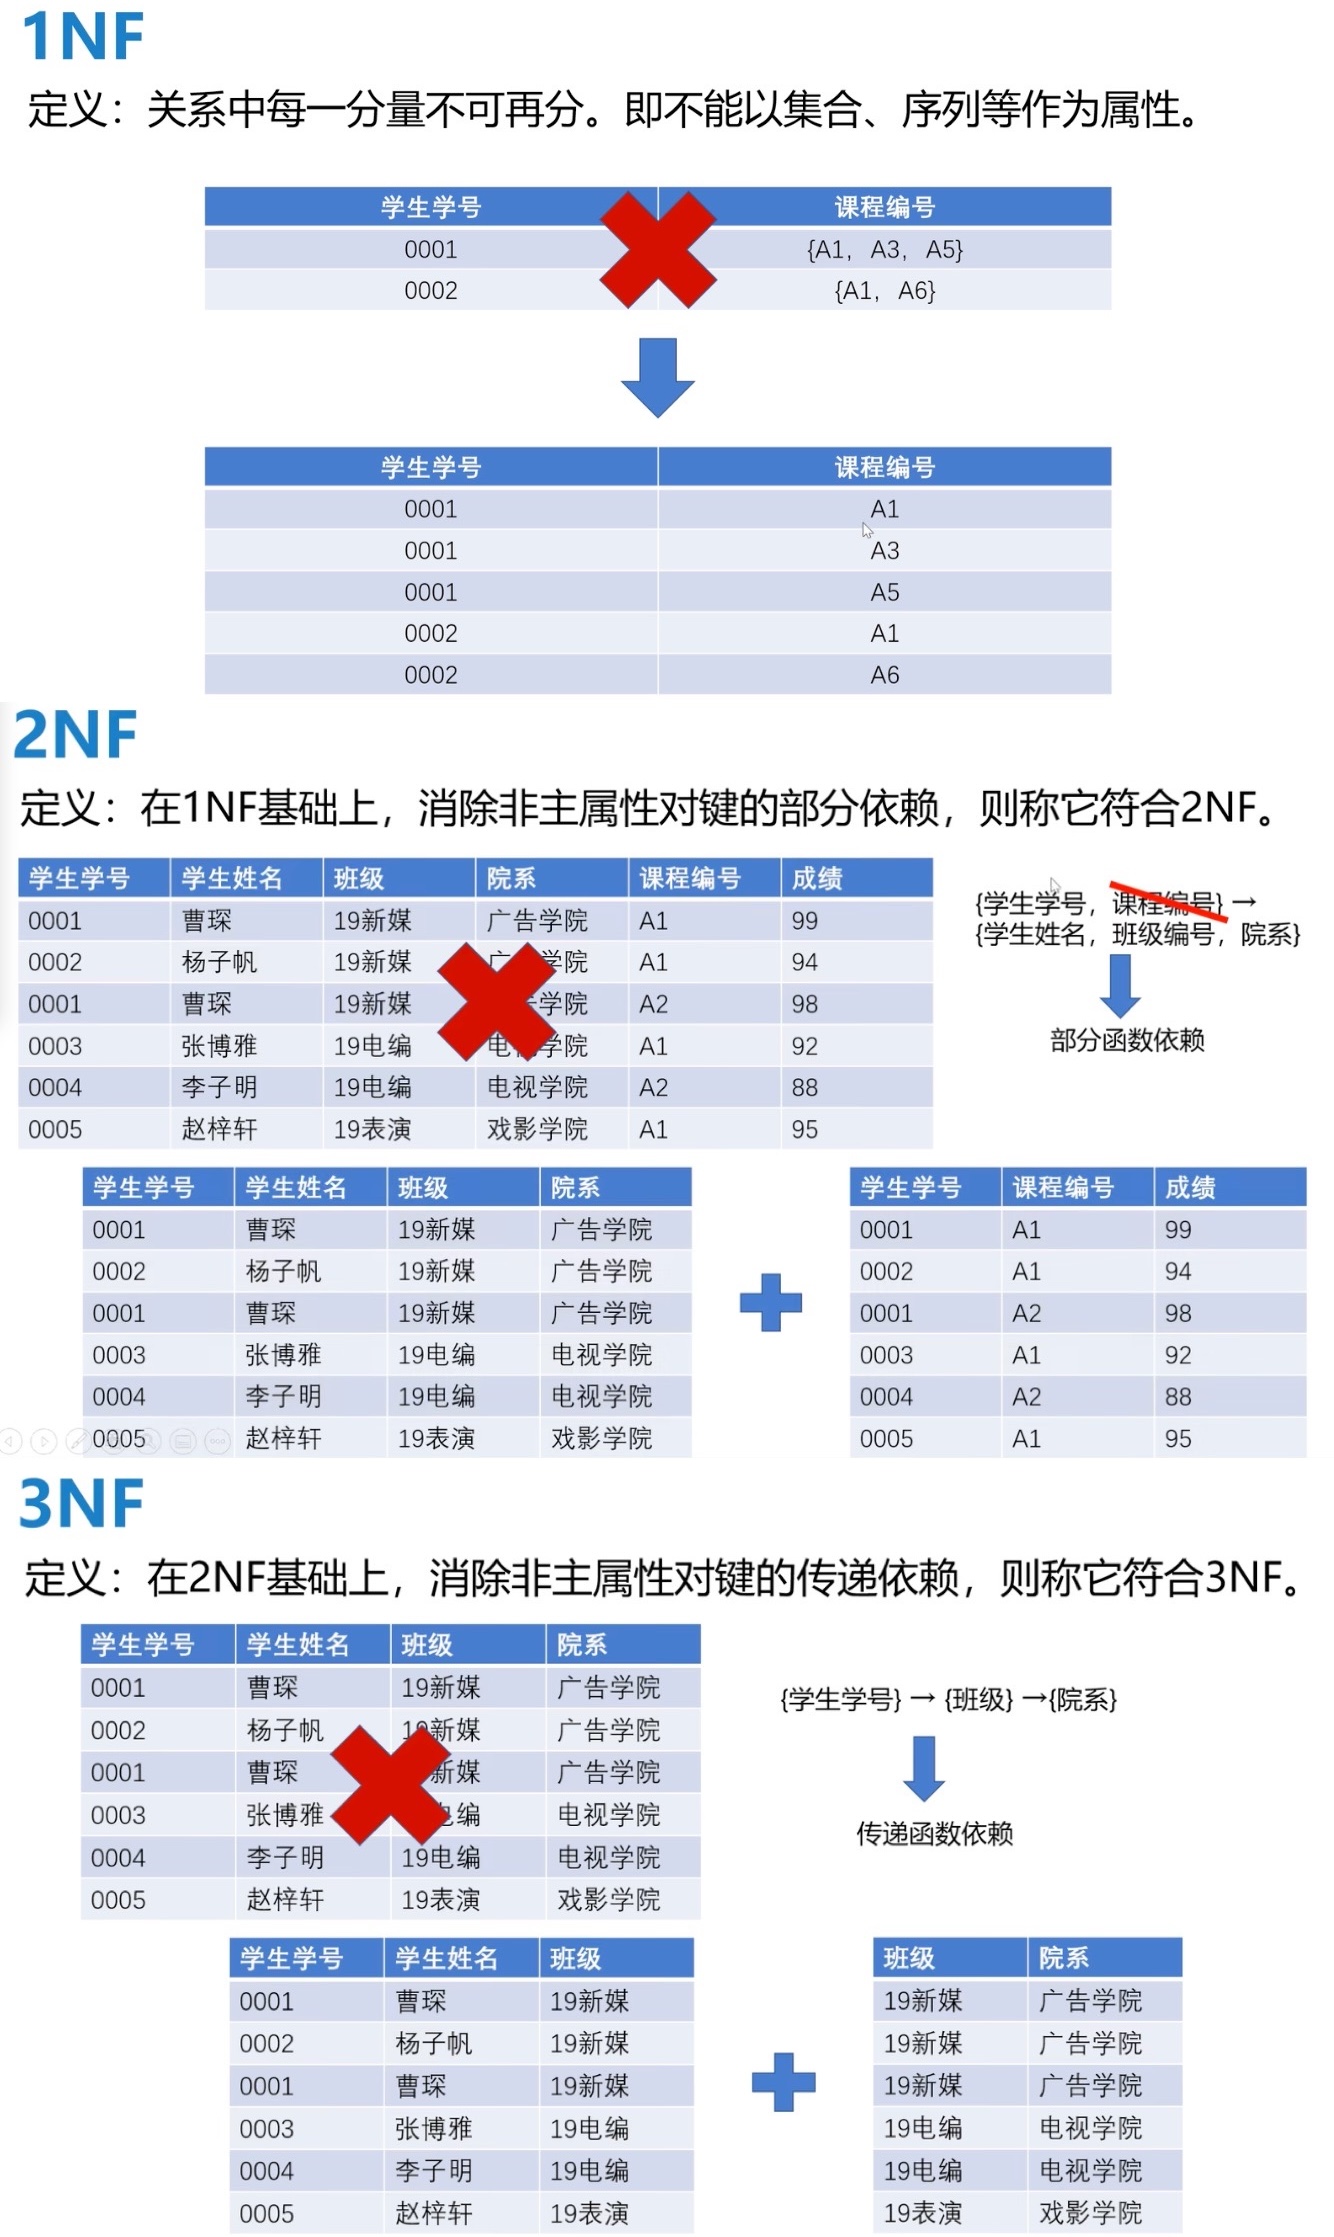
关系数据库的规范化理论

normalized_form

normalized_form

normalized_form

参考

数学符号表(维基百科)

关系代数(维基百科)

关系代数(百度百度)

SQL 能完成哪方面的计算?一文详解关系代数和 SQL 语法 | 阿里技术

雪花算法介绍

雪花算法(Snowflake)是 Twitter 提出来的一个算法,其目的是生成一个 64 bit 的二进制数:

Snowflake

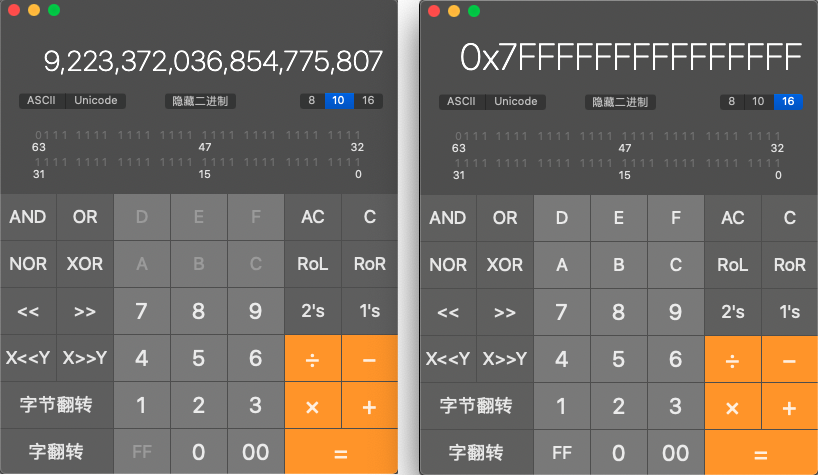
转换为十进制和十六进制分别如下图。其中十进制的最大长度为 19 位:

该二进制数分解如下:

  • 42 bit:用来记录时间戳,表示自 1970-01-01T00:00:00Z 之后经过的毫秒数(millisecond),其中 1 bit 是符号位。由于精确到毫秒(millisecond),相比有符号 32 bit 所存储的精度为秒(second)的时间戳需要多 10 bit 来记录毫秒数(0-999)。42 bit 可以记录 69 年,如果设置好起始时间例如 2018 年,那么可以用到 2087 年。42 bit 时间戳范围如下:

    1
    2
    3
    4
    5
    6
    7
    8
    9
    10
    11
    12
    13
    // 0
    long a = 0b00_00000000_00000000_00000000_00000000_00000000L;
    // 999
    long b = 0b00_00000000_00000000_00000000_00000011_11100111L;
    // 2^41-1, 2199023255551
    long c = 0b01_11111111_11111111_11111111_11111111_11111111L;

    // 1970-01-01T00:00:00.000Z
    Instant.ofEpochMilli(a).atZone(ZoneOffset.of("-00:00")).toLocalDateTime();
    // 1970-01-01T00:00:00.999Z
    Instant.ofEpochMilli(b).atZone(ZoneOffset.of("-00:00")).toLocalDateTime();
    // 2039-09-07T15:47:35.551Z
    Instant.ofEpochMilli(c).atZone(ZoneOffset.of("-00:00")).toLocalDateTime();
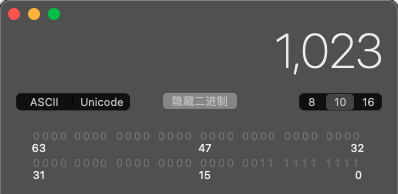
  • 10 bit:用来记录机器 ID,最多可以记录 2^10-1=1023 台机器,一般用前 5 位代表数据中心,后面 5 位是某个数据中心的机器 ID

  • 12 bit:循环位,用来对同一个毫秒之内产生的 ID,12 位最多可以记录 2^12-1=4095 个,也就是在同一个机器同一毫秒最多记录 4095 个,多余的需要进行等待下个毫秒。

上面只是一个将 64 bit 划分的标准,当然也不一定这么做,可以根据不同业务的具体场景来划分,比如下面给出一个业务场景:

  • 服务目前 QPS10 万,预计几年之内会发展到百万。
  • 当前机器三地部署,上海,北京,深圳都有。
  • 当前机器 10 台左右,预计未来会增加至百台。

这个时候我们根据上面的场景可以再次合理的划分 64 bit,QPS几年之内会发展到百万,那么每毫秒就是千级的请求,目前10台机器那么每台机器承担百级的请求(100 W / 1000 ms / 10 台)。为了保证扩展,后面的循环位可以限制到 1024,也就是 2^10,那么循环位 10 位就足够了。

机器三地部署我们可以用 3 bit 总共 8 来表示机房位置;当前机器 10 台,为了保证能够扩展到百台那么可以用 7 bit 总共 128 来表示;时间位依然是 42 bit。那么还剩下 64-10-3-7-42 = 2 bit,剩下 2 bit 可以用来进行扩展。

雪花算法实现

下面是我的对雪花算法的实现,涉及几点思考:

  1. 为了节省空间、提升运算性能,主要使用到位运算,而不是字符串操作。
  2. 为了提高可配置性,将每一部分的位数抽取成了常量,以便自定义。
  3. 解决时间回拨问题:
    • 如果回拨时长较短(可配置,代码中配了 5 ms),线程等待并重试即可;
    • 如果回拨时长较长,则利用扩展位避免生成重复 ID(扩展位可配,代码中配置了 3 位,即最多支持 3 次回拨,超出则抛异常)。
1
2
3
4
5
6
7
8
9
10
11
12
13
14
15
16
17
18
19
20
21
22
23
24
25
26
27
28
29
30
31
32
33
34
35
36
37
38
39
40
41
42
43
44
45
46
47
48
49
50
51
52
53
54
55
56
57
58
59
60
61
62
63
64
65
66
67
68
69
70
71
72
73
74
75
76
77
78
79
80
81
82
83
84
85
86
87
88
89
90
91
92
93
94
95
96
97
98
99
100
101
102
103
104
105
106
107
108
109
110
111
112
113
114
115
116
117
118
119
120
121
122
123
124
125
126
127
128
129
130
131
132
133
134
135
136
137
138
139
140
141
142
143
144
145
146
147
148
149
150
151
152
153
154
155
156
157
158
159
160
161
162
163
164
165
166
167
168
169
170
import lombok.SneakyThrows;
import lombok.extern.slf4j.Slf4j;
import org.junit.Test;

import java.time.Instant;
import java.time.LocalDateTime;
import java.time.ZoneId;
import java.util.HashSet;
import java.util.Set;

import static org.junit.Assert.assertEquals;

@Slf4j
public class IdGeneratorTest {

@Test
public void test() {
int initialCapacity = 1000;
Set<Long> ids = new HashSet<>(initialCapacity);
IdGenerator idGenerator = new IdGenerator(3, 31);

for (int i = 0; i < initialCapacity; i++) {
long id = idGenerator.nextId();
ids.add(id);

IdGenerator.log(id);
}
assertEquals(ids.size(), initialCapacity);
}

}

@Slf4j
class IdGenerator {

// 时间戳
private long timestamp;
// 数据中心
private int dataCenterNo;
// 机器
private int workerNo;
// 序列号
private int seqNo;
// 扩展位
private int ext;

// 数据中心 取值范围(十进制):0~3
private static final int DATA_CENTER_NO_BITS = 2;
// 机器 取值范围(十进制):0~31
private static final int WORKER_NO_BITS = 5;
// 序列号 取值范围(十进制):0~4095
private static final int SEQ_NO_BITS = 12;
// 扩展位 取值范围(十进制):0~7
private static final int EXT_BITS = 3;

// 数据中心 最大值(十进制):3
private static final int MAX_DATA_CENTER_NO = (1 << DATA_CENTER_NO_BITS) - 0B1;
// 机器 最大值(十进制):31
private static final int MAX_WORKER_NO = (1 << WORKER_NO_BITS) - 0B1;
// 序列号 最大值(十进制):4095
private static final int MAX_SEQ_NO = (1 << SEQ_NO_BITS) - 0B1;
// 扩展位 最大值(十进制):7
private static final int MAX_EXT = (1 << EXT_BITS) - 0B1;

// 时间戳 左移 22 位
private static final int TIMESTAMP_SHIFT = DATA_CENTER_NO_BITS + WORKER_NO_BITS + SEQ_NO_BITS + EXT_BITS;
// 数据中心 左移 20 位
private static final int DATA_CENTER_NO_SHIFT = WORKER_NO_BITS + SEQ_NO_BITS + EXT_BITS;
// 机器 左移 15 位
private static final int WORKER_NO_SHIFT = SEQ_NO_BITS + EXT_BITS;
// 序列号 左移 3 位
private static final int SEQ_NO_SHIFT = EXT_BITS;

// 最大回拨毫秒数
private static final int MAX_BACKWARD_MILLIS = 5;

/**
*
* @param dataCenterNo 数据中心编号
* @param workerNo 机器编号
*/
public IdGenerator(int dataCenterNo, int workerNo) {
if (Integer.toBinaryString(dataCenterNo).length() > DATA_CENTER_NO_BITS) {
throw new IllegalArgumentException(String.format("当前数据中心编号 %s 超限,最大支持 %s", dataCenterNo, MAX_DATA_CENTER_NO));
} else if (Integer.toBinaryString(workerNo).length() > WORKER_NO_BITS) {
throw new IllegalArgumentException(String.format("当前机器编号 %s 超限,最大支持 %s", workerNo, MAX_WORKER_NO));
}
this.dataCenterNo = dataCenterNo;
this.workerNo = workerNo;
}

/**
* 生成分布式 ID
* @return 分布式 ID
*/
public synchronized long nextId() {
long now = System.currentTimeMillis();
// init or reset
if (timestamp == 0 || timestamp < now) {
timestamp = now;
seqNo = 0;
}
// seqNo increment
else if (timestamp == now) {
if (seqNo < MAX_SEQ_NO) {
seqNo++;
} else {
log.warn("序列号已耗尽,等待重新生成。seqNo = {}, MAX_SEQ_NO = {}", seqNo, MAX_SEQ_NO);
return sleepAndNextId(1);
}
}
// clock backward
else {
return nextIdForBackward(now);
}

return timestamp << TIMESTAMP_SHIFT
| dataCenterNo << DATA_CENTER_NO_SHIFT
| workerNo << WORKER_NO_SHIFT
| seqNo << SEQ_NO_SHIFT
| ext;
}

private long nextIdForBackward(long now) {
log.warn("发生时间回拨,timestamp = {}, now = {}", timestamp, now);

long duration = timestamp - now;
// 回拨不多,直接等待并重试
if (duration <= MAX_BACKWARD_MILLIS) {
return sleepAndNextId(duration);
}
// 回拨过多,则使用扩展位
else {
if (ext < MAX_EXT) {
// 将时间戳修正为回拨时间,为防止重复生成 ID,扩展位加一,并重试
ext++;
timestamp = now;
return nextId();
} else {
throw new IllegalStateException(String.format("扩展位已耗尽。ext = %s, MAX_EXT = %s", ext, MAX_EXT));
}
}
}

@SneakyThrows
private long sleepAndNextId(long millis) {
Thread.sleep(millis);
return nextId();
}

public static void log(long id) {
long timestamp = id >> TIMESTAMP_SHIFT;
long dataCenterNo = id >> DATA_CENTER_NO_SHIFT & MAX_DATA_CENTER_NO;
long workerNo = id >> WORKER_NO_SHIFT & MAX_WORKER_NO;
long seqNo = id >> SEQ_NO_SHIFT & MAX_SEQ_NO;
long ext = id & MAX_EXT;

log.info("Binary is {}, id is {}", Long.toBinaryString(id), id);
log.info("Binary is {}, time is {}", Long.toBinaryString(timestamp), getLocalDateTime(timestamp));
log.info("Binary is {}, dataCenterNo is {}", Long.toBinaryString(dataCenterNo), dataCenterNo);
log.info("Binary is {}, workerNo is {}", Long.toBinaryString(workerNo), workerNo);
log.info("Binary is {}, seqNo is {}", Long.toBinaryString(seqNo), seqNo);
log.info("Binary is {}, ext is {}", Long.toBinaryString(ext), ext);
}

private static LocalDateTime getLocalDateTime(long timestamp) {
return Instant.ofEpochMilli(timestamp).atZone(ZoneId.systemDefault()).toLocalDateTime();
}

}

输出结果:

1
2
3
4
5
6
Binary is 110000011011010011001111001101001100000111000011000000000100000, id is 6979004485312020512
Binary is 11000001101101001100111100110100110000011, time is 2022-09-23T17:12:12.931
Binary is 10, dataCenterNo is 2
Binary is 11, workerNo is 3
Binary is 100, seqNo is 4
Binary is 0, ext is 0

位运算过程如下:

  • timestamp = id >> TIMESTAMP_SHIFT

    1
    2
       01100000 11011010 01100111 10011010 01100000 11100001 10000000 00100000
    >> 01100000 11011010 01100111 10011010 01100000 11
  • dataCenterNo = id >> DATA_CENTER_NO_SHIFT & MAX_DATA_CENTER_NO

    1
    2
    3
    4
       01100000 11011010 01100111 10011010 01100000 11100001 10000000 00100000
    >> 01100000 11011010 01100111 10011010 01100000 1110
    & 11
    = 10
  • workerNo = id >> WORKER_NO_SHIFT & MAX_WORKER_NO

    1
    2
    3
    4
       01100000 11011010 01100111 10011010 01100000 11100001 10000000 00100000
    >> 01100000 11011010 01100111 10011010 01100000 11100001 1
    & 1111 1
    = 1 1
  • seqNo = id >> SEQ_NO_SHIFT & MAX_SEQ_NO

    1
    2
    3
    4
       01100000 11011010 01100111 10011010 01100000 11100001 10000000 00100000
    >> 01100000 11011010 01100111 10011010 01100000 11100001 10000000 00100
    & 1111111 11111
    = 100
  • ext = id & MAX_EXT

    1
    2
    3
      01100000 11011010 01100111 10011010 01100000 11100001 10000000 00100000
    & 111
    = 0

延伸阅读

位运算

位运算符如下:

1
2
3
4
5
6
7
&:按位与
|:按位或
~:按位非
^:按位异或
<<:左位移(M << n = M * 2^n)
>>:右位移(M >> n = M / 2*n)
>>>:无符号右移

例如,Java 中求 key 应当放到散列表的哪个位置(offset):

1
2
3
4
5
6
7
static final int getOffset(Object key, int length) 
int hashcode;
int hash = (hashcode = key.hashCode()) ^ (hashcode >>> 16);
int offset = hash & (length - 1);
log.info("key: {}, hashcode: {}, hash: {}, offset: {}", key, Integer.toBinaryString(hashcode), Integer.toBinaryString(hash), offset);
return offset;
}

参考:

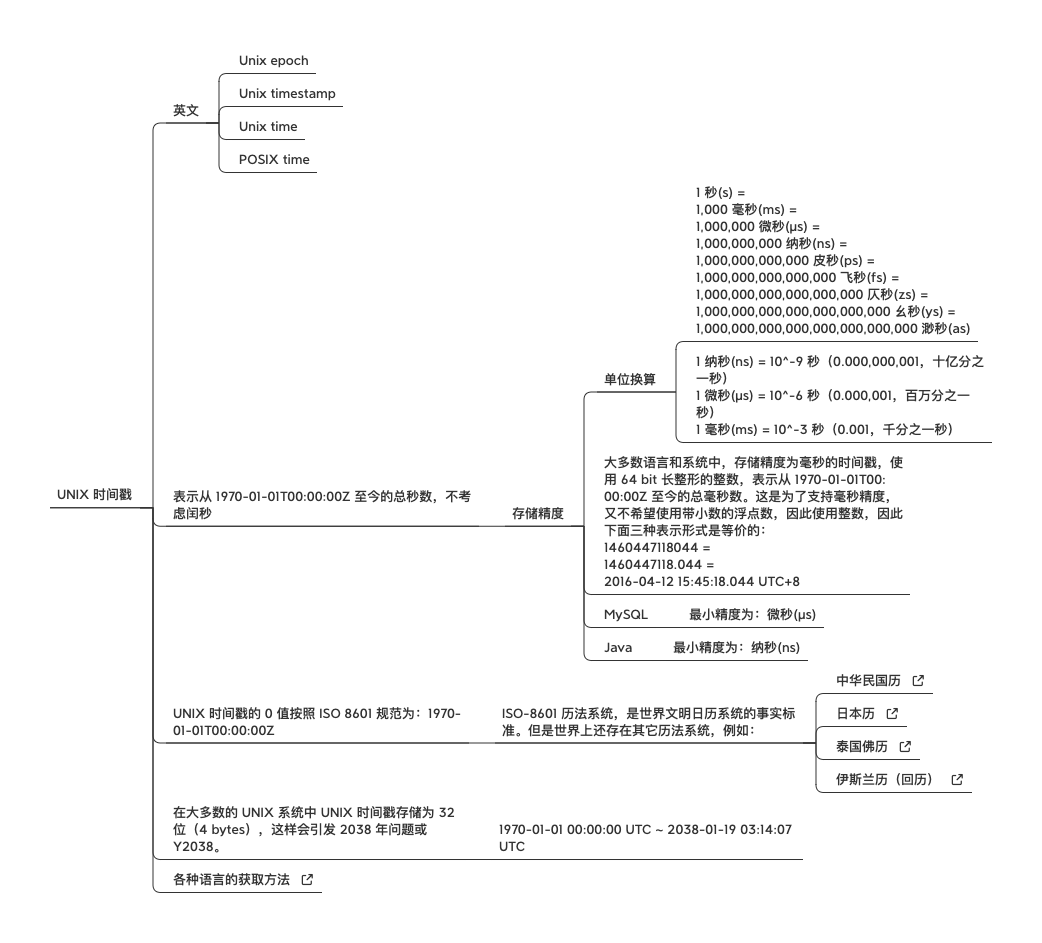
UNIX 时间戳

参考:UNIX 时间戳总结

UNIX 时间戳

unix_timestamp

时间戳问题

Y2K (Year 2000 problem)

Y2K

Y2K 是一个合成词汇:Y = Year,2 = 2,K= Kilo,因此 Y2K 的含义其实就是千禧之年 ——2000 年

https://en.wikipedia.org/wiki/Year_2000_problem

Y2K38 (Year 2038 problem)

2038 年问题又叫 Unix 千年虫或 Y2K38 问题。在时间值以带符号的 32 位整数来存储或计算的数据存储情况下,这个错误就有可能引发问题。

下面这个动画显示了 Y2K38 问题将如何重置日期:

Y2K38

这是因为:用 Unix 带符号的 32 位整数时间格式来表示的最大时间是 2038 年 1 月 19 日 03:14:07UTC(2038-01-19T03:14:07Z),这是自 1970-01-01T00:00:00Z 之后过了 2147483647 秒,值的边界如下:

时间 时间戳 二进制字面量
1970-01-01T00:00:00Z 0 00000000 00000000 00000000 00000000
2038-01-19T03:14:07Z 2^31-1, 2147483647 01111111 11111111 11111111 11111111

测试代码:

1
2
3
4
5
6
7
8
9
// 0
long a = 0;
// 2^31-1, 2147483647
long b = Integer.MAX_VALUE;

// 1970-01-01T00:00:00.000Z
Instant.ofEpochSecond(a).atZone(ZoneOffset.of("-00:00")).toLocalDateTime()
// 2038-01-19T03:14:07.000Z
Instant.ofEpochSecond(b).atZone(ZoneOffset.of("-00:00")).toLocalDateTime()

过了最大时间后,由于整数溢出,时间值将作为负数来存储,系统会将日期读为 1901 年 12 月 13 日,而不是 2038 年 1 月 19 日。

用简单的语言来说,Unix 机器最终将会耗尽存储空间来列举秒数。所以,到那一天,使用标准时间库的 C程序会开始出现日期问题。你可以在维基百科上详细阅读更多的相关内容:

目前,2038年错误没有什么通行的解决方案。如果对用于存储时间值的time_t数据类型的定义进行更改,依赖带符号的32位time_t整数性质的应用程序就会出现一些代码兼容性问题。假设time_t的类型被更改为不带符号的32位整数,那将加大最新的时间限制。但是,这会对由负整数表示的1970年之前的日期造成混乱。

使用64位架构的操作系统和程序使用64位time_t整数。使用带符号的64位值可以将日期延长至今后的2920亿年。

已有人提出了许多建议,包括以带符号的64位整数来存储自某个时间点(1970年1月1日或2000年1月1日)以来的毫秒/微秒,以获得至少30万年的时间范围。其他建议包括用新的库重新编译程序,等等。这方面的工作正在开展之中;据专家们声称,2038年问题解决起来应该不难。

各种开发语言获取当前时间戳

Java

java.time.Instant

1
2
3
4
5
6
7
// 秒时间戳
Instant.now().getEpochSecond()
// 毫秒时间戳
Instant.now().toEpochMilli()

// 毫秒时间戳
System.currentTimeMillis()

Javascript

https://developer.mozilla.org/en-US/docs/Web/JavaScript/Reference/Global_Objects/Date

1
Math.round(new Date() / 1000)

Shell

1
date +%s

MySQL

UNIX_TIMESTAMP([date])

1
SELECT UNIX_TIMESTAMP()

其它语言:…

参考

UNIX时间 - 维基百科

Y2K problem

Y2K38 problem

Y2K22 problem

计算机时间到底是怎么来的?程序员必看的时间知识!

定义

MySQL 原生支持外键(即允许跨表交叉引用相关数据)和外键约束(用于保持数据一致性!)。

外键关系涉及包含初值的父表,以及引用父表值的子表。而外键约束就定义在子表之上。

A foreign key relationship involves a parent table that holds the initial column values, and a child table with column values that reference the parent column values. A foreign key constraint is defined on the child table.

语法

CREATE TABLEALTER TABLE 语句中定义外键约束的基本语法如下:

1
2
3
4
5
6
7
8
[CONSTRAINT [fk_symbol]] FOREIGN KEY
[index_name] (col_name, ...)
REFERENCES tbl_name (col_name,...)
[ON DELETE reference_option]
[ON UPDATE reference_option]

reference_option:
RESTRICT | CASCADE | SET NULL | NO ACTION | SET DEFAULT

删除外键约束:

1
ALTER TABLE tbl_name DROP FOREIGN KEY fk_symbol;

例子

1
2
3
4
5
6
7
8
9
10
11
12
13
14
# 创建父表
CREATE TABLE `t_parent` (
`id` int(10) unsigned NOT NULL AUTO_INCREMENT,
PRIMARY KEY (`id`)
) ENGINE=InnoDB DEFAULT CHARSET=utf8mb4 COLLATE=utf8mb4_unicode_ci COMMENT='父表';

# 创建子表
CREATE TABLE `t_child` (
`id` int(10) unsigned NOT NULL AUTO_INCREMENT,
`parent_id` int(10) unsigned NOT NULL,
PRIMARY KEY (`id`),
KEY `fk_parent_id` (`parent_id`),
CONSTRAINT `fk_parent_id` FOREIGN KEY (`parent_id`) REFERENCES `t_parent` (`id`) ON DELETE CASCADE ON UPDATE CASCADE
) ENGINE=InnoDB DEFAULT CHARSET=utf8mb4 COLLATE=utf8mb4_unicode_ci COMMENT='子表';

可视化界面如下:

foreign_key_constraint

注意:

  • 创建外键约束时,如果主外键之间的数据类型不一致(例如长度、无符号),会报错:1215 - Cannot add the foreign key constraint

  • 创建外键约束后,MySQL 会为子表自动创建普通索引 fk_parent_id,以提升 join 查询性能。

  • 创建外键不一定只能引用父表的主键,也能引用普通列。如果引用普通列,MySQL 则会在父表和子表同时为该列创建普通索引。如果删除该索引会报错:1553 - Cannot drop index '...': needed in a foreign key constraint

  • reference_option 的几种情况总结如下:

    • 操作父表:

      • RESTRICTUPDATE 或者 DELETE 父表记录时,对子表进行一致性检查
      • CASCADEUPDATE 或者 DELETE 父表记录时,对子表进行级联操作
      • SET NULLUPDATE 或者 DELETE 父表记录时,对子表进行 SET NULL 操作
      RESTRICT (NO ACTION) CASCADE SET NULL
      INSERT 正常插入 正常插入 正常插入
      UPDATE 更新父表值,会报错 1451 - Cannot delete or update a parent row: a foreign key constraint fails 更新父表值,子表值级联更新 更新父表值,子表值 SET NULL
      DELETE 删除父表行,会报错 1451 - Cannot delete or update a parent row: a foreign key constraint fails 删除父表行,子表行级联删除 删除父表行,子表值 SET NULL
    • 操作子表:

      • INSERTUPDATE 触发一致性检查。
      RESTRICT (NO ACTION) CASCADE SET NULL
      INSERT 无论哪个 option,插入子表行为父表不存在的值,都会报错 1452 - Cannot add or update a child row: a foreign key constraint fails
      UPDATE 同上
      DELETE 无论哪个 option,删除子表行都 ok

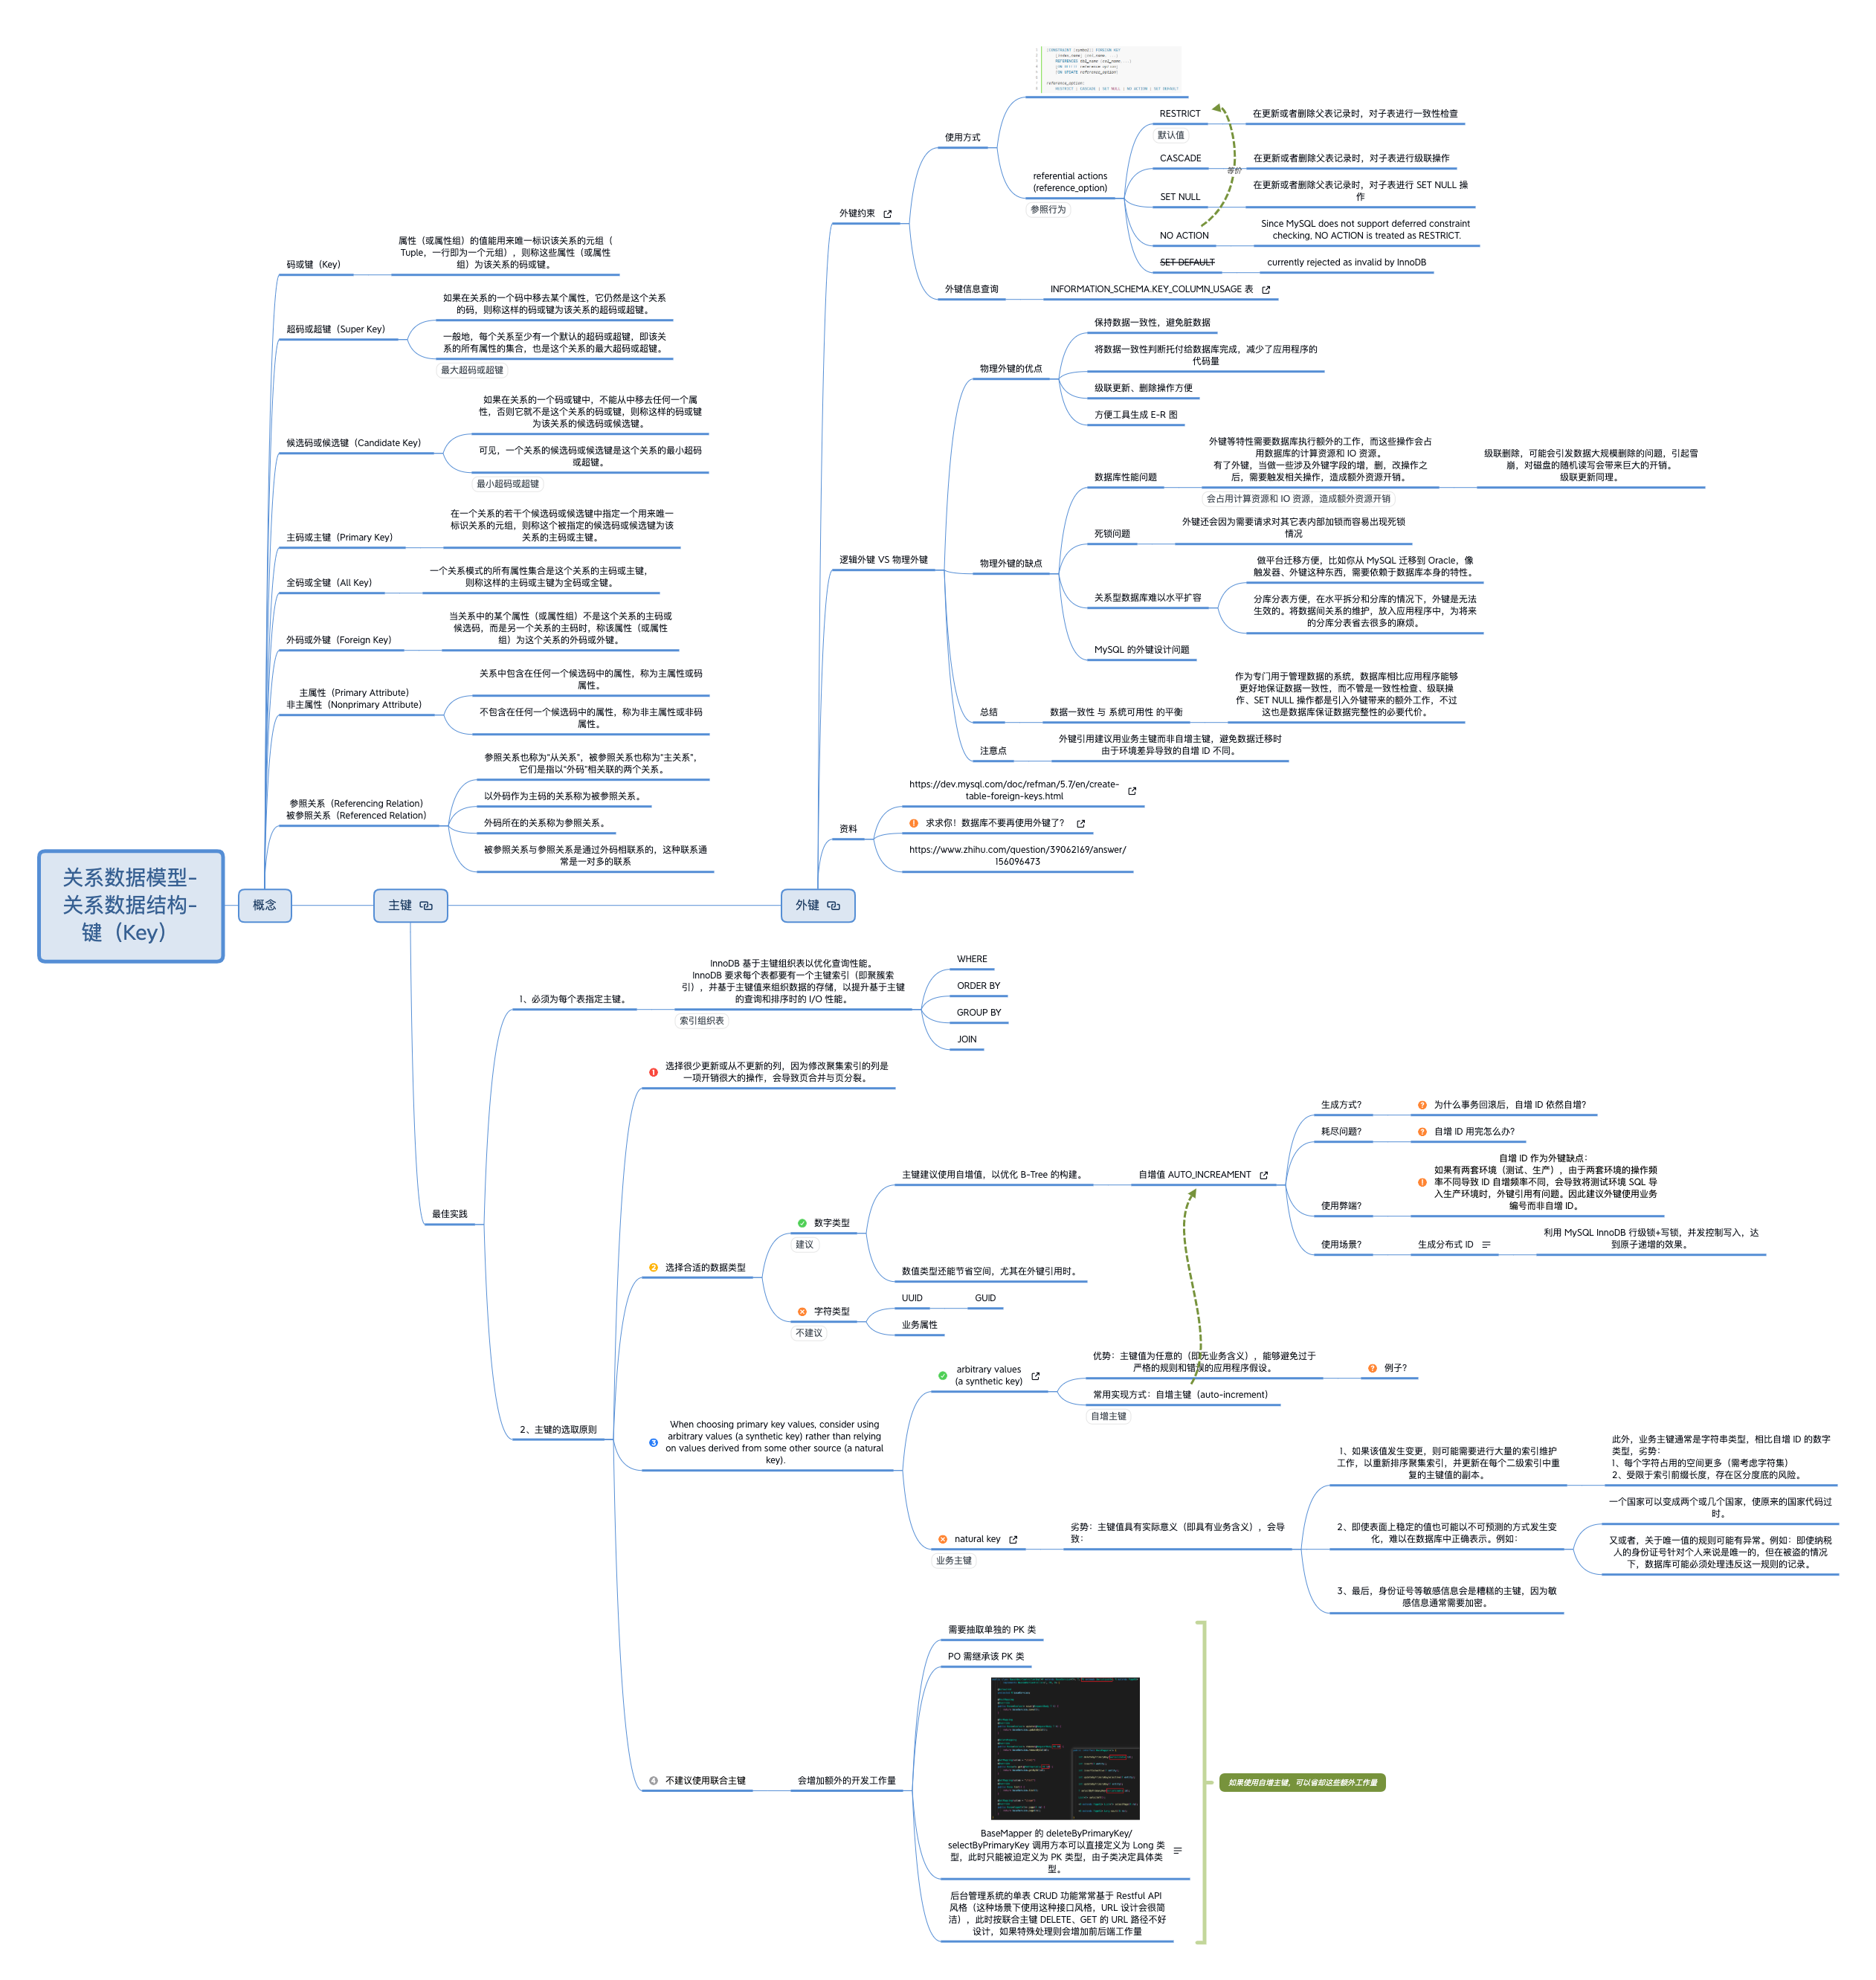
总结

primary_key_and_foreign_key

参考

https://dev.mysql.com/doc/refman/5.7/en/create-table-foreign-keys.html

https://mp.weixin.qq.com/s/jOF1rohb6OvA3Pb5rL6Ilg

OAuth 协议解决了以下问题:

  • 密码泄露风险
  • 无法控制授权范围、有效期

OAuth 协议中,术语“授权类型(Grant Types)”是指应用获取“访问令牌(Access Token)”的方式。OAuth 2.0 定义了以下几种授权类型:

几种授权类型都有其对应的使用场景,各有利弊,但目的都是为了获取访问令牌。访问令牌是一个用于访问已授权资源的临时凭据。

商户在接入认证服务器之前,需要先申请一套专用的 client_idclient_secret,据此再申请 access_token。下表总结了其中三种主流授权类型下,申请 access_token 令牌的前置条件:

授权方式 grant_type 授权的前置条件 描述
授权码模式 authorization_code 授权码 这种模式是最常见、功能最完整、流程最严密的授权模式,第三方应用需要先获取授权码,才能申请到令牌。它的特点就是通过第三方应用的后台服务器,与“服务提供商”的认证服务器进行互动,通过授权码(authorization_code)交换访问令牌(access_token,第三方应用不接触用户密码,安全性高。
密码模式 password 用户的账号、密码 这种模式通常用在用户对该应用高度信任的情况下,或者所有服务都由同一家公司提供。在这种模式下,用户必须把自己的用户名和密码发给应用。应用使用这些信息,再向“服务提供商”索要授权,其风险在于应用获知了密码。但应用无需存储密码,而是存储和使用令牌即可。
密码模式还有一种主流的变种,即使用用户手机号和短信验证码申请令牌,相比密码模式会更安全些。为了区分,可以自定义一个 grant_typesms_verify_code
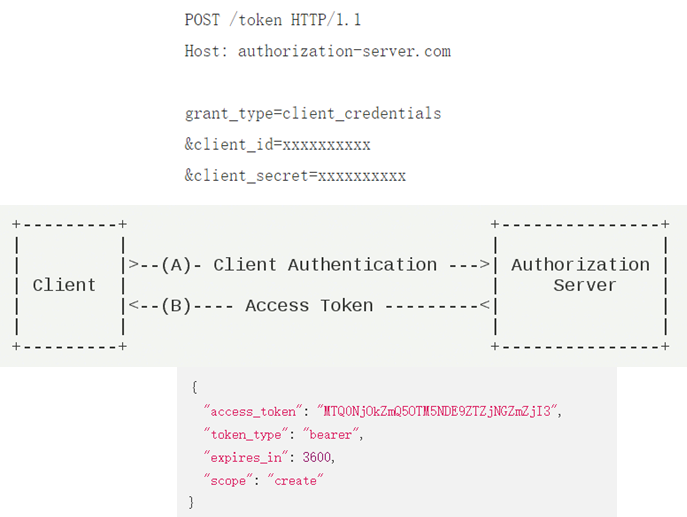
客户端模式 client_credentials 第三方应用以自己的名义,而不是以用户的名义,向“服务提供商”进行认证,并获取商户类资源,而不是用户类资源。

授权码模式

OAuth 旨在让用户能够对第三方应用授予有限的访问权限。第三方应用首先需要确定所需的权限,然后将用户导向浏览器以获得其授权。简单回顾下:

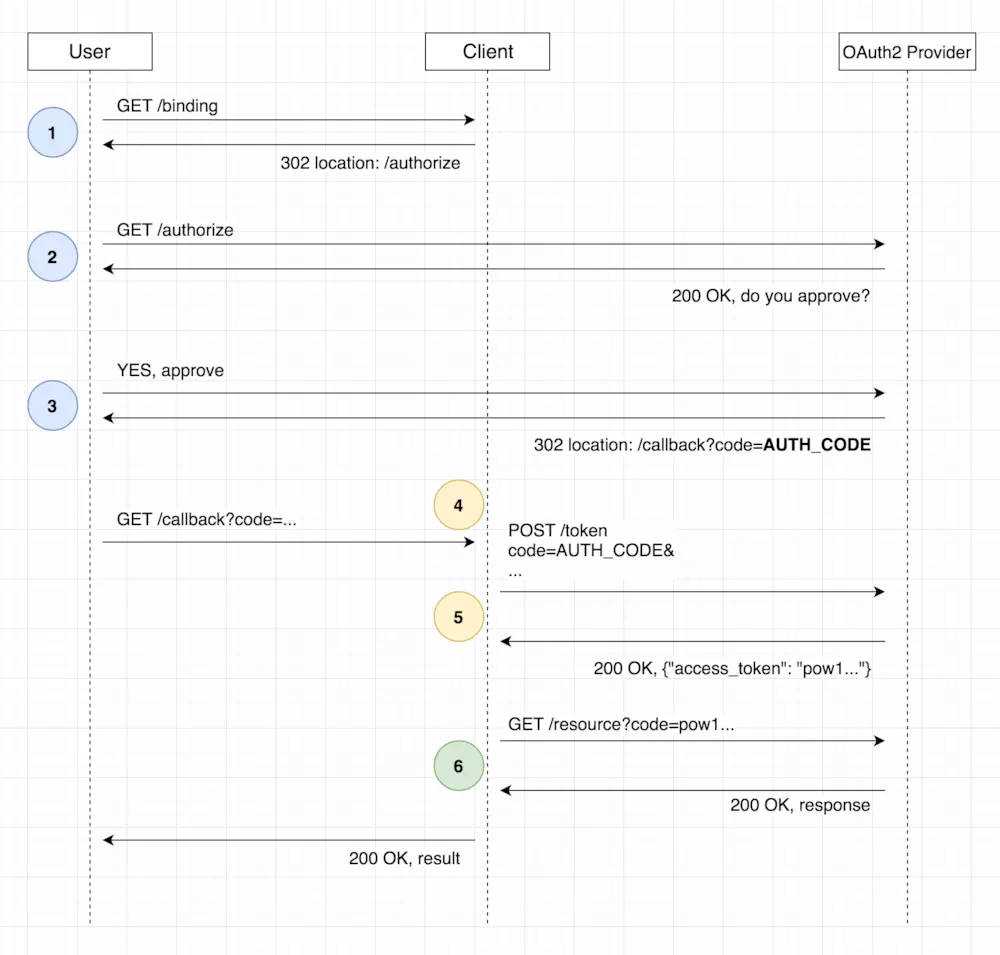
OAuth2 Authorization Code Flow

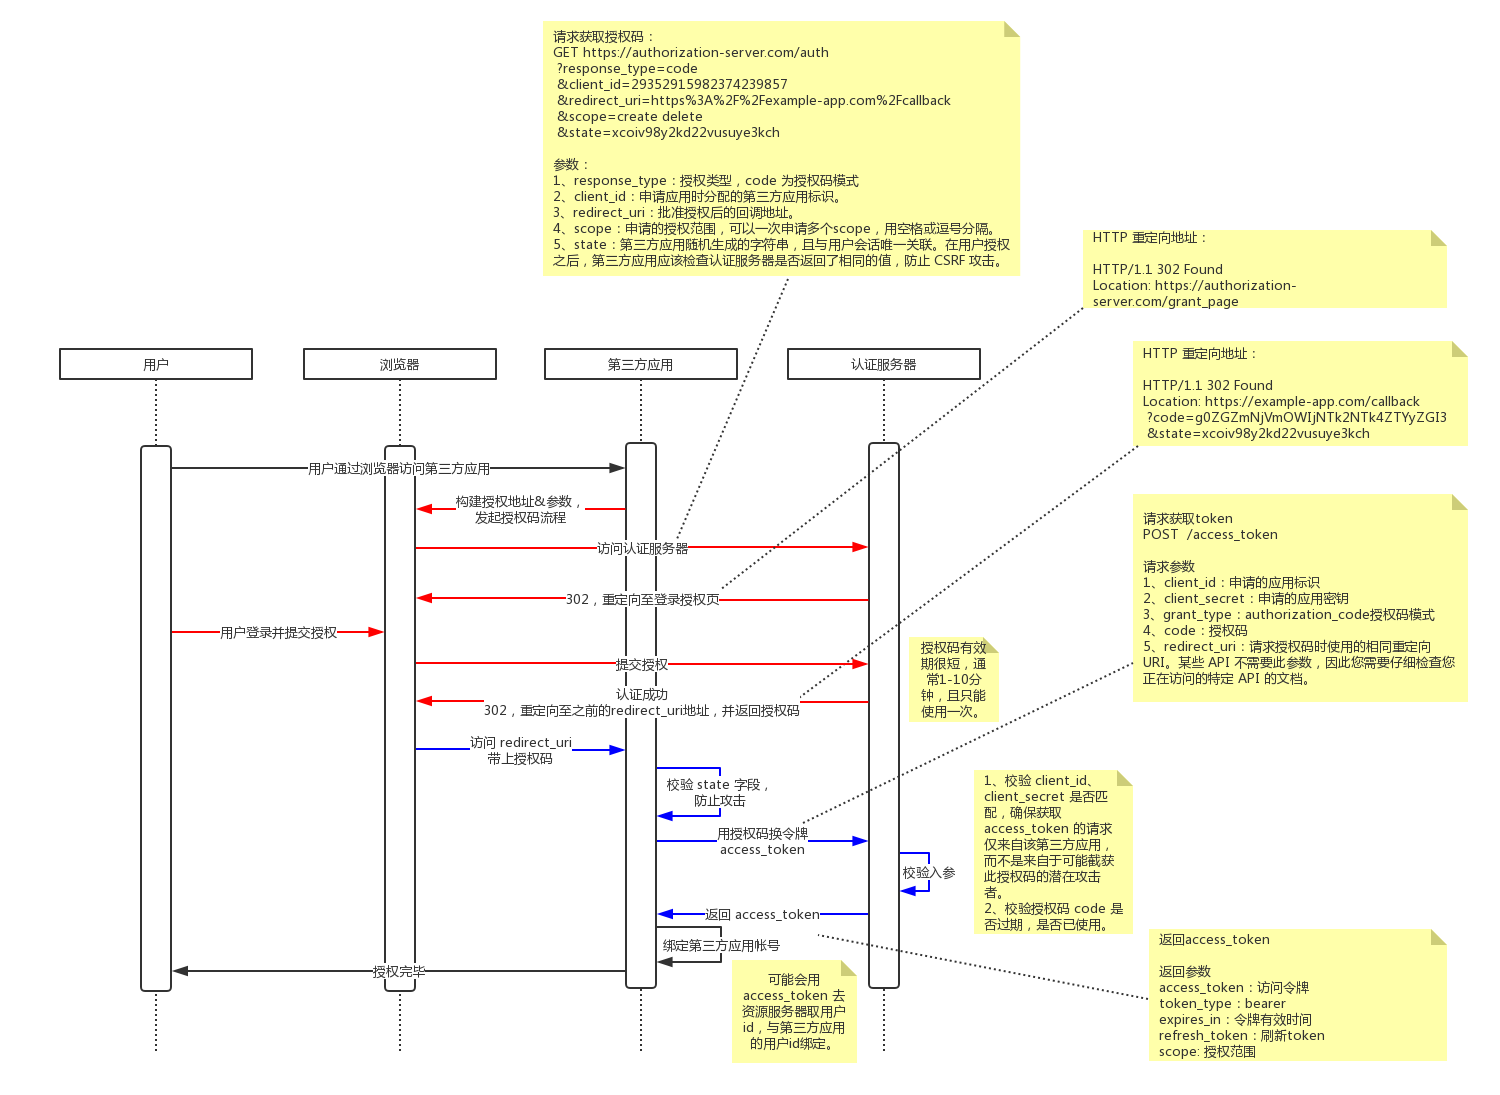
要开始授权流程,第三方应用需要先构建 URL。这里附一张流程图,详细总结下授权码模式的整个流程:

OAuth 2.0 授权码模式

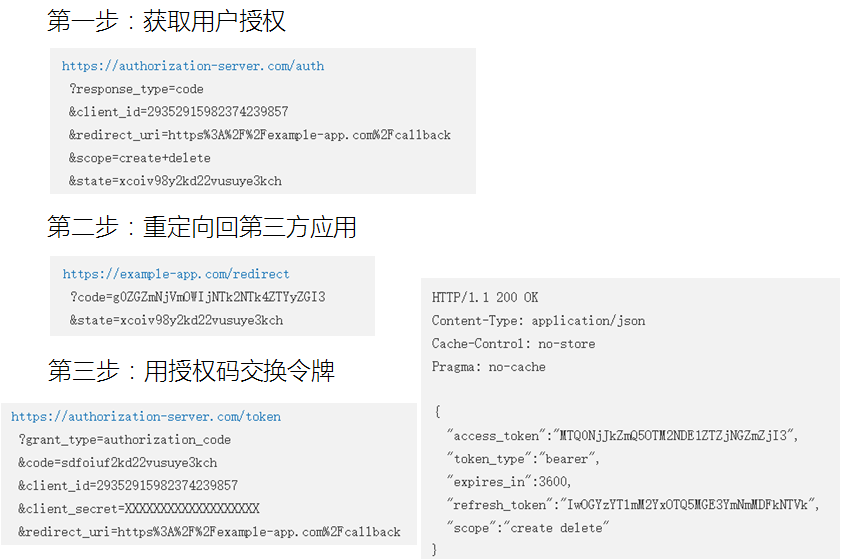
报文如下:

OAuth 2.0 授权码模式

交互方式上特别注意浏览器会进行几次 302 重定向。流程总结如下:

  1. 第三方应用首先向服务提供商申请 client_id 应用唯一标识、client_secret 密钥,用于后续获取令牌时提供身份校验;
  2. 获取授权码:此时要提供预分配好的 client_id 标识来源,提供 scope 标识要申请的权限,提供 redirect_uri 标识授权完毕后要回跳的第三方应用的链接。
  3. 第一次 302 重定向:认证服务器展示登录授权页。
  4. 第二次 302 重定向:在用户提交授权,认证服务器认证成功后,会分配授权码 code,并重定向回第三方应用的 redirect_uri
  5. 建议第三方应用要根据当前用户会话生成随机且唯一的 state 参数,并在接收到授权码时先进行校验,避免 CSRF 攻击。
  6. 最后,第三方应用会向认证服务器申请令牌 access_token,此时要提供预分配好的 client_idclient_secretcode以便认证。这一步是在后端之间完成的,对用户不可见。
  7. access_token 是有有效期的,过期后需要刷新。
  8. 拿到令牌 access_token 后,第三方应用就可以访问资源方,获取所需资源。access_token 相当于用户的 session id。

以微信公众平台为例,微信网页授权 就是使用了“授权码模式(grant_type=authorization_code)”。商户在完成接入并获取用户access_token 之后,可用于如下场景:

  • 获取用户 openid
  • 获取用户信息(如昵称、头像、性别、所在地)
  • ……

简化模式

简化了授权码模式,不再需要授权码(Authorization Code)换令牌(Access Token),而是 Authorization Server 直接返回令牌(Access Token)。

1
2
3
4
5
6
7
8
9
10
11
12
13
14
15
16
17
18
19
20
+--------+                                           +---------------+
| |--(A)------- Authorization Grant --------->| |
| | | |
| |<-(B)----------- Access Token -------------| |
| | & Refresh Token | |
| | | |
| | +----------+ | |
| |--(C)---- Access Token ---->| | | |
| | | | | |
| |<-(D)- Protected Resource --| Resource | | Authorization |
| Client | | Server | | Server |
| |--(E)---- Access Token ---->| | | |
| | | | | |
| |<-(F)- Invalid Token Error -| | | |
| | +----------+ | |
| | | |
| |--(G)----------- Refresh Token ----------->| |
| | | |
| |<-(H)----------- Access Token -------------| |
+--------+ & Optional Refresh Token +---------------+

密码模式

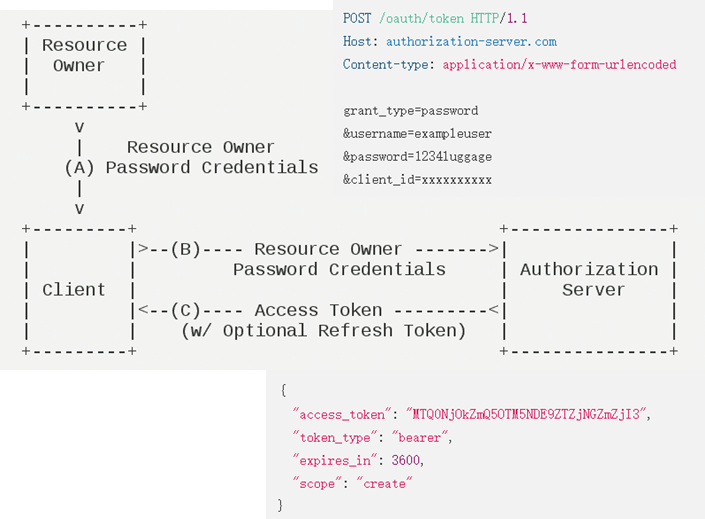
报文如下:

OAuth 2.0 密码模式

客户端模式

客户端授权模式用于请求商户资源,而不是用户资源,报文如下:

OAuth 2.0 客户端模式

以微信公众平台为例,获取公众号的 access_token 就是使用了“客户端模式(grant_type=client_credential)”。商户在完成接入并获取应用access_token 之后,可用于如下场景:

  • 自定义菜单的配置
  • 消息推送
  • 素材管理
  • 用户管理
  • 帐户管理
  • 数据统计
  • …… 大量服务

参考

https://oauth.net/2/

RFC 6749 - The OAuth 2.0 Authorization Framework - IETF

RFC 6750 - The OAuth 2.0 Authorization Framework: Bearer Token Usage

What the Heck is OAuth?

https://developer.linkedin.com/zh-cn/docs/oauth2

http://www.ruanyifeng.com/blog/2014/05/oauth_2_0.html

移花接木:针对OAuth2的CSRF攻击

微信网页授权(授权码模式)

典型技术:基本认证、摘要认证、消息认证码、JWT、单点登录(CAS 流程、OpenID)

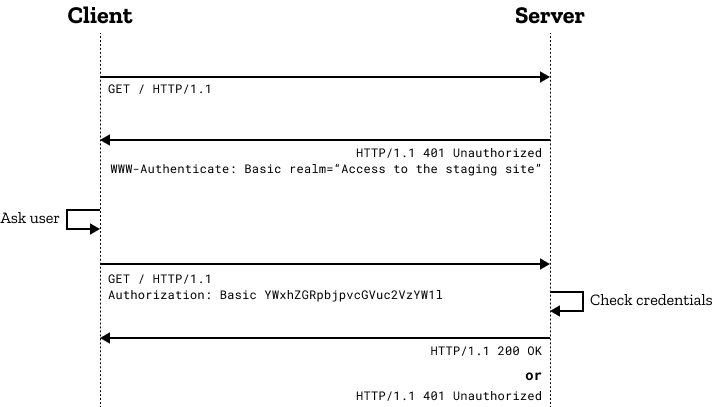
基本认证(Basic Access Authentication)

https://en.wikipedia.org/wiki/Basic_access_authentication

在 HTTP 用户代理(如:网页浏览器)请求时,提供用户名和密码的一种方式。

HTTP 请求头会包含 Authorization 字段,形式如下: Authorization: Basic <凭证>,该凭证是 Base64("username:password")

最初,基本认证是定义在 HTTP 1.0 规范(RFC 1945)中,后续的有关安全的信息可以在 HTTP 1.1 规范(RFC 2616)和 HTTP 认证规范(RFC 2617)中找到。于 1999 年 RFC 2617 过期,于 2015 年的 RFC 7617 重新被定义。

Basic_Access_Authentication

摘要认证(Digest Access Authentication)

https://en.wikipedia.org/wiki/Digest_access_authentication

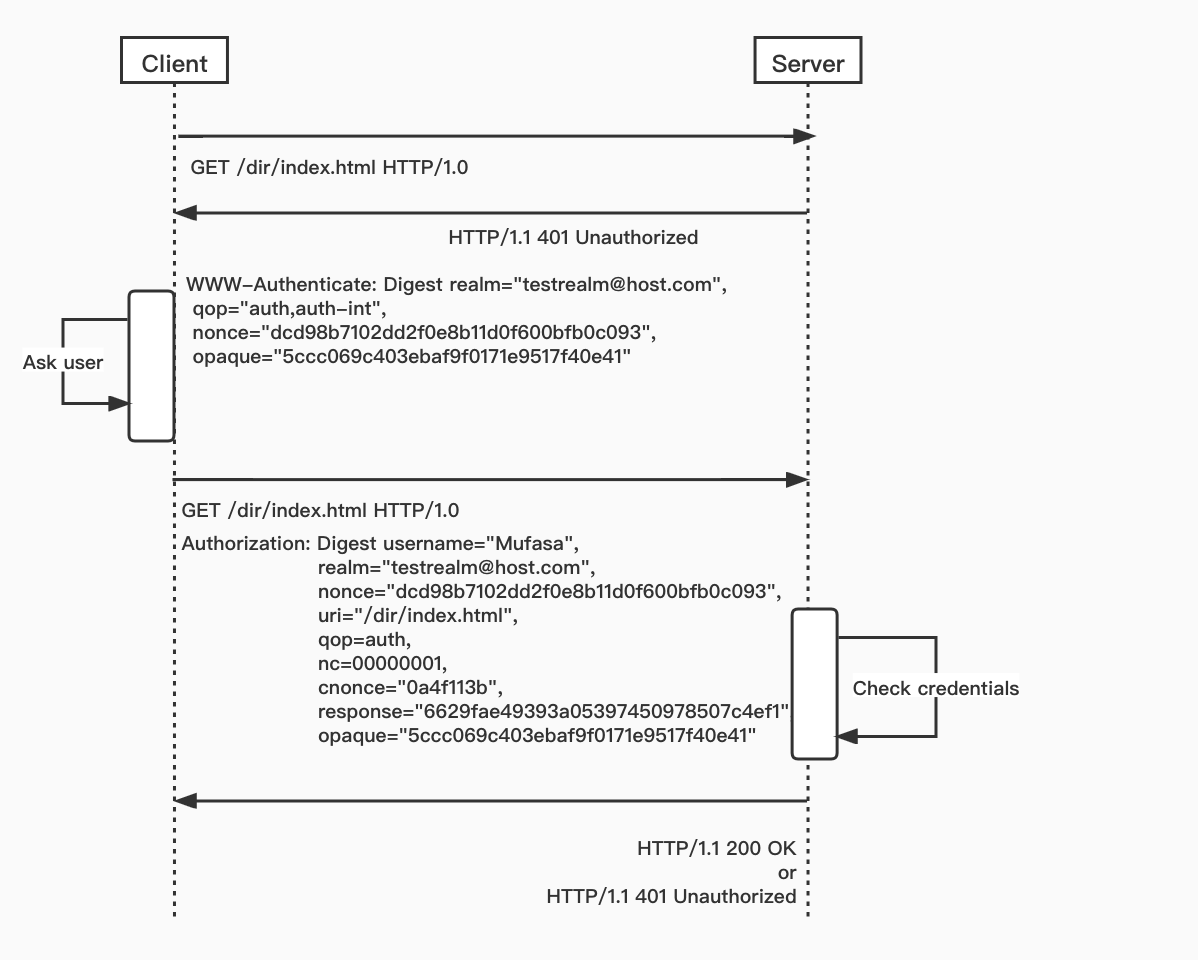
摘要认证是一种比基本认证更安全的认证方式:

It applies a hash function to the username and password before sending them over the network. In contrast, basic access authentication uses the easily reversible Base64 encoding instead of hashing, making it non-secure unless used in conjunction with TLS.

Technically, digest access authentication is an application of MD5 cryptographic hashing with usage of nonce values to prevent replay attacks. It uses the HTTP protocol.

摘要认证最初由 RFC 2069 中被定义。RFC 2069 大致定义了一个传统的由服务器生成随机数(nonce)来维护安全性的摘要认证架构。

RFC 2069 随后被 RFC 2617 取代。RFC 2617 引入了一系列安全增强的选项。

Digest_Access_Authentication

消息认证码(Message Authentication Code)

https://en.wikipedia.org/wiki/Message_authentication_code

In cryptography, a message authentication code (MAC), sometimes known as a tag, is a short piece of information used for authenticating a message. In other words, to confirm that the message came from the stated sender (its authenticity) and has not been changed. The MAC value protects a message’s data integrity, as well as its authenticity, by allowing verifiers (who also possess the secret key) to detect any changes to the message content.

MAC

HMAC

What is an HMAC?

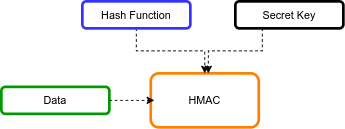
A hash-based message authentication code (HMAC, 散列消息认证码) is a type of message authentication code involving:

HMAC

If any change is made to the data being sent, the resulting HMAC will be completely different from the original. Additionally, since the key is known only to the sender and the receiver, no valid HMAC can be regenerated by anyone else.

HMAC 也是一种摘要认证方式,但相比上述两种认证方式仅保证用户的真实性(Authenticity),HMAC 还能同时保证传输数据的:

  • 完整性(Integrity)
  • 真实性(Authenticity)
  • 不可抵赖性(Non-repudiation)

HMAC 使用场景 —— HTTP 请求参数校验

All you need to do is take the HTTP request body and apply the SHA-256 hash function to it, using the secret key as the hash key. You then compare the resulting HMAC to the one contained in the Signature header:

  • If the HMACs are identical, then the data corresponds to what sender sent.
  • If they are different, this indicates that the data has been intercepted and altered in some way.

Java 使用例子:https://www.baeldung.com/java-hmac

JSON Web Token

https://oauth.net/2/jwt/

https://jwt.io/

JWT 登录认证及 token 自动续期方案解读

一个例子

场景:

  • 订单表数据量:3000 万。
  • 查询最近 7 天的订单,并做分页、分片。

表结构:

1
2
3
4
5
6
7
8
9
CREATE TABLE `t_order` (
`id` bigint(20) NOT NULL AUTO_INCREMENT,
`order_no` varchar(50) NOT NULL,
...
`create_time` datetime NOT NULL DEFAULT CURRENT_TIMESTAMP,
PRIMARY KEY (`id`),
UNIQUE KEY `uk_order_no` (`order_no`) USING BTREE,
KEY `idx_create_time` (`create_time`) USING BTREE
) ENGINE=InnoDB DEFAULT CHARSET=utf8

超多分页场景如下:

1
2
3
4
5
6
7
8
9
explain select * from t_order 
where create_time between '2019-10-17' and '2019-10-25'
limit 1000000, 10;

+----+-------------+---------+-------+-----------------+-----------------+---------+------+---------+-----------------------+
| id | select_type | table | type | possible_keys | key | key_len | ref | rows | Extra |
+----+-------------+---------+-------+-----------------+-----------------+---------+------+---------+-----------------------+
| 1 | SIMPLE | t_order | range | idx_create_time | idx_create_time | 5 | NULL | 3775048 | Using index condition |
+----+-------------+---------+-------+-----------------+-----------------+---------+------+---------+-----------------------+

虽然走了 idx_create_time 索引,但仍然是个慢查询,扫描行数过多。

超多分页的问题是什么?

随着偏移量 offset 的增加,MySQL 需要花费大量的时间来扫描需要丢弃的数据。本质上就是 offset 过大导致的大量回表 I/O 查询。

如果能减少这种大量的回表查询,就能提升查询性能。

概念介绍

什么是延迟关联优化?

什么是“延迟关联”?

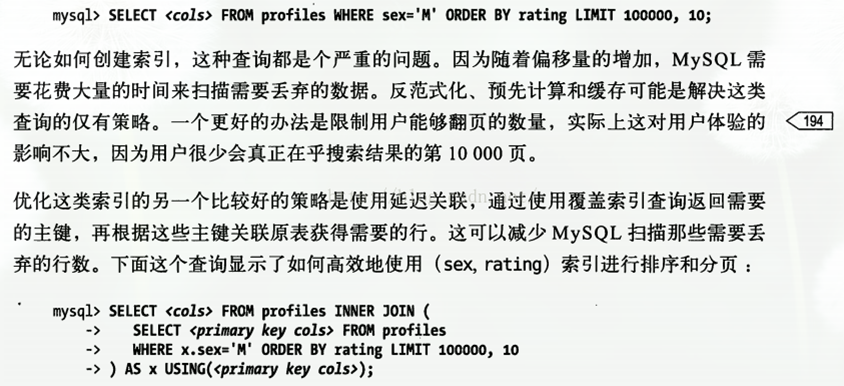
通过使用覆盖索引查询返回需要的主键,再根据主键关联原表获得需要的数据。

参考两个材料:

《高性能 MySQL》P194:

deferred_join_1

《阿里巴巴 Java 开发手册》:

deferred_join_2

什么是覆盖索引?

查询的列被所建的辅助索引所覆盖,无需回表:

1
2
3
4
5
6
7
8
9
explain select id from t_order 
where create_time between '2019-10-17' and '2019-10-25'
limit 1000000, 10;

+----+-------------+---------+-------+-----------------+-----------------+---------+------+---------+--------------------------+
| id | select_type | table | type | possible_keys | key | key_len | ref | rows | Extra |
+----+-------------+---------+-------+-----------------+-----------------+---------+------+---------+--------------------------+
| 1 | SIMPLE | t_order | range | idx_create_time | idx_create_time | 5 | NULL | 3775048 | Using where; Using index |
+----+-------------+---------+-------+-----------------+-----------------+---------+------+---------+--------------------------+

上述查询字段改为 id 后,执行计划中新增: Extra=Using index,表示走覆盖索引,无需回表,查询速度快了 N 倍。

延迟关联优化

延迟关联优化涉及到了 SQL 优化的两个重要概念:覆盖索引和回表。

  • 通过覆盖索引在辅助索引上完成所有扫描、过滤、排序(利用索引有序)和分页;
  • 最后通过主键回表查询,最大限度减少回表查询的 I/O 次数。

SQL 改造如下:

1
2
3
4
5
6
7
8
9
10
11
12
13
14
15
explain select * from t_order t 
inner join (
select id from t_order
where create_time between '2019-10-17' and '2019-10-25'
limit 1000000, 10
) e
on t.id = e.id;

+----+-------------+---------------+--------+-----------------+-----------------+---------+------+---------+--------------------------+
| id | select_type | table | type | possible_keys | key | key_len | ref | rows | Extra |
+----+-------------+---------------+--------+-----------------+-----------------+---------+------+---------+--------------------------+
| 1 | PRIMARY | <derived2> | ALL | NULL | NULL | NULL | NULL | 1000010 | NULL |
| 1 | PRIMARY | t | eq_ref | PRIMARY | PRIMARY | 8 | e.id | 1 | NULL |
| 2 | DERIVED | t_order | range | idx_create_time | idx_create_time | 5 | NULL | 3775048 | Using where; Using index |
+----+-------------+---------------+--------+-----------------+-----------------+---------+------+---------+--------------------------+

优化前:

  1. 辅助索引查询,得到 id
  2. id 逐一回表查询(1000000 + 10 次回表)
  3. 查询结果放弃前 offset 行,返回 limit 行

优化后:

  1. 辅助索引覆盖查询,得到 id
  2. 查询结果放弃前 offset 行,返回 limit 行
  3. 只需 10 条 id 回表查询,大大减少回表查询的 I/O 次数

参考

https://dev.mysql.com/doc/refman/5.7/en/derived-tables.html

http://mysql.taobao.org/monthly/2017/03/05/

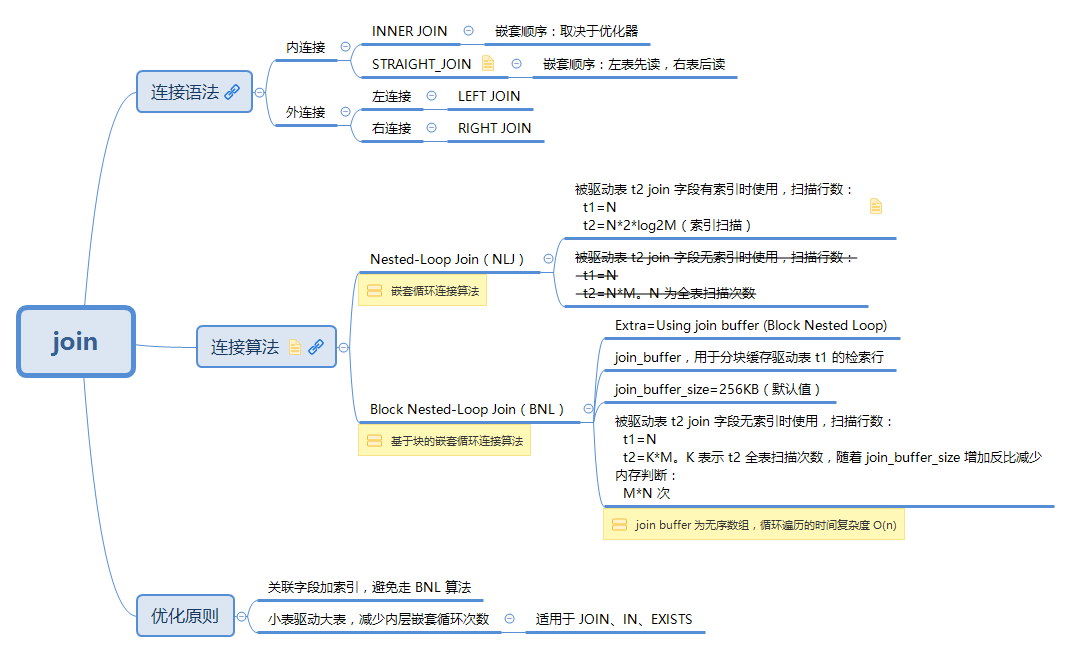
join

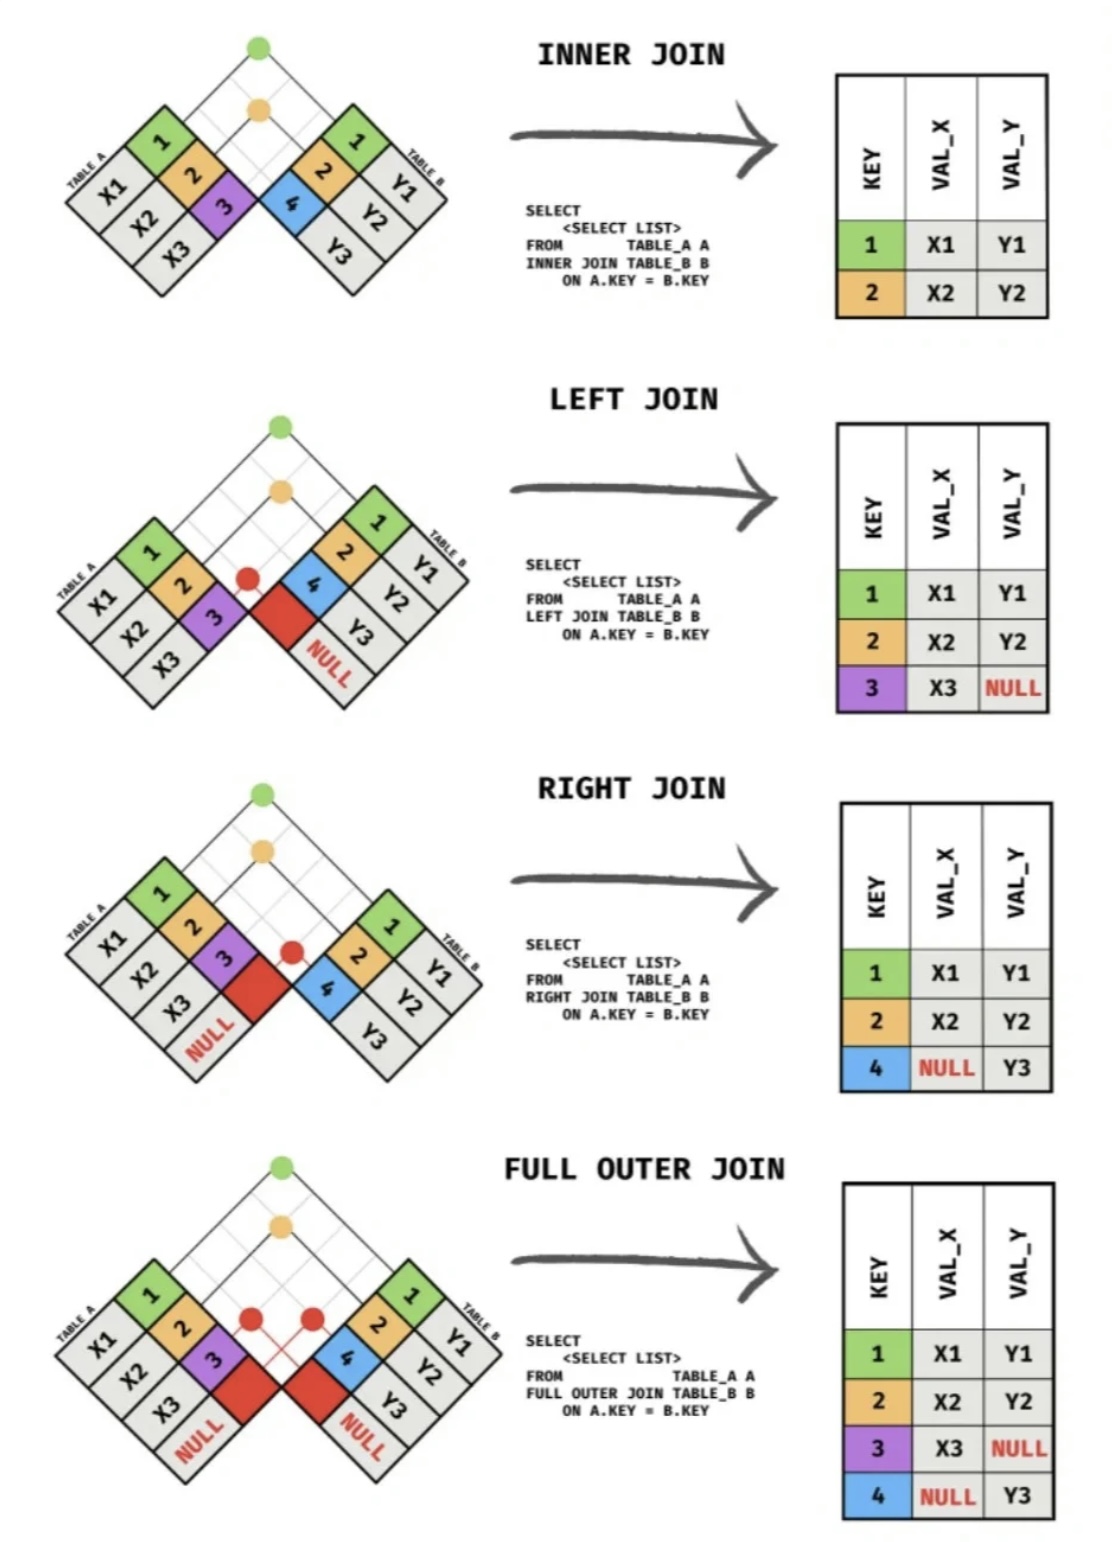
连接语法

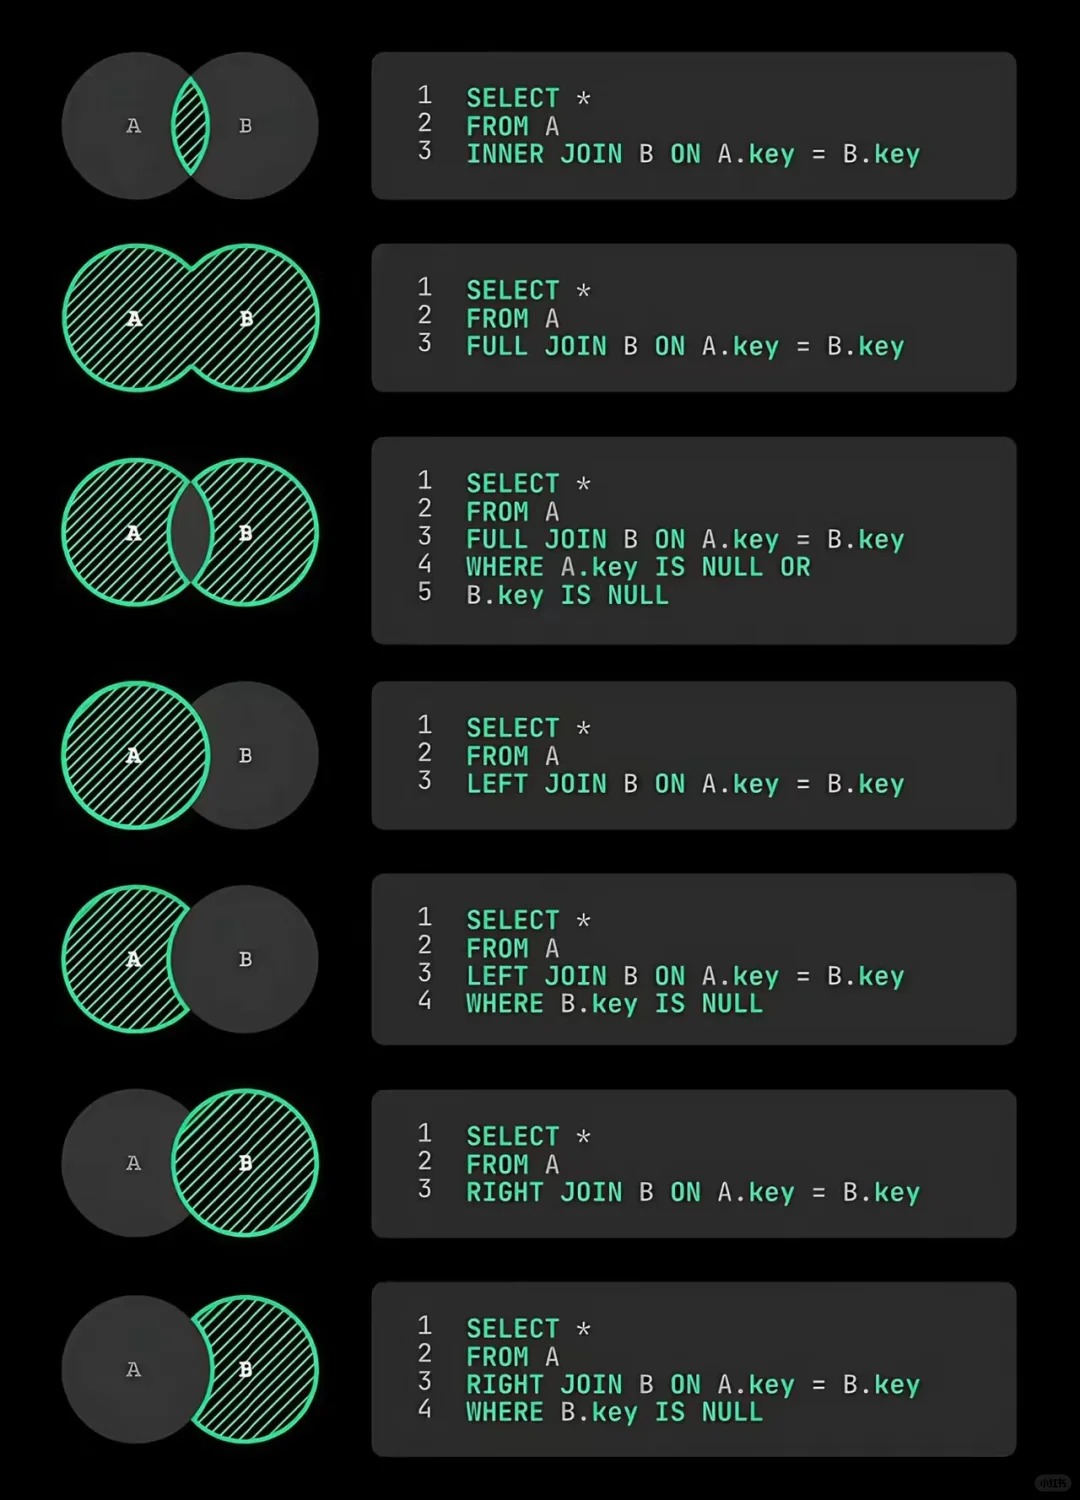
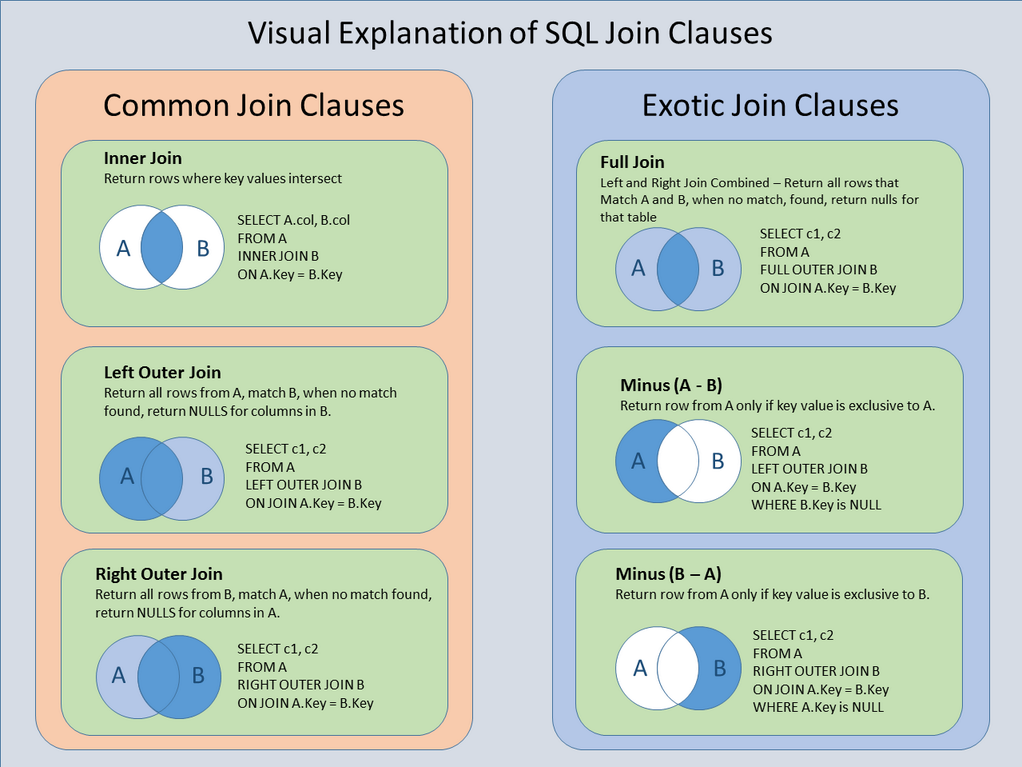
join

join

join

join

内连接

1
2
3
4
5
6
7
8
9
# 简单的等值语法创建内联结
SELECT vend_name, prod_name, prod_price
FROM Vendors, Products
WHERE Vendors.vend_id = Products.vend_id;

# ANSI SQL 规范首选 INNER JOIN 语法创建内联结
SELECT vend_name, prod_name, prod_price
FROM Vendors INNER JOIN Products
ON Vendors.vend_id = Products.vend_id;

在内连接两个表时,实际要做的是将第一个表中的每一行与第二个表中的每一行配对,WHEREON 子句作为过滤条件,只包含那些匹配连接条件的行

由没有连接条件的表关系返回的结果为笛卡儿积(cartesian product)。检索出的行的数目将是第一个表中的行数乘以第二个表中的行数。因此应当总是提供连接条件。

外连接(左、右)

许多连接将一个表中的行与另一个表中的行相关联,但有时候需要包含没有关联行的那些行,例如:

  • 对每个顾客下的订单进行计数,包括那些至今尚未下订单的顾客;

  • 列出所有产品以及订购数量,包括没有人订购的产品;

  • 计算平均销售规模,包括那些至今尚未下订单的顾客。

在上述例子中,连接包含了那些在相关表中没有关联行的行。这种连接称为外连接。

例如,要检索出所有顾客+订单,包括那些还未下单的顾客:

1
2
3
4
5
6
7
8
9
10
11
12
13
SELECT Customers.cust_id, Orders.order_num
FROM Customers LEFT OUTER JOIN Orders
ON Customers.cust_id = Orders.cust_id;

->
cust_id order_num
---------- ---------
1000000001 20005
1000000001 20009
1000000002 NULL
1000000003 20006
1000000004 20007
1000000005 20008

上例如果使用内连接,将不包含 1000000002 顾客,因为他还未下单(即连接条件不匹配)。

作为对比,下例使用内连接 INNER JOIN 和聚集函数 COUNT() 统计出所有顾客的订单数:

1
2
3
4
5
6
7
8
9
10
11
12
SELECT Customers.cust_id, COUNT(Orders.order_num) AS num_ord
FROM Customers INNER JOIN Orders
ON Customers.cust_id = Orders.cust_id
GROUP BY Customers.cust_id;

->
cust_id num_ord
---------- --------
1000000001 2
1000000003 1
1000000004 1
1000000005 1

但如果使用左外连接 LEFT OUTER JOIN 和聚集函数 COUNT() 进行相同统计,将会包括那些还未下单的顾客,例如顾客 1000000002

1
2
3
4
5
6
7
8
9
10
11
12
13
SELECT Customers.cust_id, COUNT(Orders.order_num) AS num_ord
FROM Customers LEFT OUTER JOIN Orders
ON Customers.cust_id = Orders.cust_id
GROUP BY Customers.cust_id;

->
cust_id num_ord
---------- -------
1000000001 2
1000000002 0
1000000003 1
1000000004 1
1000000005 1

由于 COUNT(column) 计数会忽略 NULL 值,因此顾客 1000000002 的统计结果为 0。

注意,左、右外连接之间的唯一差别是所关联的表的顺序。换句话说,调整 FROMWHERE 子句中表的顺序,左外连接可以转换为右外连接。因此,这两种外连接可以互换使用,哪个方便就用哪个。

连接算法

MySQL 使用下面两种算法执行表连接:

  • 嵌套循环连接算法(Nested-Loop Join(NLJ)),在被驱动表 join 字段有索引时使用。
  • 基于块的嵌套循环连接算法(Block Nested-Loop Join(BNL)),在被驱动表 join 字段无索引时使用,以减少被驱动表的全表扫描次数。

NLJ

Nested-Loop Join (NLJ) :

A simple nested-loop join (NLJ) algorithm reads rows from the first table in a loop one at a time, passing each row to a nested loop that processes the next table in the join. This process is repeated as many times as there remain tables to be joined.

例如,使用以下 join type 执行 t1t2t3 三个表之间的表连接:

1
2
3
4
Table   Join Type
t1 range
t2 ref
t3 ALL

使用 NLJ 算法,则按以下方式处理连接:

1
2
3
4
5
6
7
for each row in t1 matching range {
for each row in t2 matching reference key {
for each row in t3 {
if row satisfies join conditions, send to client
}
}
}

BNL

BNL 算法将外层循环的检索行缓存到 join_buffer(无序数组)中,以减少内层循环的全表扫描次数。例如,如果外层循环先将 10 行数据读入缓冲区,并将其传递给下一个内层循环,内层循环只需全表扫描一次,即可将读取到的每一行与缓冲区中的所有 10 行在内存中进行比较。这将使得内层循环表的全表扫描次数减少一个数量级。

MySQL join buffer 具有以下特征:

使用 BNL 算法,伪代码如下:

1
2
3
4
5
6
7
8
9
10
11
12
13
14
15
16
17
18
19
20
21
for each row in t1 matching range {
for each row in t2 matching reference key {
store used columns from t1, t2 in join buffer
if buffer is full {
for each row in t3 {
for each t1, t2 combination in join buffer {
if row satisfies join conditions, send to client
}
}
empty join buffer
}
}
}

if buffer is not empty {
for each row in t3 {
for each t1, t2 combination in join buffer {
if row satisfies join conditions, send to client
}
}
}

S 为每行 used columns from t1, t2 的大小, C 为其行数,则 t3 全表扫描的次数为:

1
2
3
4
t3_scanned_count = 
(S * C) % join_buffer_size == 0 ?
(S * C) / join_buffer_size :
(S * C) / join_buffer_size + 1

因此,随着 join_buffer_size 增加,t3 全表扫描的次数反比减少,直到 join_buffer_size=(S * C) 时则无法再优化。

参考

JOIN Syntax

Optimizing SELECT Statements