Qida's Blog

纸上得来终觉浅,绝知此事要躬行。

学习 Git 快一年了,感受良多,总结如下。

如何开始?

早年的时候,为了获取优质的项目和资源,注册了 GitHub 的账号,但仅仅简单用了 Star 和 Clone 功能。后来开始想在 GitHub 上面托管一些资源,陆续做了一些功课:

  • Git 官方文档,第一手官方材料,由浅入深,涉及 Git 各方面的内容,建议有实操经验的同学深入阅读。
  • GitHub 帮助文档,偏向实操,建议初学者阅读。而且里面涉及到一些 GitHub 特性(图形化操作、Social、Pages)可以与 Git 互补。
  • 廖雪峰的博客

其实网上相关教程、博客、书籍很多,但建议初学者重心先放在:

  • 基础命令的实操(推荐 Git cheatsheet,按功能分组命令,便于记忆)
  • 简单概念的理解(例如重点关注 Git 文件流转的三个工作区域及远程仓库,至于配置、分支(我知道分支是 Git 的杀手锏功能,但事实上很多人只用到一个 master 分支)、工作流等先统统忽略)

然后安装好 Git,选择好一个代码托管商(如国外 GitHub,国内 GitCafe),赶紧先跑起来,再好起来!如果你曾大致了解过 Git 这一门技术,你会发现这是属于“记忆型”的技术,需要多用才熟能生巧。

我的学习轨迹

第一轮

第一轮学习从零开始,大致如下:

  • 简单阅读了一些文档,用思维导图做成笔记。
  • 安装客户端,实操命令。
  • 把所做所得整理成 PPT,用自己的理解在团队内部做了一次技术分享,反响不错,还加深了自己的理解。

第二轮

第二轮的起因是因为想用 GitHub Pages 服务搭建一个静态博客写写文章。由于已经有了第一轮的沉淀,这回学习速度就很快了。还顺便学会了 Markdown 语法和 Hexo 博客搭建。

第三轮

第三轮是因为跳槽后新公司正好使用的是 Git,但由于团队成员用得都不熟练,因此利用空余时间进一步研究了 Git 的进阶内容:

  • 分支管理与团队工作流程
  • 冲突解决方案
  • pullmergelogresetcheckout 等实用命令
  • rebasecherry-pick 等高级命令

整个过程使用的是“INK 学习法”,并再次将理解的内容整理成 PPT 与团队分享。这轮学习的不同之处在于:

  • 以往都是个人使用 Git,使用的命令都很简单。当与团队一起使用时,问题规模不同,对工具的理解也会进一步加深。
  • 与第一次纯粹分享不同,这次侧重于推广我的方案,规范团队的工作流程,将知识转化为生产力。

总结

学习的轨迹应当是螺旋向上,难易度逐轮递增。每一轮的学习主题还应有所侧重,意图一口一个大胖子的行为会噎死自己 :)

如今 Git 对我来说不止是门技术,更是一种生活方式。除了工作中每天都要用到,通过它还“连接”了我与开源世界。

参考

https://learngitbranching.js.org/

告别 SVN,Git 成 “独苗”:GitHub 在 13 年后宣布淘汰 Subversion 支持

1.获取权限

首先获取相关 Group 的 Owner 权限。

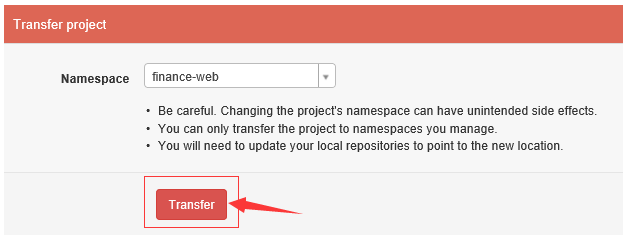
2.在线迁移

Git 迁移项目

3.更新本地仓库

更新本地仓库,首先查看当前 remote url:

1
2
3
$ git remote -v
origin git@git.kd.ssj:finance-ssjmarket/finance-market.git (fetch)
origin git@git.kd.ssj:finance-ssjmarket/finance-market.git (push)

使用 git remote set-url 重置 remote url:

1
$ git remote set-url origin git@git.kd.ssj:finance-web/finance-market.git

检查重置是否成功:

1
2
3
$ git remote -v
origin git@git.kd.ssj:finance-web/finance-market.git (fetch)
origin git@git.kd.ssj:finance-web/finance-market.git (push)

4 批量更新本地仓库

适用于一堆 git 仓库放在同一个目录下,可以用这个方法进行批量替换:

  1. 检查一下现在的 url:
1
cat ./finance-*/.git/config | grep 'git@'
  1. 批量替换:
1
ls -1 ./仓库名-*/.git/config | xargs  sed -i 's/git@.*\:/git@github.com:/g'
  1. 再次检查一下结果:
1
cat ./finance-*/.git/config | grep 'git@'

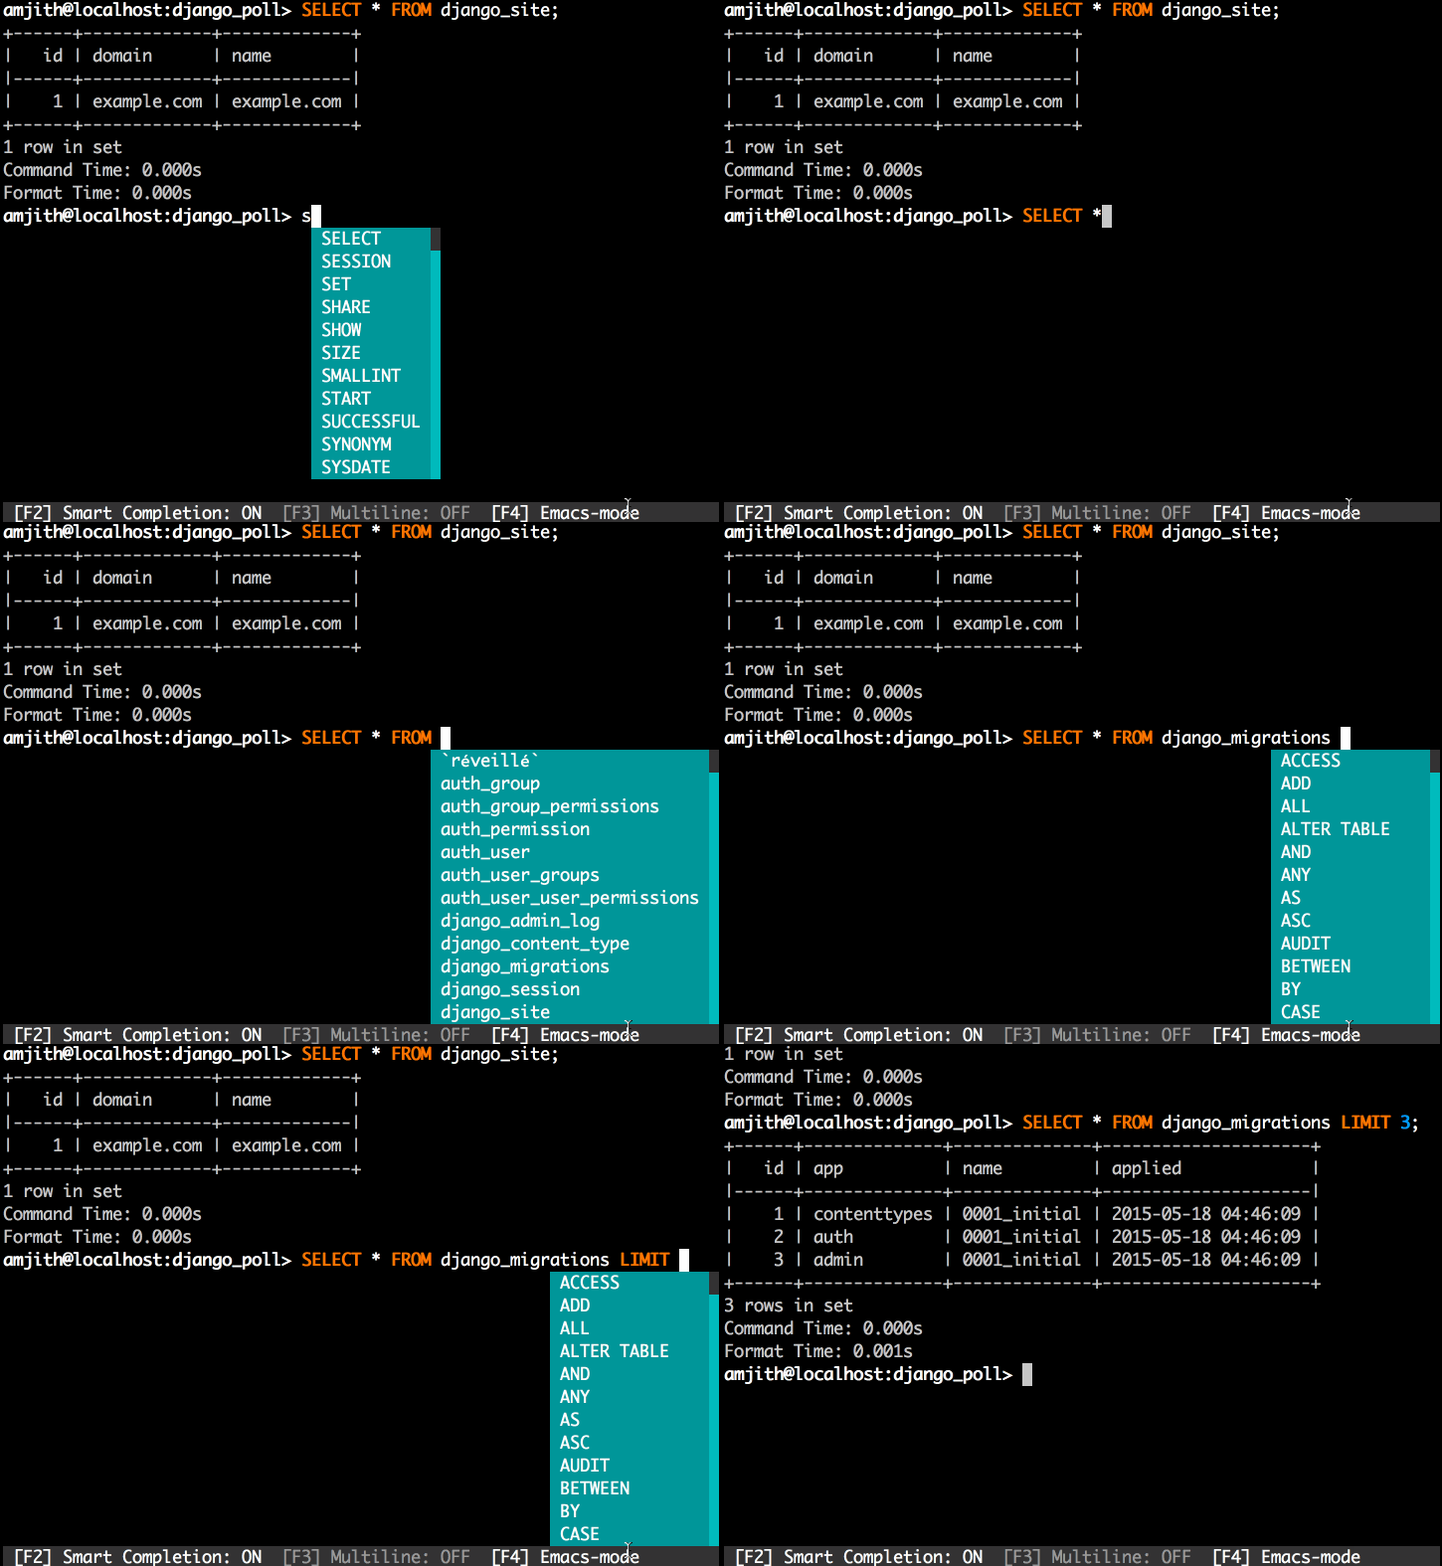
工作中常用到 mysql 自带的命令行工具,但实在难用。推荐一款 MySQL 命令行工具——MyCli,支持自动补全语法高亮。也可用于 MariaDB 和 Percona。

功能如下:

MyCLI

MyCLI 的兼容性爆表,支持 Windows、MacOS、Linux,运行在 Python 2.7, 3.3, 3.4, 3.5, 3.6。安装简易,例如 Windows 只要安装了 Python 环境及其包管理工具 pip ,就能一键安装:

1
2
3
4
5
$ pip install mycli

or

$ easy_install mycli

其它系统的安装方式,请参考:http://mycli.net/install

Windows 下使用 cmd 连接数据库,如下:

1
mycli -hlocalhost -P3306 -uroot -p123456

我们知道如何在电脑上通过 Chrome、Firefox 调试页面请求,但在手机端呢?我们可以使用 fiddler 来调试webapp。fiddler 是一个很好的调试、抓包工具。

问题:在客户端打开页面有问题,但浏览器正常;(由于客户端特定的环境,我们无法在电脑端浏览器调试定位一些问题,线上环境,更不能修改代码来调试。怎么办? 用Fiddler 代理本地文件来调试)

解决办法: 使用Fiddler 代理调试APP页面;

PC 端设置

Fiddler 安装

https://www.telerik.com/download/fiddler

Fiddler 设置

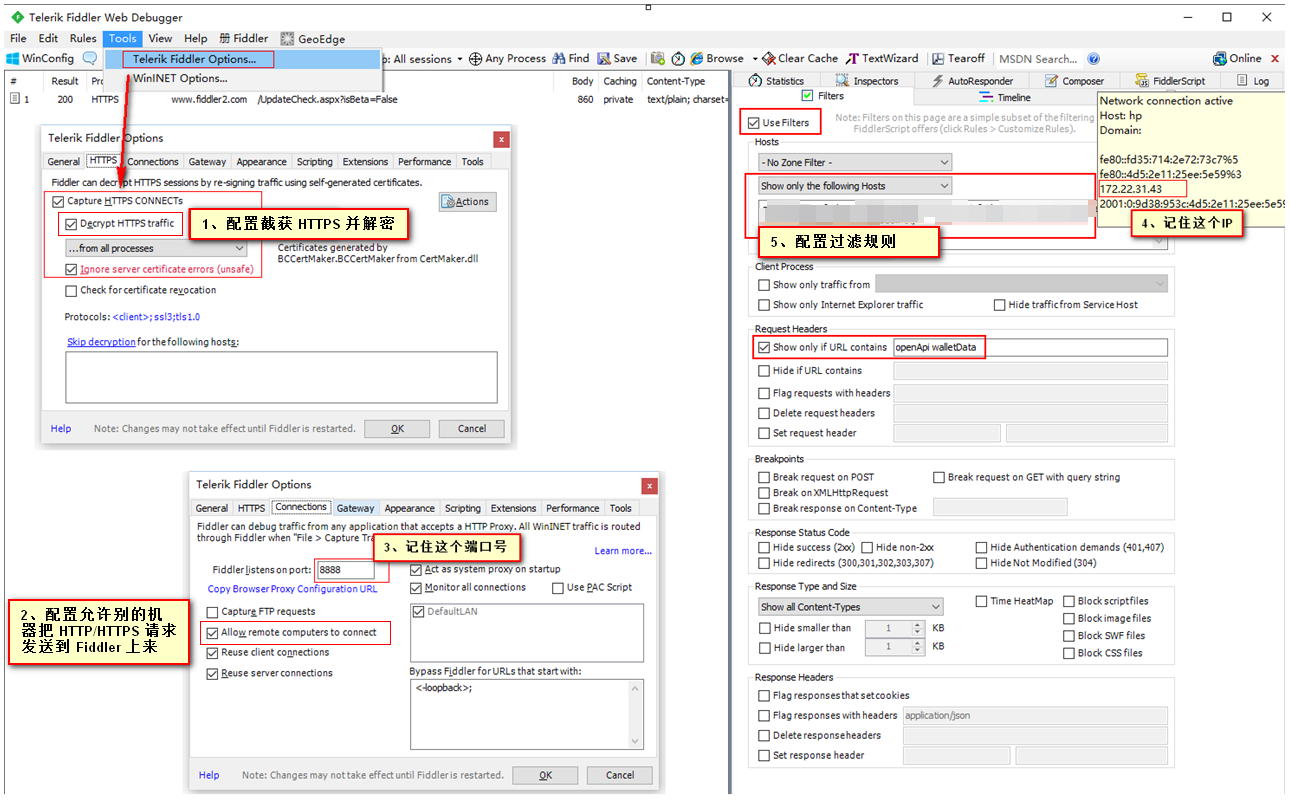
首先打开Fiddler->Tools->Fiddler Options 进行配置,配置完成后重启 Fiddler,如下图:

Fiddler 设置

关闭防火墙

关闭本机防火墙,避免手机无法 ping 通。

iPhone 手机端调试

参考:http://blog.csdn.net/asmcvc/article/details/51566569

安装 Fiddler 证书

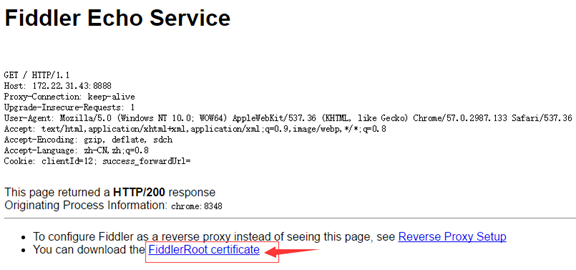
手机浏览器访问 172.22.31.43:8888 ,点击安装证书:

安装 Fiddler 证书

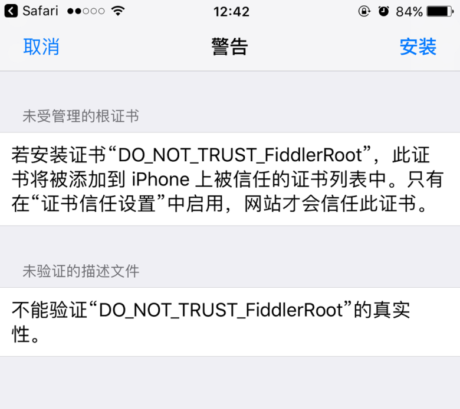
提示警告,继续安装:

安装 Fiddler 证书

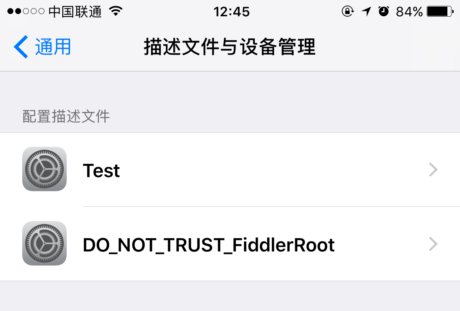
安装完毕:

安装 Fiddler 证书

证书信任设置

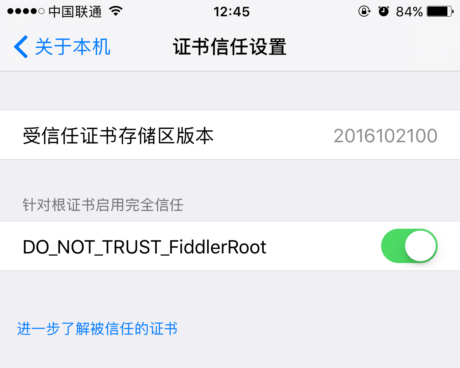
iOS 10 需要设置:通用 - 关于本机 - 证书信任设置 - 针对根证书启用完全信任:

证书信任设置

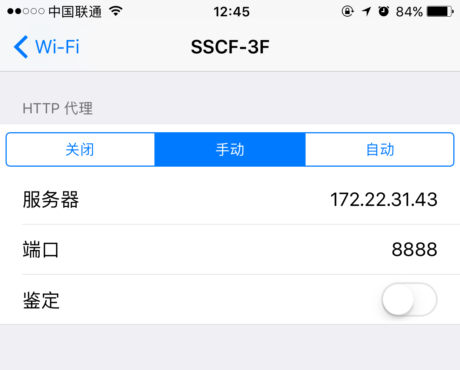
WIFI 代理设置

WIFI 代理设置

开始抓包调试

嗅探所有请求、响应

打开APP页面,可以嗅探被过滤的请求:

嗅探器

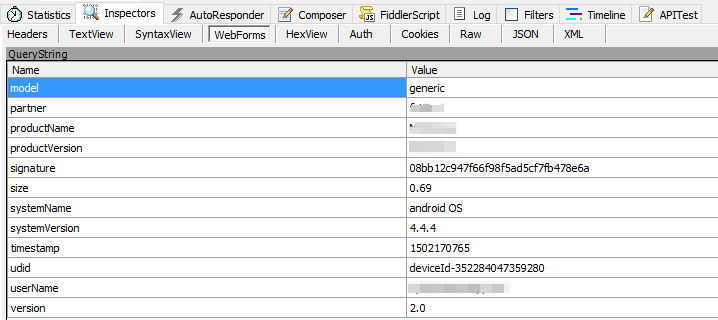
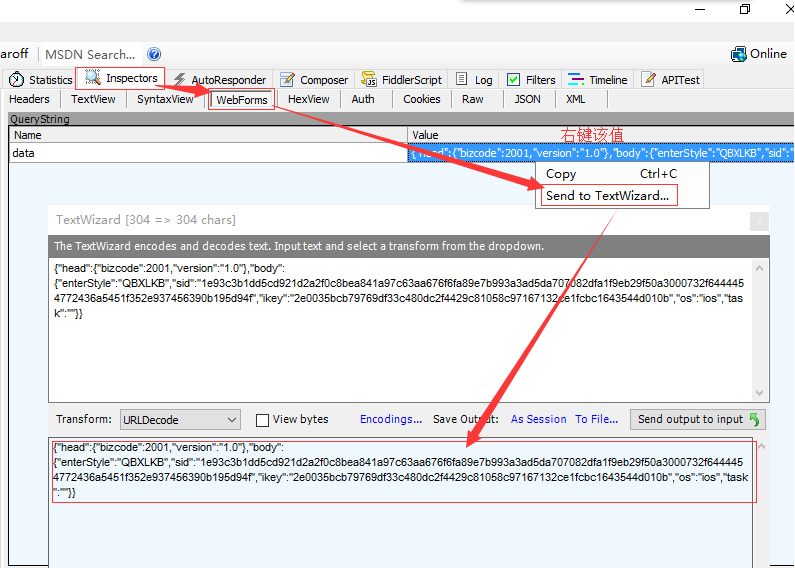
解码 URL 请求参数

普通表单的显示如下:

解码 URL 请求参数

可以使用 Send to TextWizard 进一步解码:

解码 URL 请求参数

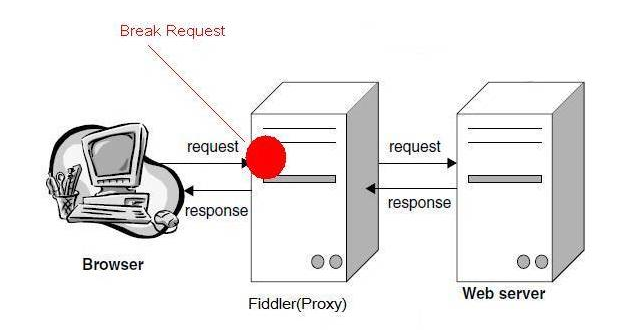
设置断点,修改请求、响应

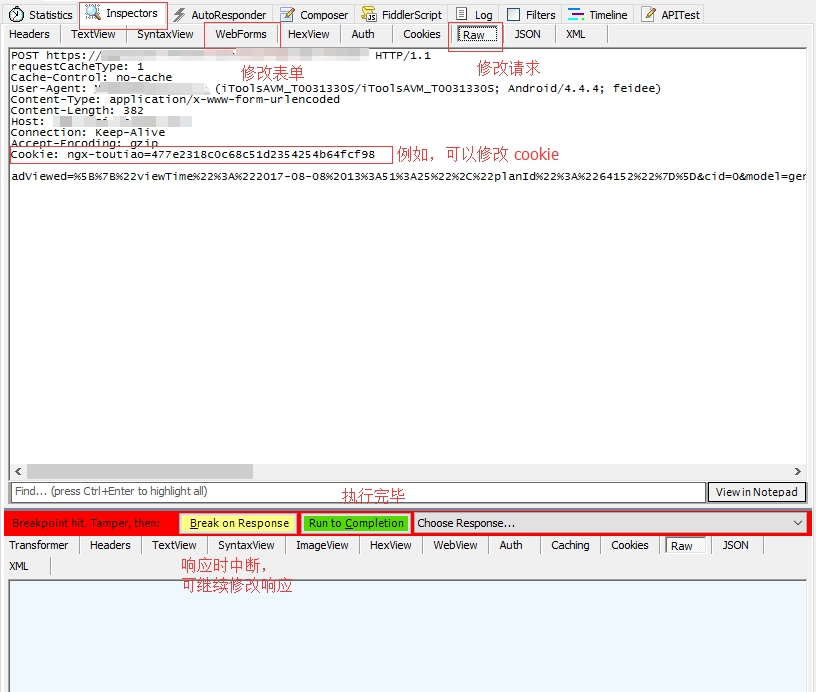
Fiddler 最强大的功能莫过于设置断点了,设置好断点后,你可以修改请求头(如 cookie)、请求体、响应头、响应体。

断点原理

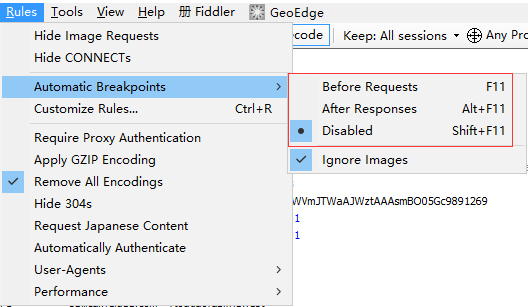
设置断点有两种方法:

第一种:设置全局断点

打开 Fiddler 点击 Rules-> Automatic Breakpoint -> Before Requests,可修改请求;After Responses,可修改响应。

如何消除全局断点呢? 点击Rules-> Automatic Breakpoint ->Disabled

设置全局断点

第二种:设置指定断点

在命令行中输入命令: bpu www.baidu.com (这种方法只会中断 www.baidu.com)

如何消除命令呢? 在命令行中输入命令 bpu

断点效果如下:

设置指定断点

设置指定断点

自动响应

有时候,线上客户端环境下打开的页面有bug无法用浏览器调试,则可以用fiddler代理本地文件来进行调试,非常方便。例如:

设置自动响应

我们将线上JS文件代理为本地文件,我们可以修改本地文件,就能用客户端打开看到修改结果,非常方便,当然我们可以同时代理 引入 vconsole 来在手机端打印错误日志。

也可以将一个接口代理下来,然后新建一个json文件,和代理js文件是同样的方法,就可以修改接口的请求了。

PS:代理接口时可能会出现跨域问题,解决方法点这里

显示 IP

如何显示 IP?只需配置一行代码:

1
FiddlerObject.UI.lvSessions.AddBoundColumn("IP", 120, "X-HostIP");

显示 IP

常见问题

  1. 多级代理相互影响(数据库连接vpn_ssl、蓝灯、xx-net等)
  2. 代理缓存
  3. 左下角的“Captuing”仅用于控制电脑端抓包,不影响手机端,可以关掉,避免影响电脑端的正常上网(例如网易云音乐听歌,印象笔记同步)。
  4. 开启代理后,响应体不会被 gzip,也没有响应头:Content-Encoding: gzip。可以自行用 Chrome 和 IE 对比测试。

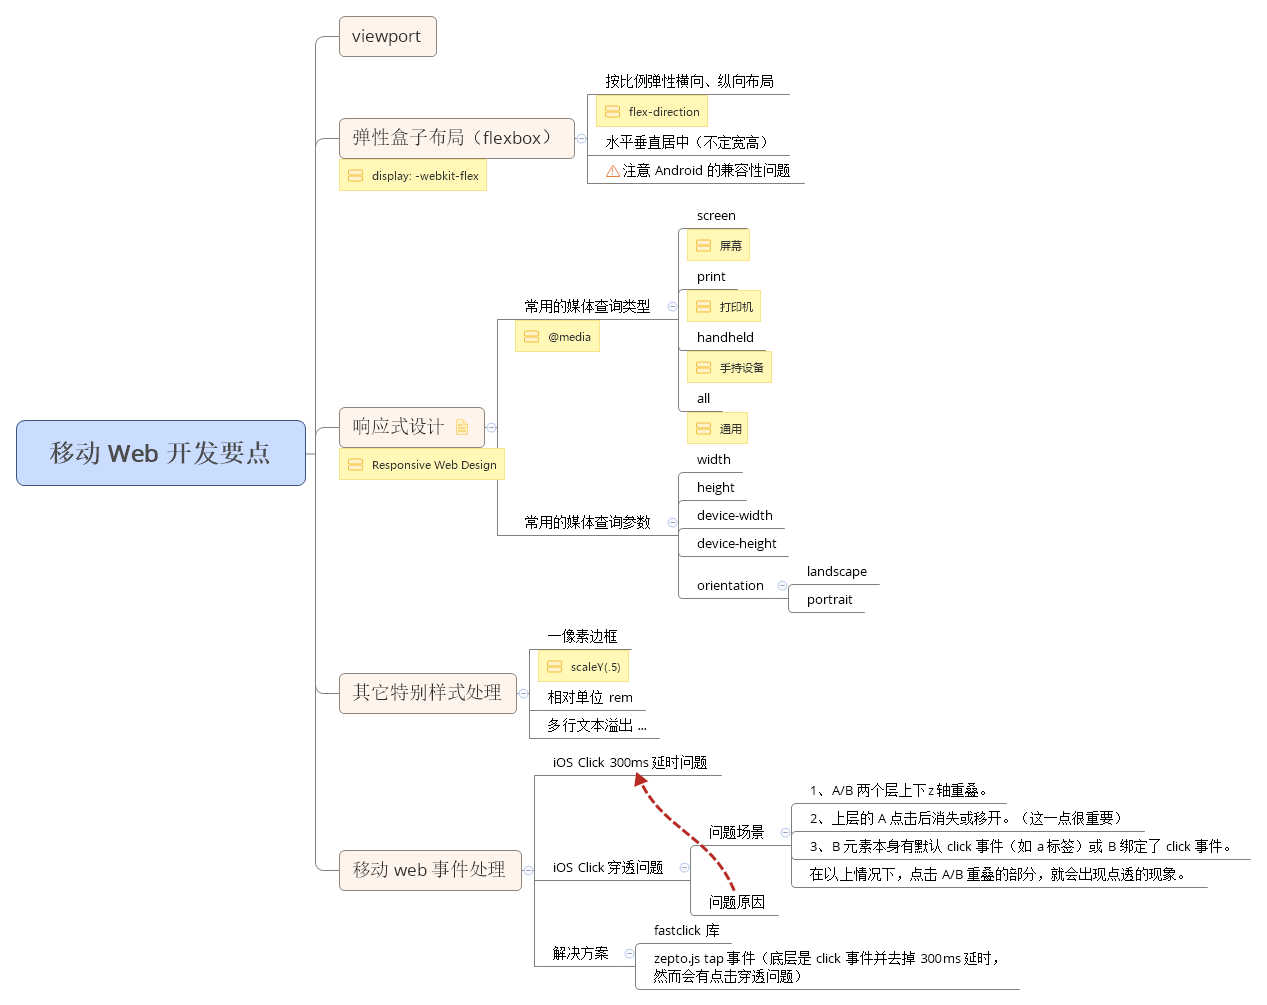
移动 Web 开发要点总结

总结下其中几个要点:

iOS 300ms 点击延时问题

为什么存在这个问题?

这要追溯至 2007 年初。苹果公司在发布首款 iPhone 前夕,遇到一个问题 —— 当时的网站都是为大屏幕设备所设计的。于是苹果的工程师们做了一些约定,应对 iPhone 这种小屏幕浏览 PC 端站点的问题。这当中最出名的,当属双击缩放(double tap to zoom)。

双击缩放,顾名思义,即用手指在屏幕上快速点击两次,iOS 自带的 Safari 浏览器会将网页缩放至原始比例。

那么问题来了,假设用户在 iOS Safari 里边点击了一个链接,当用户一次点击屏幕之后,浏览器并不能立刻判断用户是确实要打开这个链接,还是想要进行双击操作。

因此,iOS Safari 就等待 300 毫秒,以判断用户是否再次点击了屏幕。如果没有,就触发 click 点击事件。

According to Google:

… mobile browsers will wait approximately 300ms from the time that you tap the button to fire the click event. The reason for this is that the browser is waiting to see if you are actually performing a double tap.

验证问题

1
2
3
4
5
6
7
8
9
10
11
12
13
14
15
16
17
18
19
20
21
22
23
24
25
26
<html>
<body>
<button>Click Me</button>
<script type="text/javascript">
var button = document.querySelector("button"),
record;

button.addEventListener("touchstart", function(){
record = Date.now();
console.log("button touchstart");
});
button.addEventListener("touchend", function(){
var delay = Date.now() - record;
console.log("button touchend delay: " + delay + "ms");
});
button.addEventListener("click", function(){
var delay = Date.now() - record;
console.log("button click delay: " + delay + "ms");
});
document.addEventListener("click", function(){
var delay = Date.now() - record;
console.log("document click delay: " + delay + "ms");
});
</script>
</body>
</html>

iOS Safari 上点击后,显示结果如下:

1
2
3
4
button touchstart
button touchend delay: 59ms
button click delay: 310ms
document click delay: 312ms

可见,click 事件延迟了 300ms 左右。

找出原因

当一个用户点击屏幕的时候,会产生两个事件:touchclicktouch 事件会首先触发,完成捕获、冒泡的事件流。同时在点击的 300ms 延时后,触发 click 事件。

解决方案

如今移动端 webapp 性能都追求与原生应用匹配,上述 iOS 单击事件 300ms 延迟,显然是不可接受的。有三个解决方案:

方案一

只使用 touch 事件,然后使用 e.preventDefault() 来阻止默认行为 click

1
2
3
4
5
6
7
8
9
10
11
12
13
14
15
16
17
18
19
20
21
22
23
24
25
26
27
<html>
<body>
<button>Click Me</button>
<script type="text/javascript">
var button = document.querySelector("button"),
record;

button.addEventListener("touchstart", function(e){
record = Date.now();
console.log("button touchstart");
e.preventDefault();
});
button.addEventListener("touchend", function(){
var delay = Date.now() - record;
console.log("button touchend delay: " + delay + "ms");
});
button.addEventListener("click", function(){
var delay = Date.now() - record;
console.log("button click delay: " + delay + "ms");
});
document.addEventListener("click", function(){
var delay = Date.now() - record;
console.log("document click delay: " + delay + "ms");
});
</script>
</body>
</html>

效果如下:

1
2
button touchstart
button touchend delay: 60ms

这种方案看起来简单易行,然而功能复杂的时候容易出问题。比如滑动加选择,会因为滑动触发 touchend,从而触发选择行为。所以如果本该绑定在 click 上的事件全部绑定到 touchend 事件上,就会出现问题。请看下例:

1
2
3
4
5
6
7
8
9
10
11
12
13
14
15
16
17
18
19
20
21
22
23
24
25
26
27
28
29
<html>
<body>
<button>Click Me</button>
<script type="text/javascript">
var button = document.querySelector("button"),
record;

button.addEventListener("touchstart", function(){
record = Date.now();
console.log("button touchstart");
});
document.addEventListener("touchmove", function(){
console.log("document move");
});
button.addEventListener("touchend", function(){
var delay = Date.now() - record;
console.log("button touchend delay: " + delay + "ms");
});
button.addEventListener("click", function(){
var delay = Date.now() - record;
console.log("button click delay: " + delay + "ms");
});
document.addEventListener("click", function(){
var delay = Date.now() - record;
console.log("document click delay: " + delay + "ms");
});
</script>
</body>
</html>

当点击按钮并拖动时,显示结果如下:

1
2
3
4
5
6
7
button touchstart
document move
document move
document move
document move
document move
button touchend delay: 943ms

可见:

  • 该例中用户可能只想拖动页面,但却被迫触发了 touchend 事件。所以如果本该绑定在 click 上的事件全部绑定到 touchend 事件上,就会出现问题,违背用户意图。

  • 拖动行为会导致 click 事件不会执行,可以理解为 touchmoveclick 是相斥的。

因此,建议用回 click

方案二

使用 zepto.js 的 tap 事件,底层是 click 事件并去掉 300ms 延时,然而会有点击穿透的问题。

方案三

使用 fastclick,兼容性好,用法简单,没有点透问题,如下:

1
2
3
4
5
6
7
8
9
10
11
12
13
14
15
16
17
18
19
20
21
22
23
24
25
26
27
28
29
30
<html>
<body>
<button>Click Me</button>
<script type="text/javascript" src="fastclick.js"></script>
<script type="text/javascript">
var button = document.querySelector("button"),
record;

button.addEventListener("touchstart", function(){
record = Date.now();
console.log("button touchstart");
});
button.addEventListener("touchend", function(){
var delay = Date.now() - record;
console.log("button touchend delay: " + delay + "ms");
});
button.addEventListener("click", function(){
var delay = Date.now() - record;
console.log("button click delay: " + delay + "ms");
});
document.addEventListener("click", function(){
var delay = Date.now() - record;
console.log("document click delay: " + delay + "ms");
});
document.addEventListener('DOMContentLoaded', function() {
FastClick.attach(document.body);
}, false);
</script>
</body>
</html>

效果如下:

1
2
3
4
button touchstart
button touchend delay: 60ms
button click delay: 60ms
document click delay: 60ms

参考

http://developer.telerik.com/featured/300-ms-click-delay-ios-8/

https://www.sitepoint.com/5-ways-prevent-300ms-click-delay-mobile-devices/

http://www.linovo.me/front/webapp-300ms.html

https://github.com/ftlabs/fastclick

https://github.com/filamentgroup/tappy/

http://labs.ft.com/2011/08/fastclick-native-like-tapping-for-touch-apps/

http://www.mamicode.com/info-detail-666685.html

https://www.jianshu.com/p/dc3bceb10dbb

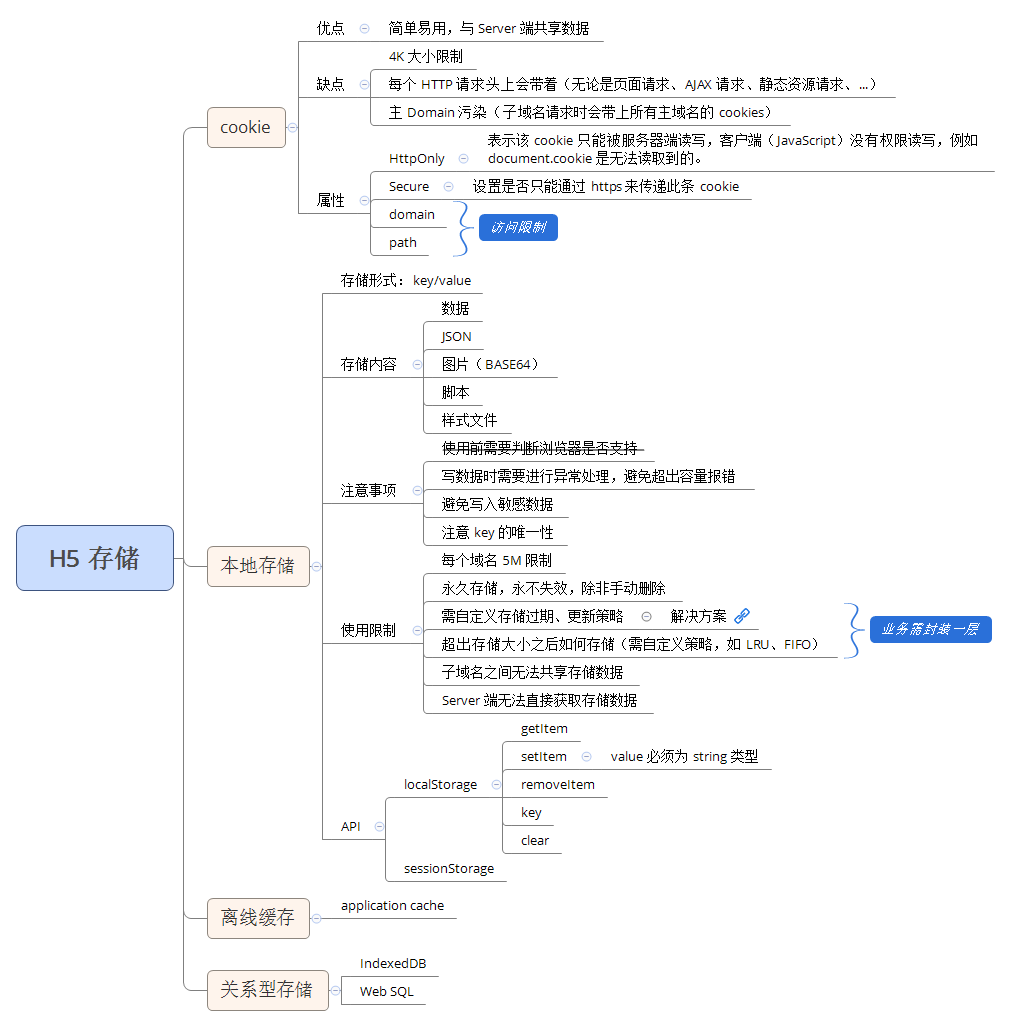
h5 存储

Cookie 指令在 HTTP 头的形式如下:

  • HTTP 请求头 Cookie 指令:

    1
    Cookie: code=23365f1409b; __auth=eda2ebe49a4a91d3546435c3
  • HTTP 响应头 Set-Cookie 指令:

    1
    Set-Cookie: code=23365f1409b; Expires=Thu, 31-Dec-2016 07:23:59 GMT; Domain=x.y.z.com; Path=/ws; Secure; HttpOnly

其中 Cookie 的 domain 属性比较特殊,存在一些读写限制:可读写本身或上一级 domain 的 cookie,但无法读写同级或下一级 domain 的 cookie。

z.com y.z.com
z.com
y.z.com ×
x.z.com × ×
x.y.z.com × ×

如果不设置 Cookie 的 Expires 或者 Max-Age 属性,其默认值是 Session,也就是关闭浏览器后该 Cookie 就消失了。

参考

https://www.ibm.com/developerworks/cn/java/books/javaweb_xlb/10/index.html

http://www.cnblogs.com/xiaowei0705/archive/2011/04/19/2021372.html

某段时期前端技术选型上使用过 Gulp.js 解决前端工程化及自动化构建问题,下表整理了其在实践项目中常用的插件:

插件 功能 备注
gulp-jshint 检查 JavaScript 语法 http://jshint.com/docs/options/
gulp-uglify 压缩 JavaScript
gulp-sourcemaps 输出 sourcemaps 部署前端之前,开发者通常会对代码进行打包压缩,这样可以减少代码大小,从而有效提高访问速度。然而,压缩代码的报错信息是很难Debug的,因为它的行号和列号已经失真。这时就需要Source Map来还原真实的出错位置了。
gulp-imagemin 压缩图片 progressive JPEG 图像渐进式扫描;interlaced GIF 图像隔行扫描
gulp-rev 静态资源 hash 在实际生产环境中,我们页面引用的静态资源的文件名都是带版本号的(非覆盖式升级),这样方便版本管理(如更新与回滚)和防止缓存。通常我们使用文件的md5编码作为版本号,生成文件指纹。
gulp-less Less 文件编译 用于引入 Less 扩展 CSS 语言,提升前端样式的开发效率。
gulp-autoprefixer 根据所需兼容的浏览器版本,自动补全厂商前缀
gulp-css-base64 将CSS 样式表中引用的图片和字体通过 base64 编码压缩合并到一起,减少文件请求数 maxWeightResource 资源最大阈值,默认为 32K
gulp-ejs 编译 HTML 中的 ejs 模板,可用于页面布局拆分,提升代码复用性 http://ejs.co/
gulp-htmlmin 压缩 HTML
gulp-inline-source 将 HTML 外部引用的样式和脚本以内联的方式嵌到 HTML 文件中,减少文件请求数
gulp-if 编译时动态判断
gulp-replace 编译时动态替换字符串 可用于根据不同环境构建代码,解决各环境间的差异。例如正则匹配并全局替换 HTML 中的 ${web} 变量。
gulp-tar 打包静态资源 tar-stream
gulp-mock-server API Mock Server,前后端分离后的 API 模拟利器
browser-sync 监听本地文件变化并同步刷新浏览器,提升开发效率的利器 https://www.browsersync.io/

连接协议对比

常见的几种连接协议:

  • SSH2(默认,相对于SSH1进行了加密算法的改进,使用最广泛)
  • SSH1
  • Telnet
  • Telnet/SSL
  • Rlogin
  • Serial
  • TAPI

在出现 SSH 之前,系统管理员需要登入远程服务器执行系统管理任务时,都是用 telnet 来实现的,telnet 协议底层使用 TCP 协议,端口号 23,采用明文密码传送,在传送过程中对数据也不加密,很容易被不怀好意的人在网络上监听到密码。

同样,在 SSH 工具出现之前 R 系列命令也很流行(由于这些命令都以字母 r 开头,故把这些命令合称为 R 系列命令,R 是 remote 的意思),比如 rexec 是用来执行远程服务器上的命令的,和 telnet 的区别是 telnet 需要先登录远程服务器再实行相关的命令,而 R 系列命令可以把登录和执行命令并登出系统的操作整合在一起。这样就不需要为在远程服务器上执行一个命令而特地登录服务器了。

SSH 全称 Secure SHell,顾名思义就是非常安全的 shell 的意思,SSH 协议是 IETF(Internet Engineering Task Force) 的 Network Working Group 所制定的一种协议。SSH 的主要目的是用来取代传统的 telnet 和 R 系列命令rloginrshrexec 等)远程登录和远程执行命令的工具,实现对远程登录和远程执行命令加密。防止由于网络监听而出现的密码泄漏,对系统构成威胁。

SSH 是一种加密协议,不仅在登录过程中对密码进行加密传送,而且对登录后执行的命令的数据也进行加密,这样即使别人在网络上监听并截获了你的数据包,他也看不到其中的内容。SSH 协议底层使用 TCP 协议,端口号 22

鉴权方式对比

不同于 telnet 只支持 Password 密码鉴权,SSH 同时支持以下几种鉴权方式(Authentication):

  • Password(密码)
  • Public Key(公钥)
  • Keyboard Interactive(键盘交互)
  • GSSAPI

目前 SSH 最常用的鉴权方式有 Password 和 Public key 。Public Key 非对称(asymmetric)鉴权认证使用一对相关联的 Key Pair(一个公钥 Public Key,一个私钥 Private Key)来代替传统的密码(Password)。顾名思义,Public Key 是用来公开的,可以将其放到 SSH 服务器自己的帐号中,而 Private Key 只能由自己保管,用来证明自己身份。

使用 Public Key 加密过的数据只有用与之相对应的 Private Key 才能解密。这样在鉴权的过程中,Public Key 拥有者便可以通过 Public Key 加密一些东西发送给对应的 Private Key 拥有者,如果在通信的双方都拥有对方的 Public Key(自己的 Private Key 只由自己保管),那么就可以通过这对 Key Pair 来安全地交换信息,从而实现相互鉴权。

OpenSSH

OpenSSH 是 SSH 协议的免费开源实现。OpenSSH 套件由以下工具集组成:

远程操作工具:

  • ssh(替代 telnetrlogin
  • scp(替代 rcp
  • sftp(替代 ftp

公私钥管理工具:

  • ssh-add Tool which adds private keys to the authentication agent.
  • ssh-keygen Key generation tool.
  • ssh-keysign Helper program for host-based authentication.
  • ssh-keyscan Utility for gathering public host keys from a number of hosts.

客户端工具:

  • ssh-agent An authentication agent that can store private keys.

服务端工具:

  • sshd 一个运行于服务端的独立守护进程(standalone daemon)
  • sftp-server SFTP 服务器

常用命令

当管理的服务器较多时,ssh 远程需要频繁的输入用户名、密码、服务器 IP,操作非常繁琐,下面介绍一些命令结合配置以简化操作。

ssh

ssh 命令用法:

1
$ ssh [-p port] [user@]hostname [command]

有时候输入 ssh 的参数繁琐,一旦服务器较多,要一个个记住并且敲入时非常低效。因此 ssh 提供了配置文件的方式简化命令行选项。ssh 依序从下列来源中获取配置,最先获取的值将优先使用:

  1. 命令行选项(command-line options)
  2. 用户配置文件 ~/.ssh/config
  3. 系统配置文件 /etc/ssh/ssh_config

常用配置项如下:

1
2
3
4
5
Host    别名
HostName 主机名
Port 端口
User 用户名
IdentityFile 密钥文件的路径

通过配置,ssh 远程命令简化如下:

1
$ ssh 别名

例如:

1
$ ssh pc2 /sbin/ifconfig

pc2 是从 ~/.ssh/config 中获取的 hostname 别名。

ssh-keygen

在使用 ssh 进行远程登录时,由于默认使用的是 Password 鉴权方式,因此每次登录都需要输入密码,操作麻烦。下面介绍使用 Public Key 鉴权方式实现免密登录

一、创建一对公私钥:

1
2
$ ssh-keygen -t rsa -C who@where
询问密码时,保持为空并回车

二、启动 SSH 认证代理程序:

1
2
$ eval `ssh-agent`
Agent pid 1760

三、添加私钥:

1
2
3
4
$ ssh-add ~/.ssh/id_rsa
Identity added: ~/.ssh/id_rsa
$ ssh-add -l
2048 8a:63:12:ae:b1:4c:be:03:e7:7f:92:3e:e5:44:56:bb ~/.ssh/id_rsa (RSA)

四、将公钥上传到服务端,添加到被登录帐户可信列表文件

1
$ scp ~/.ssh/id_rsa.pub who@where:~/.ssh/authorized_keys

五、修改服务端文件权限:

1
2
$ chmod 700 ~/.ssh
$ chmod 600 ~/.ssh/*

之后再使用 ssh 登录时,客户端的 ssh-agent 会发送私钥去和服务端上的公钥做匹配,如果匹配成功就可以免密登录了。

ssh-add

ssh-add 命令常见用法:

1
2
3
4
5
6
7
8
9
10
11
12
13
14
usage: ssh-add [options] [file ...]
Options:
-l List fingerprints of all identities.
-E hash Specify hash algorithm used for fingerprints.
-L List public key parameters of all identities.
-k Load only keys and not certificates.
-c Require confirmation to sign using identities
-t life Set lifetime (in seconds) when adding identities.
-d Delete identity.
-D Delete all identities.
-x Lock agent.
-X Unlock agent.
-s pkcs11 Add keys from PKCS#11 provider.
-e pkcs11 Remove keys provided by PKCS#11 provider.

例如:

1
2
3
4
5
$ ssh-add -D
All identities removed.

$ ssh-add -l
The agent has no identities.

参考:http://linux.101hacks.com/unix/ssh-add/

scp

scp 命令常用参数:

1
2
3
-r 递归复制(用以传输文件夹)
-p 传输时保留文件权限及时间戳
-C 传输时进行数据压缩

可以结合 bash 的 for 循环实现批量 scp 目录:

1
2
3
4
5
6
7
8
#!/bin/bash

HOST_IP=('192.168.0.1' '192.168.0.2' '192.168.0.3')

for ip in ${HOST_IP[@]}
do
scp -rp /some/files ${ip}:/some/
done

相关文件

SSH 相关文件和配置:

文件 描述
~/.ssh/id_rsa.pub 公钥(Public Key)
~/.ssh/id_rsa 私钥(Private Key)
~/.ssh/known_hosts 位于客户端的公钥列表文件,首次与目标主机建立 SSH 连接时,需要添加对方的公钥到这个文件以便后续通信
《关于 Linux 中 known_hosts 文件的必知必会》
~/.ssh/authorized_keys 位于服务端的公钥列表文件,列出了所有被允许登录进来的可信公钥信息(Lists the public keys that are permitted for logging in)
~/.ssh/config 客户端用户配置文件,可以通过 man ssh_config 命令查看帮助。
/etc/ssh/ssh_config 客户端系统配置文件
/etc/ssh/sshd_config 服务端配置文件

ssh banner

https://en.wikipedia.org/wiki/ASCII_art

保持会话不掉线

1
2
3
Host *
ServerAliveInterval 240
ServerAliveCountMax 2

ServerAliveInterval 设置了客户端在发送保持连接信号之前的等待时间。

OpenSSL

OpenSSL 加密库 ( libcrypto) 实现了各种 Internet 标准中使用的各种加密算法。该库提供的服务被 TLS 和 CMS 的 OpenSSL 实现使用,它们也被用于实现许多其它第三方产品和协议。

该库的功能包括对称加密、公钥加密、密钥协商、证书处理、加密散列函数、加密伪随机数生成器、消息身份验证代码 (MAC)、密钥派生函数 (KDF) 和各种实用程序。

OpenSSL

Generate Private and Public Key

https://www.openssl.org/docs/man3.0/man1/openssl.html

  1. Create Private Key
1
openssl genrsa -out rsa_private_key.pem 2048
  1. Generate Public Key
1
openssl rsa -in rsa_private_key.pem -out rsa_public_key.pem -pubout
  1. Encode Private Key to PKCS#8
1
openssl pkcs8 -topk8 -in rsa_private_key.pem -out pkcs8_rsa_private_key.pem -nocrypt

For signature, please use pkcs8_rsa_private_key.pem (result of step 3).

rsync

批量 scp 的缺点是会全量同步,且删除行为无法同步,可以用 rsync 命令优化:

1
2
3
4
5
拉取:
$ rsync [option...] [user@]host:src... [dest]

推送:
$ rsync [option...] src... [user@]host:dest

如果双方都修改了同一文件的同一个地方,rsync 不管源和目标的修改时间谁先谁后,而是以源作为基准去覆盖目标文件。

常用参数:

  • -a:归档模式,等价于 -rlptgoD(不包括 -H, -A, -X
    • -r, --recursive:递归遍历目录
    • -l, --links:复制软链接(symbolic link, symlinks)
    • -p, --perms:保留权限
    • -t, --times:保留修改时间
    • -g, --group:保留属组
    • -o, --owner:保留属主
    • -D:等价于:
      • --devices:保留设备文件
      • --specials:保留特殊文件
  • -v, --verbose:详细输出信息
  • -H, --hard-links:保留硬链接(hard links)

批量 rsync

1
2
3
4
5
6
7
8
#!/bin/bash

HOST_IP=('192.168.0.1' '192.168.0.2' '192.168.0.3')

for ip in ${HOST_IP[@]}
do
rsync -avH --delete /some/* ${ip}:/some/
done

进行如下文件操作测试:

  • 新增文件:web-banner-20170717.jpg
  • 删除文件:web-banner-20170716.jpg

从输出可见,只会增量同步并删除指定的文件:

1
2
3
4
sending incremental file list
resmarket/static/site/v1/img/banner/
resmarket/static/site/v1/img/banner/web-banner-20170717.jpg
deleting resmarket/static/site/v1/img/banner/web-banner-20170716.jpg

参考

https://en.wikipedia.org/wiki/Telnet

https://en.wikipedia.org/wiki/Secure_Shell

在 Linux 上保护 SSH 服务器连接的 8 种方法 | 良许 Linux

5 Unix / Linux ssh-add Command Examples to Add SSH Key to Agent

ssh keygen 中生成的 randomart image 是什么

SSH Not Working In MacOS Ventura: How To Fix

https://wizardzines.com/comics/ssh/
SSH

《rsync同步的艺术》–linux命令五分钟系列之四十二

https://wizardzines.com/comics/openssl/
OpenSSL

某段时期前端技术选型上使用过 Require.js 解决前端模块化的问题,下面整理了一些简单实践:

Require.js 使用

第一步,按功能将 JS 分门别类:

  • dist/
  • app/
    • js/
      • require_config.js
      • entry/
        • main.js
      • module/
        • sub.js
      • lib/
        • require.js
        • zepto.js
      • util/
    • css/
    • img/
    • ……
本地路径 功能描述
js/entry 各功能主模块(主入口)
js/module 各功能子模块
js/lib 第三方库
js/util 自定义库

第二步,参考《Patterns for separating config from the main module》将 RequireJS 配置项从各功能主模块中剥离出来,放到 js/require_config.js 统一管理:

1
2
3
4
5
6
7
8
9
10
11
/**
* 定义 RequireJS 全局配置
*/
var require = {
paths: {
mod: '/contextpath/js/module',
wgt: '/contextpath/js/widget'
lib: '/contextpath/js/lib',
util: '/contextpath/js/util'
}
};

第三步,在页面中引入配置文件及入口文件,注意先后顺序:

1
2
3
4
<!-- 先注册配置 -->
<script src="js/require_config.js"></script>
<!-- 然后引入 require.js ,并载入主模块 main.js -->
<script src="js/lib/require.js" data-main="js/entry/main.js"></script>

第四步,使用 define() 函数编写子模块 js/module/sub.js。引入所需的模块,如 zepto:

1
2
3
4
5
6
/**
* 子模块依赖 zepto
*/
define(['lib/zepto'], function($) {
...
});

第五步,使用 require() 函数编写主模块 js/entry/main.js

1
2
3
4
5
6
/**
* 主模块依赖 sub.js
*/
require(['mod/sub'], function(sub) {
...
});

通过 AMD 规范定义的两个关键函数 define()require() ,我们可以很轻松的在老版本 ES5 上实现模块化功能,解决依赖关系混乱和全局变量的问题。

Require.js 构建

需要注意的是,模块拆分之后脚本文件数量会变多,HTTP 请求也会相应增多。使用 RequireJS 的优化工具 r.js 合并压缩相关联的脚本文件,可以解决这个问题。

参考

JavaScript 模块化技术的起源:《A JavaScript Module Pattern

JavaScript 模块化技术的一些高级特性:《JavaScript Module Pattern: In-Depth》(中文版

RequireJS 的一些入门用法参考:

一张图简要描述 Spring MVC 的处理流程:

Spring MVC

  • Spring MVC 的核心前端控制器 DispatcherServlet 接收 HTTP 请求并询问 Handler mapping 该请求应该转发到哪个 Controller 方法。
  • Controller 业务处理完毕,返回 逻辑视图名(通常是一个字符串)
  • 最后 viewResolver 解析逻辑视图名并返回相应的 View,如 JSP、FreeMarker。

实现一个 Controller

下面介绍编写控制器过程中常用的注解:

定义一个控制器

@Controller

Traditional MVC controller relying on a view technology to perform server-side rendering.

@RestController

RESTful web service controller simply populates and returns a object that will be written directly to the HTTP response as JSON. Thanks to Spring’s HTTP message converter support, you don’t need to do this conversion manually. Because Jackson 2 is on the classpath, Spring’s MappingJackson2HttpMessageConverter is automatically chosen to convert the object to JSON.

It’s shorthand for @Controller and @ResponseBody rolled together.

映射请求

@RequestMapping

@RequestMapping 用于将 HTTP 请求映射到指定的 Controller 类或方法。

一、可匹配的请求属性如下:

  • value 用于匹配指定的请求路径,例如:value = "/index"
  • method 用于匹配指定的请求方法,例如:method = RequestMethod.POST
  • consumes 用于匹配指定的请求头 Content-Type,例如:consumes = MediaType.APPLICATION_JSON_UTF8_VALUE
  • produces 用于匹配指定的请求头 Accept,例如:produces = MediaType.APPLICATION_JSON_UTF8_VALUE
  • params 用于匹配指定的请求参数,例如:
    • 匹配存在:params = "myParam"
    • 匹配不存在:params = "!myParam"
    • 匹配指定参数值:params = "myParam=myValue"
  • headers 用于匹配指定的请求头,例如:
    • 匹配存在:headers = "myHeader"
    • 匹配不存在:headers = "!myHeader"
    • 匹配指定值:headers = "myHeader=myValue"

尽管你可以使用媒体类型通配符(例如:content-type=text/*accept=xxx)去匹配 Content-TypeAccept 请求头,但还是更推荐使用 consumesproduces 属性。因为它们专门用于此目的。

二、Spring Framework 4.3 还引入了五个等价的变体注解,相当于 @RequestMapping 注解与 method 属性的组合使用:

1
2
3
4
5
@GetMapping
@PostMapping
@PutMapping
@DeleteMapping
@PatchMapping

三、标注了 @RequestMapping 注解的方法可以拥有非常灵活的方法签名。支持以下参数类型/注解、返回类型/注解:

方法参数类型

@RequestMapping 注解的方法,参数可以是下列任一类型:

Request / Response

用于访问当前 javax.servlet.http.HttpServletRequest / javax.servlet.http.HttpServletResponse

1
2
3
4
5
@RequestMapping("/index")
public void go(HttpServletRequest request, HttpServletResponse response) {
request.getHeader("host"); // 读取指定 HTTP 请求头
response.getWriter().write("hello world"); // 浏览器将会显示:hello world
}

使用这类方法参数有点类似于传统的 Servlet 编程。

InputStream / Reader

用于访问当前请求内容的 java.io.InputStream / java.io.Reader

OutputStream / Writer

用于生成当前响应内容的 java.io.OutputStream / java.io.Writer

1
2
3
4
@RequestMapping("/index")
public void go(Writer writer) {
writer.write("hello world"); // 浏览器将会显示:hello world
}

Session

用于访问当前 javax.servlet.http.HttpSession

1
2
3
4
@RequestMapping("/index")
public void go(HttpSession session) {
session.getAttribute("xxx"); // 读取指定 Session 值
}

HttpEntity<?>

HttpEntity<?> 用于同时访问 HTTP 请求头和请求体(HTTP request headers and contents)

1
2
3
4
5
6
@RequestMapping("/index")
public void go(HttpEntity<String> httpEntity) {
String body = httpEntity.getBody();
HttpHeaders headers = httpEntity.getHeaders();
String host = headers.getFirst("host");
}

Map / Model / ModelMap

Map / Model / ModelMap 用于在 Controller 层填充将会暴露给 View 层的 Model 对象。

方法参数注解

尽管使用常规类型的方法参数更接近于人们所熟悉的传统 Servlet 编程,但在 Spring 编程中却不建议这么做。因为这样会导致 JavaBean 与 Servlet 容器耦合,侵入性强,难以进行单元测试(如 Mock 测试)。最佳实践应当是传入注解后被解析好的数据类型,下面介绍这些常用的注解:

@PathVariable

@PathVariable 用于标注某个方法参数与某个 URI 模板变量(URI template variable) 的绑定关系,常用于 RESTful URL,例如 /hotels/{hotel}

@RequestParam

@RequestParam 用于标注某个方法参数与某个 HTTP 请求参数(HTTP request parameter) 的绑定关系。

Annotation which indicates that a method parameter should be bound to a web request parameter.

Supported for annotated handler methods in Spring MVC and Spring WebFlux as follows:

  • In Spring MVC, “request parameters” map to query parameters, form data, and parts in multipart requests. This is because the Servlet API combines query parameters and form data into a single map called “parameters”, and that includes automatic parsing of the request body.
  • In Spring WebFlux, “request parameters” map to query parameters only. To work with all 3, query, form data, and multipart data, you can use data binding to a command object annotated with ModelAttribute.

If the method parameter type is Map and a request parameter name is specified, then the request parameter value is converted to a Map assuming an appropriate conversion strategy is available.

If the method parameter is Map or MultiValueMap and a parameter name is not specified, then the map parameter is populated with all request parameter names and values.

例子 1:POST with form data

1
2
3
4
5
POST /test HTTP/1.1
Host: localhost:8080
Content-Type: application/x-www-form-urlencoded

data=123,234

例子 2:GET with query string parameters

1
2
GET /test?data=123,234 HTTP/1.1
Host: localhost:8080

代码:

1
2
3
4
@RequestMapping("/test")
public void test(@RequestParam("data") String data) {
log.info(data); // 123, 234
}

Type conversion is applied automatically if the target method parameter type is not String. See the section called “Method Parameters And Type Conversion”.

1
2
3
4
@RequestMapping("/test")
public void test(@RequestParam("data") ArrayList<String> data) {
log.info(data.toString()); // 123, 234
}

When an @RequestParam annotation is used on a Map<String, String> or MultiValueMap<String, String> argument, the map is populated with all request parameters.

1
2
3
4
@RequestMapping("/test")
public void test(@RequestParam("data") Map<String, String> data) {
log.info(data.get("data")); // 123, 234
}

使用时需要注意 required 这个属性:

  • 方法参数不写 @RequestParam,默认的 requiredfalse
  • 方法参数写了 @RequestParam,默认的 requiredtrue
  • 方法参数同时写了 @RequestParam + defaultValue,默认的 requiredfalse

@RequestBody

@RequestBody 用于标注某个方法参数与某个 HTTP 请求体(HTTP request body) 的绑定关系。 @RequestBody 会调用合适的 message convertersHTTP 请求体(HTTP request body) 写入指定对象,默认的 HttpMessageConverter 如下:

content-type Description
ByteArrayHttpMessageConverter converts byte arrays.
StringHttpMessageConverter converts strings.
application/x-www-form-urlencoded FormHttpMessageConverter converts form data to/from a MultiValueMap<String, String>.
application/json MappingJackson2HttpMessageConverter converts JSON.

例子:

1
2
3
4
5
POST /test HTTP/1.1
Host: localhost:8080
Content-Type: application/json

["123", "234"]
1
2
3
@RequestMapping("/test")
public void test(@RequestBody List<String> data) {
}

An @RequestBody method parameter can be annotated with @Valid, in which case it will be validated using the configured Validator instance. When using the MVC namespace or the MVC Java config, a JSR-303 validator is configured automatically assuming a JSR-303 implementation is available on the classpath.

@RequestHeader

@RequestHeader 用于标注某个方法参数与某个 HTTP 请求头(HTTP request header) 的绑定关系。

@CookieValue

@CookieValue 用于标注某个方法参数与某个 HTTP cookie 的绑定关系。方法参数可以是 javax.servlet.http.Cookie,也可以是具体的 Cookie 值(如字符串、数字类型等)。

举个例子:

1
2
3
4
5
6
@ResponseBody
@RequestMapping("/index")
public Employee getEmployeeBy(
@RequestParam("name") String name,
@RequestHeader("host") String host,
@RequestBody String body) {...}

方法参数验证

Spring MVC 可以快速整合 JSR 303 - Bean Validation 实现方法参数校验,用法如下:

1
2
3
4
5
6
7
8
9
@ResponseBody
@RequestMapping(value = "/test")
public String test(@Validated RequestVO request, BindingResult bindingResult) {
if (bindingResult.hasErrors()) {
String errMsg = bindingResult.getAllErrors().stream()
.map(DefaultMessageSourceResolvable::getDefaultMessage)
.collect(Collectors.joining(", "));
...
}

用到:

org.springframework.validation.annotation.Validated 注解

org.springframework.validation.BindingResult 接口

参考:

Spring4新特性——集成Bean Validation 1.1(JSR-349)到SpringMVC

方法返回类型

@RequestMapping 注解的方法,返回类型可以是下列任一常规类型:

HttpEntity<?>

org.springframework.http.HttpEntity

Represents an HTTP request or response entity, consisting of headers and body.

Typically used in combination with the RestTemplate, like so:

1
2
3
4
HttpHeaders headers = new HttpHeaders();
headers.setContentType(MediaType.TEXT_PLAIN);
HttpEntity<String> entity = new HttpEntity<String>(helloWorld, headers);
URI location = template.postForLocation("http://example.com", entity);

or

1
2
3
HttpEntity<String> entity = template.getForEntity("http://example.com", String.class);
String body = entity.getBody();
MediaType contentType = entity.getHeaders().getContentType();

Can also be used in Spring MVC, as a return value from a @Controller method:

1
2
3
4
5
6
@RequestMapping("/handle")
public HttpEntity<String> handle() {
HttpHeaders responseHeaders = new HttpHeaders();
responseHeaders.set("MyResponseHeader", "MyValue");
return new HttpEntity<String>("Hello World", responseHeaders);
}

ResponseEntity<?>

org.springframework.http.ResponseEntity

Extension of HttpEntity that adds a HttpStatus status code. Used in RestTemplate as well @Controller methods.

In RestTemplate, this class is returned by getForEntity() and exchange():

1
2
3
4
ResponseEntity<String> entity = template.getForEntity("http://example.com", String.class);
String body = entity.getBody();
MediaType contentType = entity.getHeaders().getContentType();
HttpStatus statusCode = entity.getStatusCode();

Can also be used in Spring MVC, as the return value from a @Controller method:

1
2
3
4
5
6
7
8
@RequestMapping("/handle")
public ResponseEntity<String> handle() {
URI location = ...;
HttpHeaders responseHeaders = new HttpHeaders();
responseHeaders.setLocation(location);
responseHeaders.set("MyResponseHeader", "MyValue");
return new ResponseEntity<String>("Hello World", responseHeaders, HttpStatus.CREATED);
}

Or, by using a builder accessible via static methods:

1
2
3
4
5
@RequestMapping("/handle")
public ResponseEntity<String> handle() {
URI location = ...;
return ResponseEntity.created(location).header("MyResponseHeader", "MyValue").body("Hello World");
}

ModelAndView

org.springframework.web.servlet.ModelAndView

Holder for both Model and View in the web MVC framework.

String

表示直接返回视图名。

方法返回注解

@ResponseBody

用于标注某个方法返回值与 WEB 响应体(response body) 的绑定关系。 @ResponseBody 会跳过 ViewResolver 部分,调用合适的 message converters,将方法返回值作为 WEB 响应体(response body) 写入输出流。

1
2
3
4
5
@RequestMapping("/index")
@ResponseBody
public Date go() {
return new Date();
}

@ResponseStatus

@ResponseStatus 用于返回 HTTP 响应码,例如返回 404:

1
2
3
4
@RequestMapping("/index")
@ResponseStatus(value = HttpStatus.NOT_FOUND, reason = "找不到网页")
public void go() {
}

视图处理

统一异常处理

Classes annotated with @ControllerAdvice can contain @ExceptionHandler, @InitBinder, and @ModelAttribute annotated methods, and these methods will apply to @RequestMapping methods across all controller hierarchies as opposed to the controller hierarchy within which they are declared.

@RestControllerAdvice is an alternative where @ExceptionHandler methods assume @ResponseBody semantics by default.

Both @ControllerAdvice and @RestControllerAdvice can target a subset of controllers:

1
2
3
4
5
6
7
8
9
10
11
// Target all Controllers annotated with @RestController
@ControllerAdvice(annotations = RestController.class)
public class AnnotationAdvice {}

// Target all Controllers within specific packages
@ControllerAdvice("org.example.controllers")
public class BasePackageAdvice {}

// Target all Controllers assignable to specific classes
@ControllerAdvice(assignableTypes = {ControllerInterface.class, AbstractController.class})
public class AssignableTypesAdvice {}

例子:

1
2
3
4
5
6
7
8
9
10
11
@Slf4j
@RestControllerAdvice
public class GlobalExceptionHandler {

@ExceptionHandler(Throwable.class)
public ResponseEntity<String> handleException(Throwable e){
log.error(e.getMessage(), e);
return new ResponseEntity<>(e.getMessage(), HttpStatus.valueOf(500));
}

}

CORS 支持

核心配置

参考

Serving Web Content with Spring MVC

Building a RESTful Web Service

Enabling Cross Origin Requests for a RESTful Web Service

告别混乱代码: Spring 后端接口规范